- 1 Introduction
- 2 Definitions
- 3 Assumptions
- 4 Questions
- 5 User Interaction and Design
- A. Entering the printing flow - choosing Registered v. Random Repeat
- B. Entering the print designer
- C. Results after clicking Find
- D. Technical drawing
- E. Share item
- F. The Cart with printed items
- G. Share cart
- H. Checkout screens
- I. Order acknowledgment
- J. Order history
- K. Shipping notification
- L. Going from cart to widget and back to cart
- M. Process flow
- N. Not Doing
- 7 Testing
- 8 Change management and rollout planning
1 Introduction
Our current menu within the widget for specifying printed jobs is not very intuitive, and it is limited to supporting random repeat printing only. We would like to replace it with a more intuitive tool which also accommodates registered printing.
Background and strategic fit
Laddawn's long term strategy is to grow sales through increased quoting of in-house and Marketplace printed jobs, and to gain a clear advantage over competitors in this area by providing an easy-to-use tool that no one else offers.
Goals
- Make quoting and converting printed jobs easier for both distributors and CE/CR staff:
- By enabling them to see the artwork (or a placeholder) as it would appear on the product (bag, etc.), and to visualize the spacing, positioning, etc. of artwork.
- By giving them familiar, user-friendly tools for adding images and text, sizing, choosing colors and moving and rotating images.
- By providing additional helper text as appropriate.
- Increase our offerings to include registered printing.
- Increase sales, by increasing our offerings and by making quoting easier.
- Increase accuracy of quotes and orders through tools that lead to better, more complete print specifications.
Solution
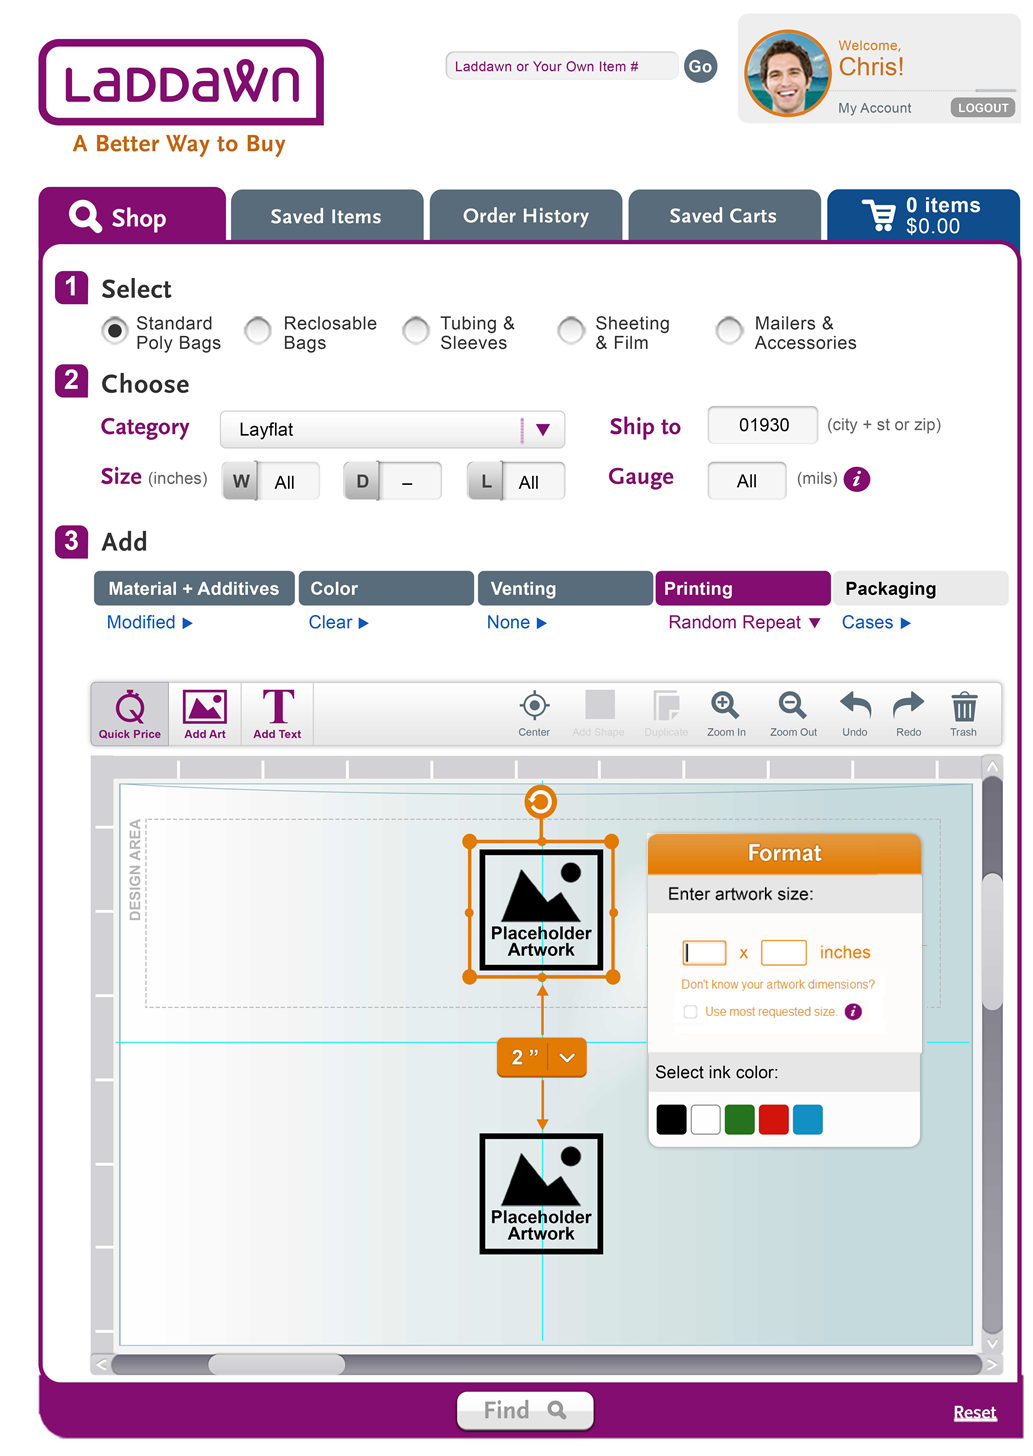
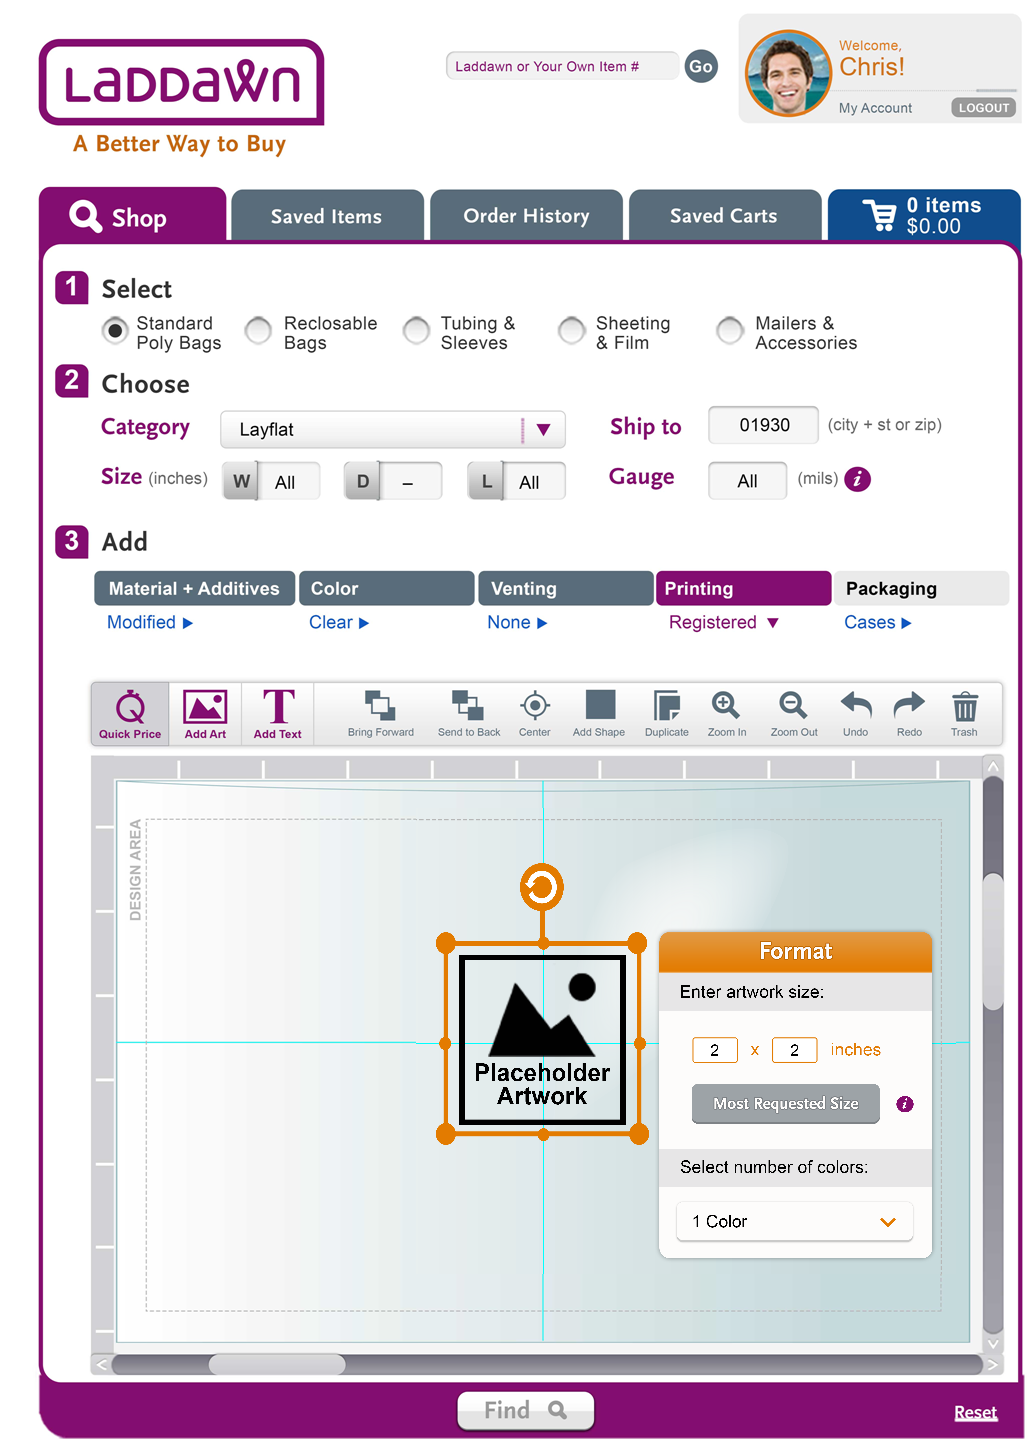
The solution is to create a GUI "what you see is what you get" (WYSIWYG) print "designer" that is integrated into our current Shop widget. We will expand the width of the widget to provide additional real estate to accommodate this feature, as well as to accommodate other changes down the road.
Quotes, even provisional ones lacking final artwork, will include a printing proof in the form of a PDF schematic that distributors can share with their customers and ultimately get sign off on before the quote is converted to an order.
Scope
In the long run, we want to expand this into a more holistic "bag designer" concept (to incorporate end user selection of venting options and perhaps other options specific to the product), but for this release, this feature is solely intended to enable users to specify requirements for registered and random repeat printing.
Although we will eventually support registered printing on two sides, the first release will support only one side.
What products can we print on?
The first release of the print designer will support all current random repeat offerings as well as registered printing on layflats and zip tops - dimensions and rules below.
Registered
Film: Clear only, no additives or colors.
| Layflat | ZipTop Zip Top w/Hang Hole Tamper Evident Zip Top | |
| Min width | 3" | 4" |
| Max width | 30" | 30" |
| Min length | 3" | 4" |
| Max length | 36" | 36" |
Min gauge | 1 mil | 2 mil |
| Max gauge | 6 mil | 6 mil |
Current Random Repeat offerings
- Width range is 4”-98” (w/exceptions shown below)
- Length range is 6”-288” (no length if continuous)
- Gauge:
- If Bubble < 6”, low range = 2mil
- If Bubble >=6” < 8”, low range = 1.5mil
- If Packaging = Cases, low range = 1mil
- Layflat Bags, Sleeves, Centerfold Continuous Sheeting and Centerfold Perforated Sheets – High range = 8mil
- Gusseted Bags, Furniture Bags, Mattress Bags, Tubing, Gusseted Continuous Sheeting and Gusseted Perforated Sheets – High range = 6mil
Catalog Codes that do not allow RRP:
- All ‘Stock Only’ catalog codes, where Level 3 is disabled
- Liners
- Vacuum Bags
- Continuous Singlewound Sheeting
- Perforated Singlewound Sheets
Restricted Catalog Codes – no RRP allowed:
- Material = Transmetallic Shielding
- Material = Polypropylene
- Microperf Vented
- Material = VCI and Bubblesize >60” and Width >60”
- Material = Antistatic and Bubblesize 60” and Width > 60”
- Packaging = Cases and Gauge < 1mil
- Folded Bags on a Roll
- Bags w/Bubble < 6” and Gauge < 2mil
- Bags w/Bubble < 8” and Gauge < 1.5mil
Registered
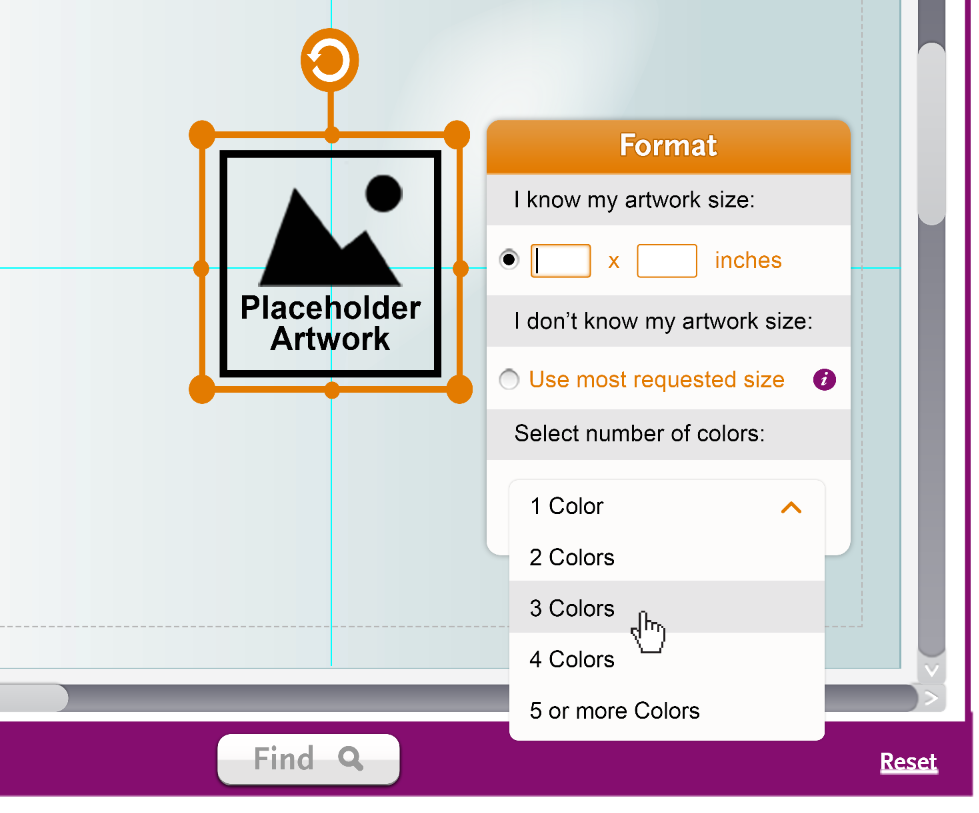
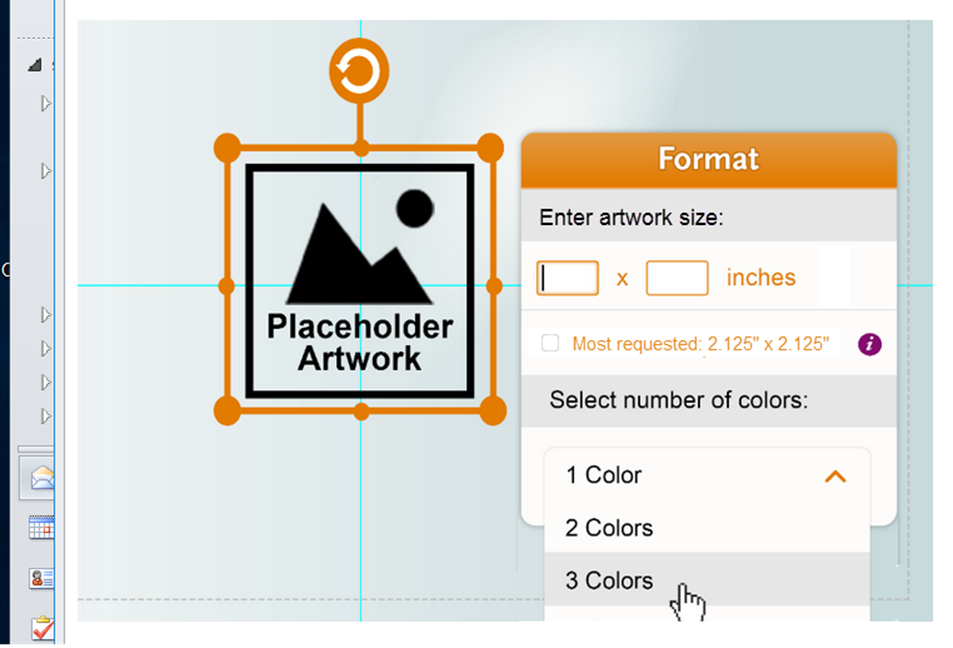
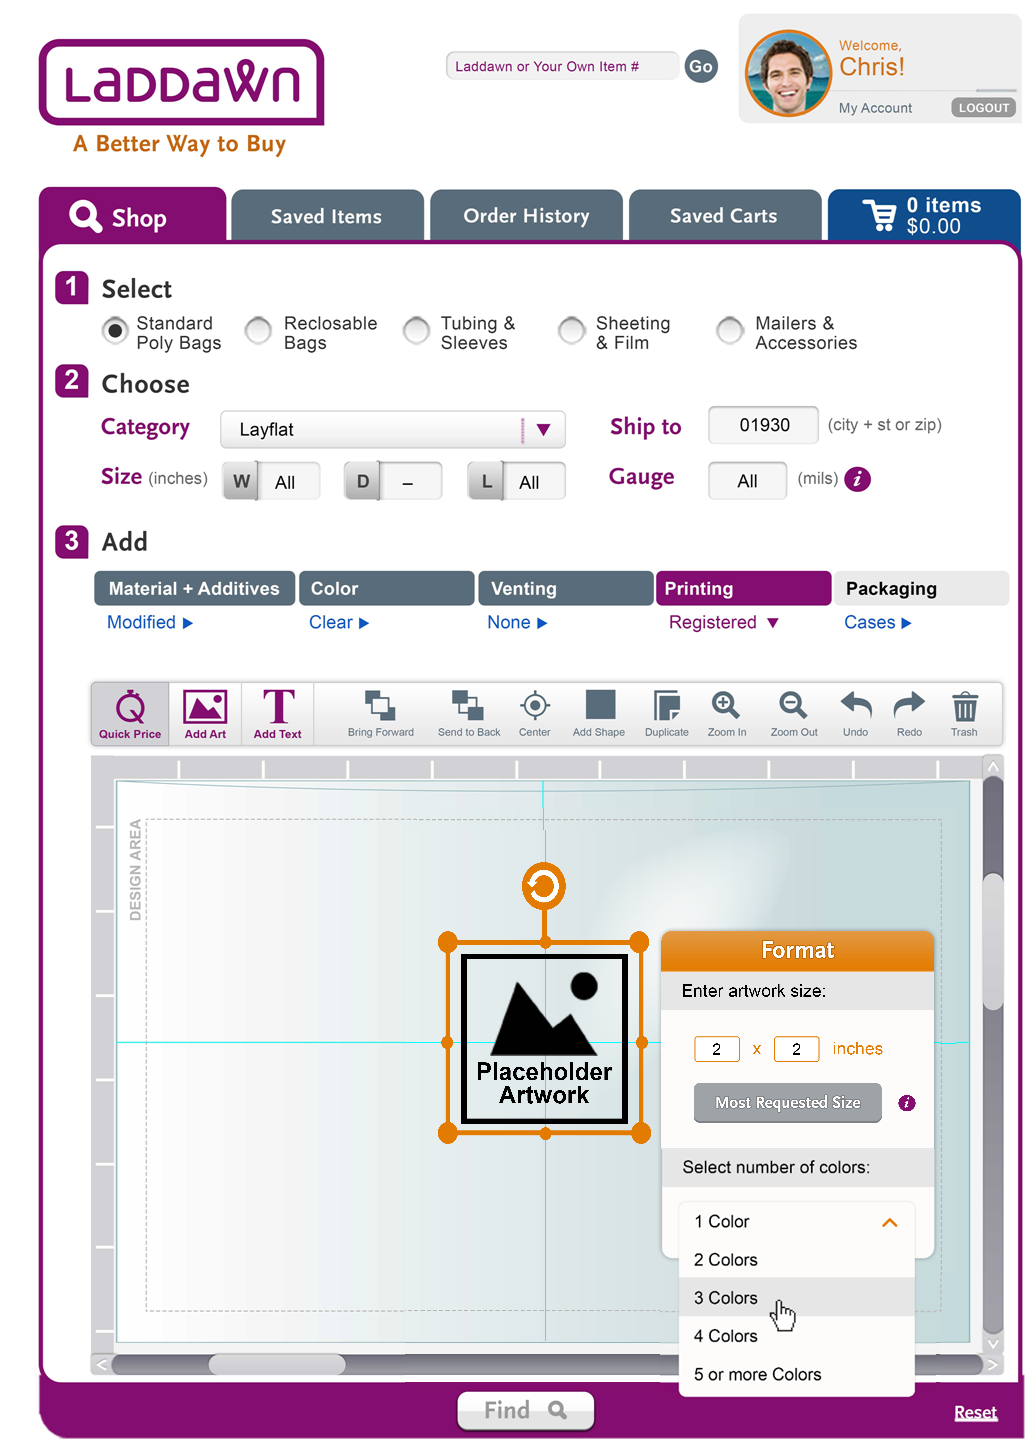
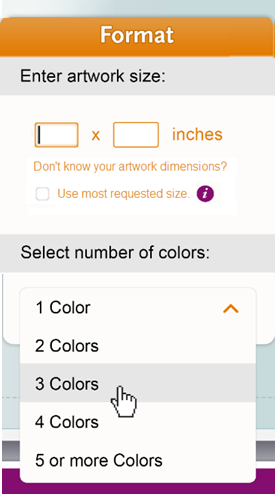
- Rather than prompt customers tell us if they wish to use CMYK process or specific spot colors, we will quote 1/2/3/4 and "5 or more" colors. To simplify the interface as well as quoting logic, one to four colors will be quoted as spot colors; "5 or more" will be quoted as CMYK (even if all or some are spot colors). We will keep an eye on quotes v. conversions and actual artwork for net gains/losses on plate/printing costs.
- Registered printing will support CMYK full color process printing, as well as several spot colors (at least four of our vendors have the capability to spot print up to 10 colors). For this release, Marketing has decided to quote anything with 5 or more colors as CMYK (even if these could be 5 or more spot colors, requiring more than the 4 plates CMYK would require).
2 Definitions
| Random repeat printing | Registered printing | ||
|---|---|---|---|
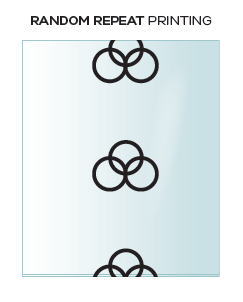 | Printing on a bag that is replicated equidistantly between images throughout the production run making it possible for multiple images to appear on a bag and for part of one image to appear on 1 bag and the other part of the image to appear on the next bag. Laddawn guarantees 1 full image will be produced on the bag, but does not guarantee the placement of the image on the bag. Ink colors: Although there are vendors who can support printing with more than one ink color, the first release of the print designer will only support printing one ink color. (If more than one color is desired, we will quote that as NS.) | 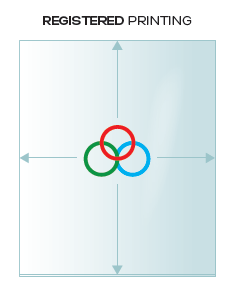 | Printing that appears on every bag in the exact same place as all the other bags in the production run. The printer may print an eyespot or registration mark (see more definitions below) on each item to ensure consistent positioning of artwork and alignment of individual color plates. Ink colors: These types of images and half-tones are supported through Process print, which is a layering of 4 colors to produce an infinite number of colors…Spot printing, which we also will support means no layering of colors and typically are for images that have 4 or fewer distinct colors, but on some rare occasions have 8 to 10 colors. |
Number "up" - Quantity of repeats in 24” maximum repeat area. The number up is calculated to ensure 1 full image per bag. In cases of tubing, the default is 1 every 24” because there is no length spec to calculate against. The customer must know the finished bag size and calculate their own frequency of repeat based on the 24” maximum repeat area. Sometimes more than 1 image per bag is desired, so the customer will choose a higher number up than our standard 1 per bag. | |||
Plate - A rubber material that the image is embossed on used to pick up ink and transfer it to the bag or tubing. The printing is done by a bag running over a drum on which a plate or plates are mounted, which rotates as the plastic passes over it.
Image - The artwork, logo, or text that is being printed. Types of image files accepted are .pdf, .ai, .eps, .jpg, .png.
PDF schematic - a diagram of the printed bag, showing dimensions/orientation of the bag and the positioning of the image on it, which will be attached to the work order and used by the setup techs to configure the print job during production. Will be referred to on the site as "technical drawing."
PMS colors - PMS stands for "Pantone Matching System"; these are colors printed with pre-mixed inks and each color is represented by a numbered color code. The colors are then reproduced using single or multiple printing plates.
CMYK - Also known as four-color process printing, this is the method used for printing full-color artwork and photographs. To reproduce a color image, the printer separates the image into the four colors: cyan (C), magenta (m), yellow (y) and black (k).

Eyespot, aka registration mark - A small mark, often a rectangular shape, usually located near the edge of a design, to activate an automatic electronic position regulator for controlling "register" of the printed design - this ensures correct positioning of the artwork itself as well as the individual color plates. Plates which are "out of register" produce misaligned images (or blurry images in the case of CMYK).
3 Assumptions
With the exception of text-based artwork, customers are not using our Print Designer to create original artwork. Therefore, customers need tools to add text, and to position, resize, rotate, and select colors for images - in addition to basic tools like "undo." They do not need paint and drawing tools or sophisticated color manipulation tools. If they have artwork to quote with, it is being given to them by the customer, most likely the customer's art department (or equivalent).
Quotations are often highly speculative - chances are, the distributor is trying to win business from a customer who has already done a printed bag with another supplier. More often than not they do not have artwork to upload for an initial quote, or an actual sample which they could measure. Nevertheless, they probably have a rough idea of both bag and artwork size - if they win the business, they are almost guaranteed to need to make changes to both product dimensions and artwork specifications.
4 Questions
See questions embedded above and below.
5 User Interaction and Design
Caveat concerning mockups
Most/all screens show "Find" disabled. Not sure we want that, although if Find is always enabled, we do want to throw an error message if user has not entered information required to generate a quote (for example, no size provided in Quick Price, or they've only gotten as far as screen 'a' below and they attempt to click Find). The error message should perhaps give them option to go back to no printing?
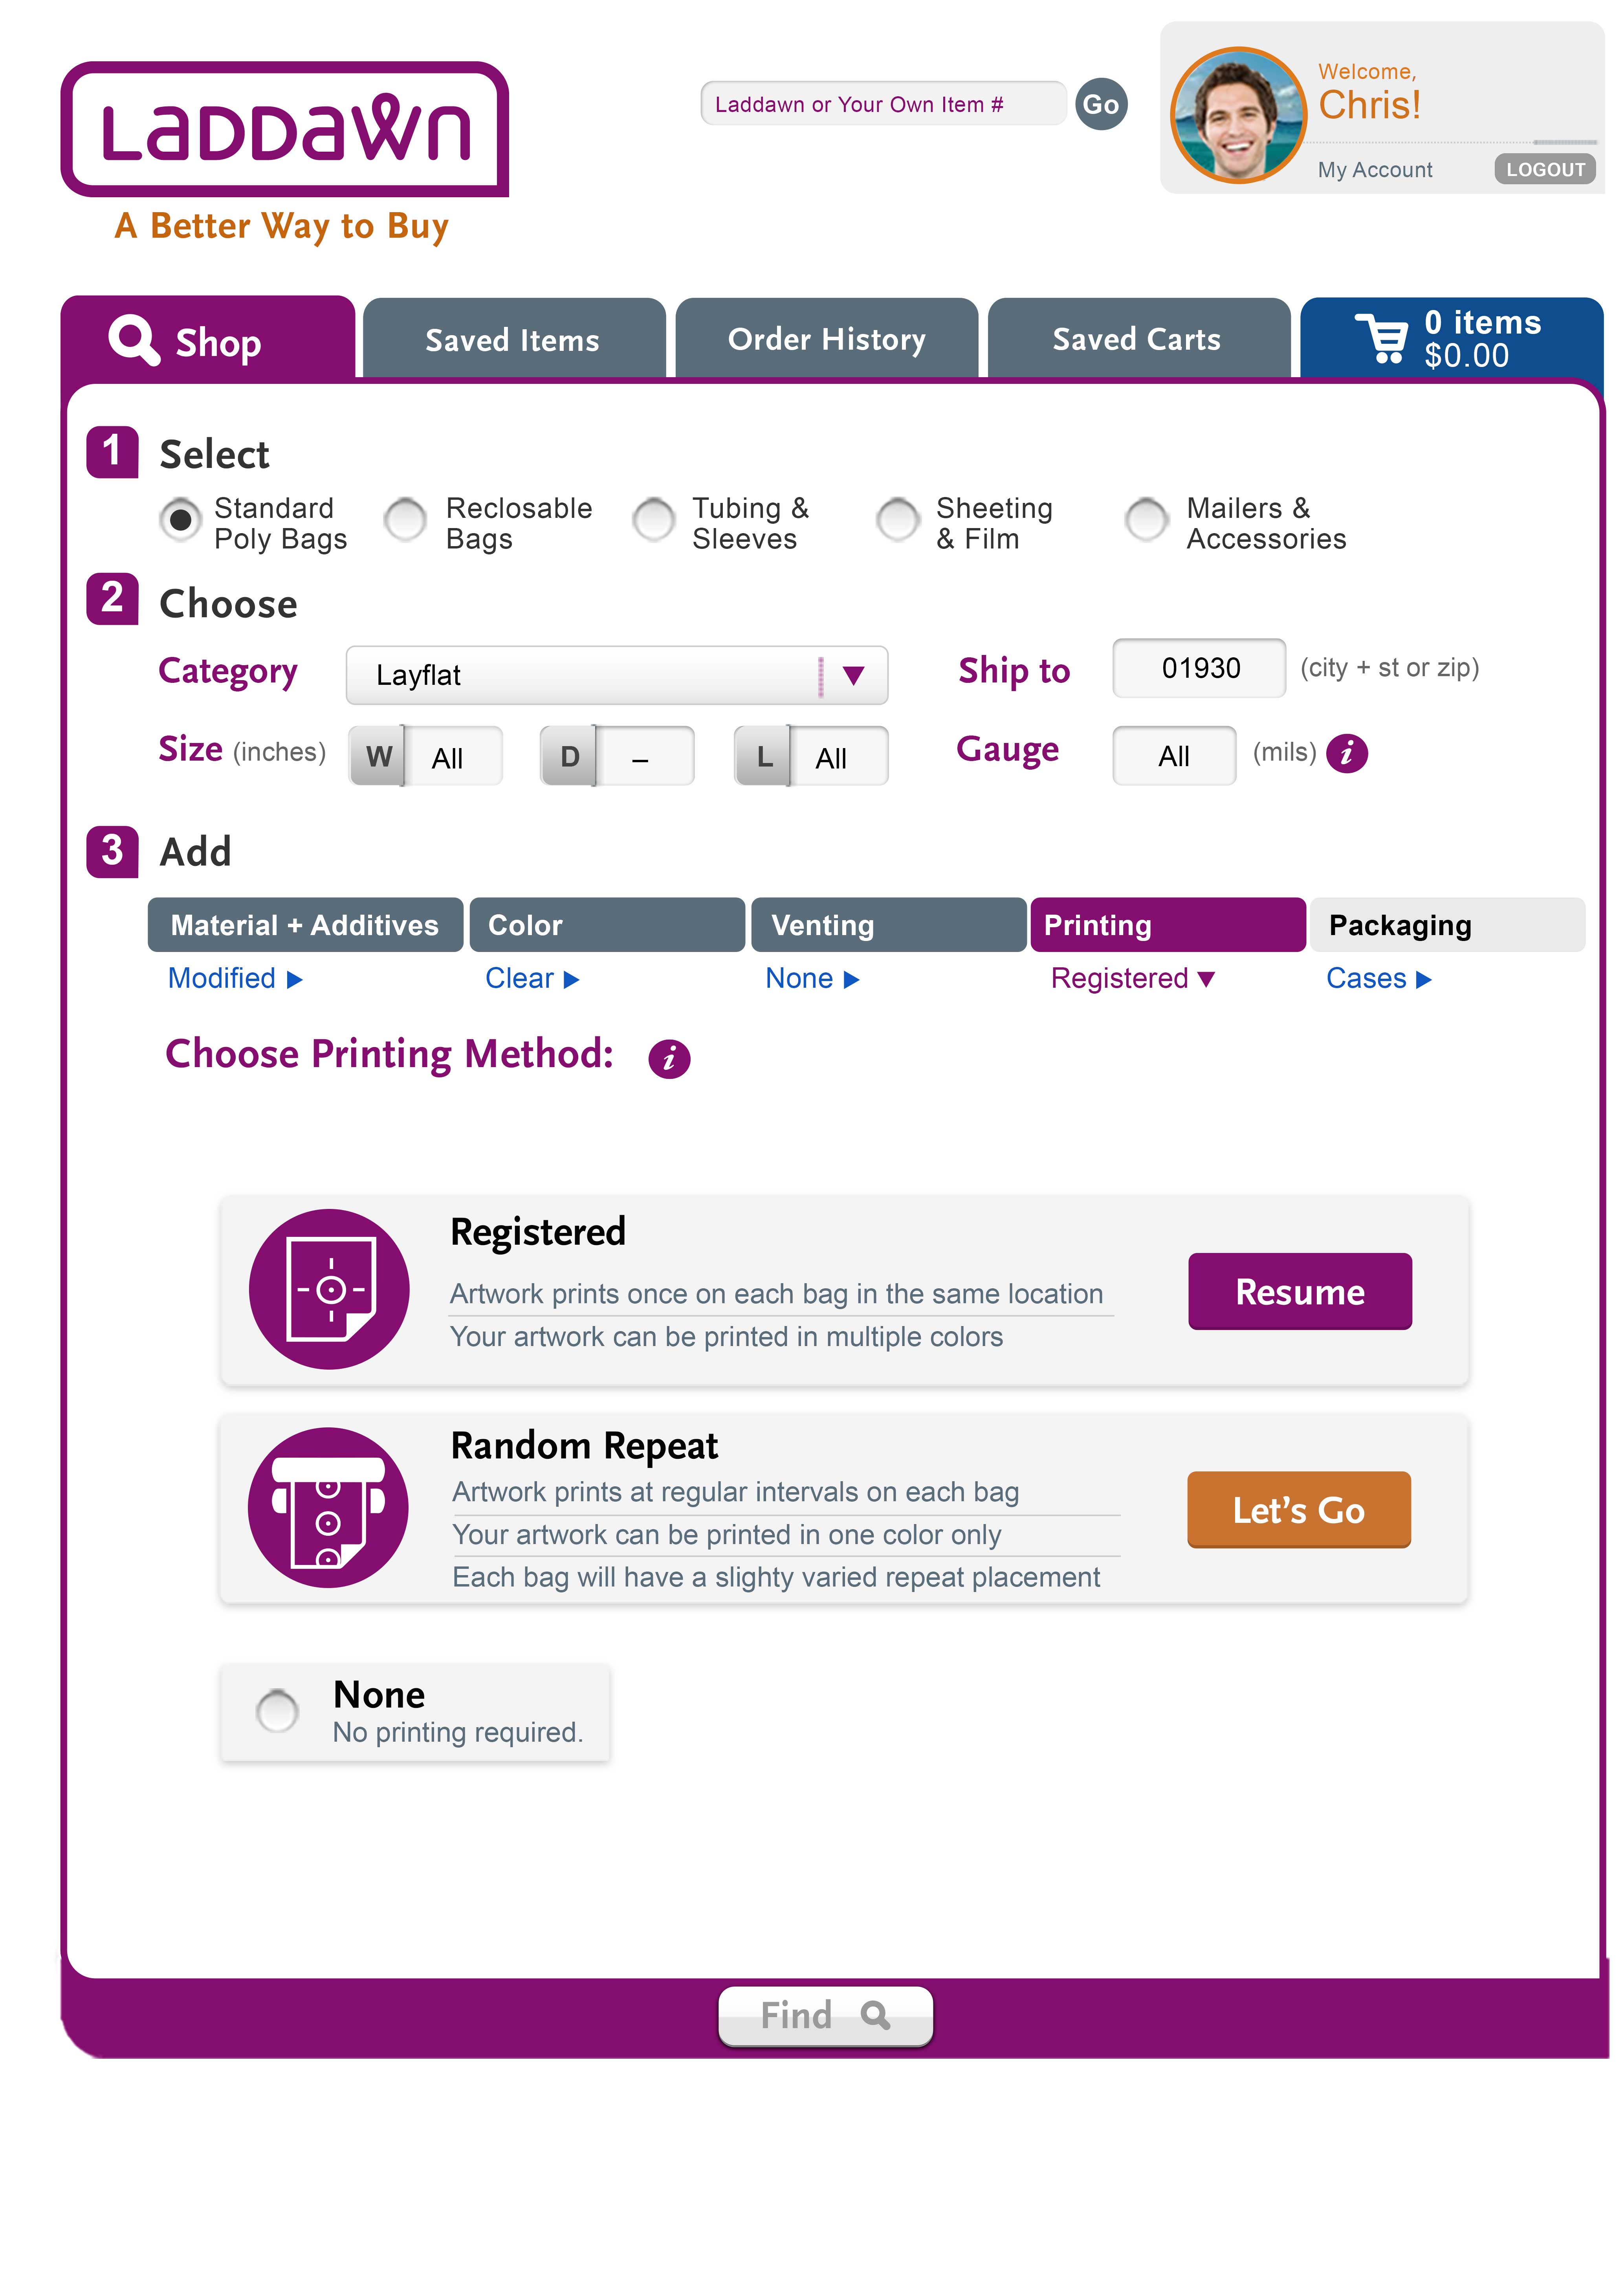
A. Entering the printing flow - choosing Registered v. Random Repeat
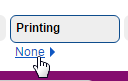
The user has entered category and dimensions; they've clicked the "None" link under printing ...
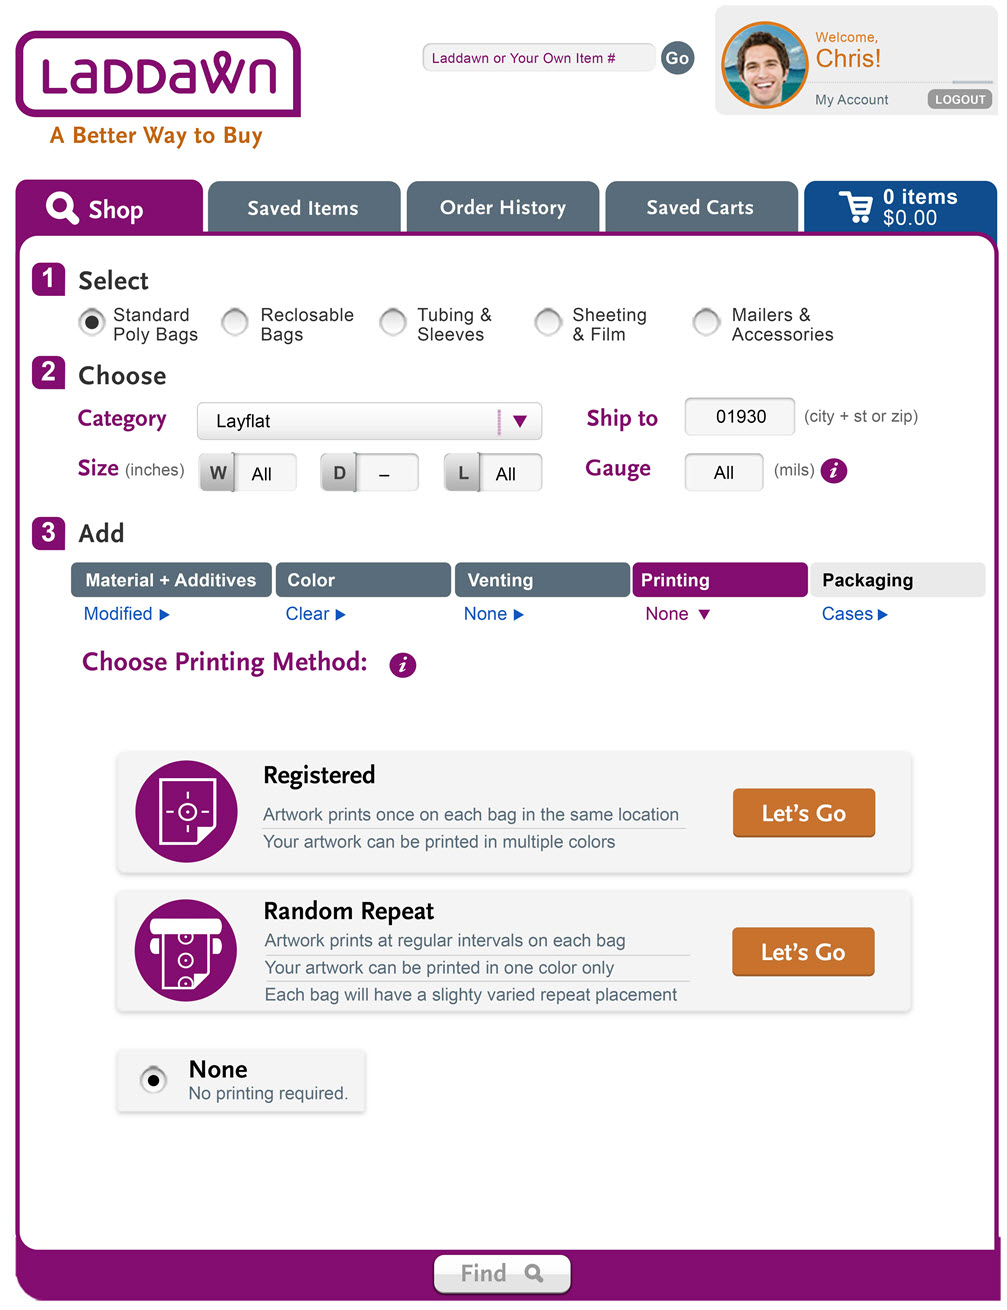
....to expose the first screen of the designer (choose printing method). It is defaulted to "None." Clicking Let's Go for either option brings you directly into the designer for Registered or Random Repeat (shown in next section). | If you leave the designer after having chosen registered or random, and then reopen the print menu, you will be returned to this initial screen. Or if you're in the designer, and you want to return to this screen, clicking the breadcrumb will bring you here. You can change to no printing (none) or to the other printing method (random as shown below). Clicking the breadcrumb link from here will close up the menu. |
|
|
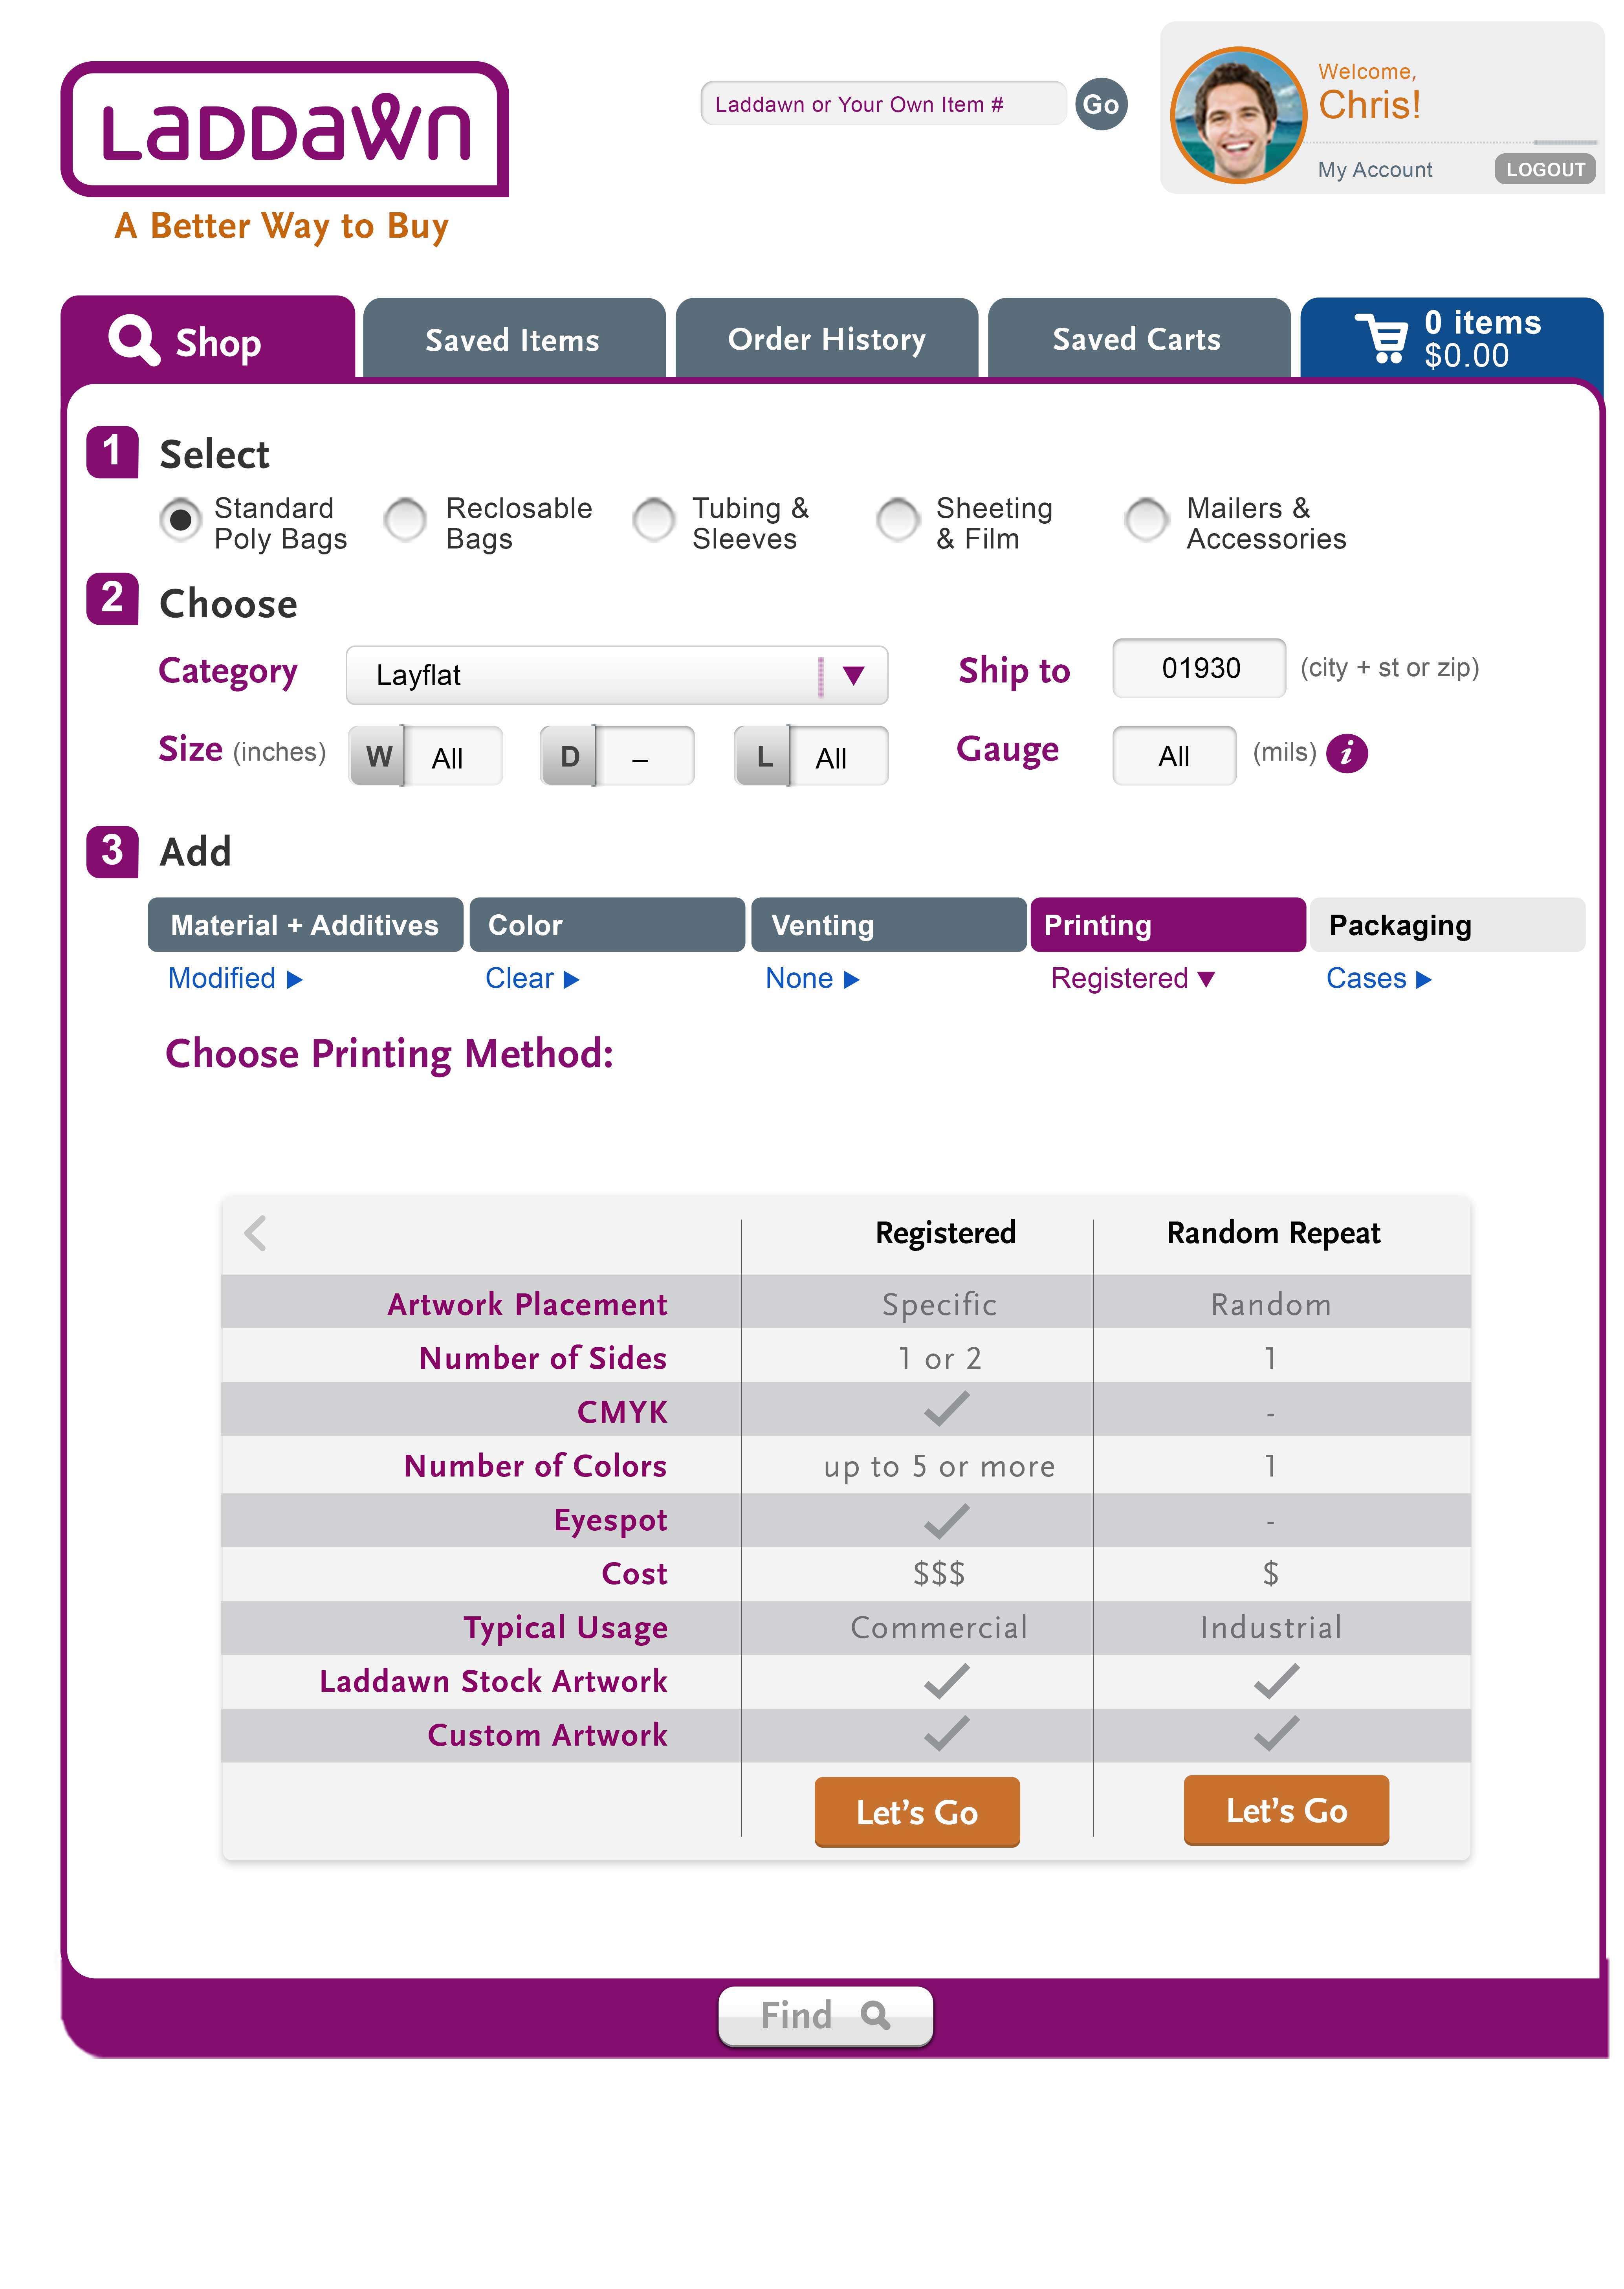
Clicking the "i" to the right of Choose Printing Method brings you to a comparison chart to help you choose. (Content subject to revision.) Back arrow returns you to main print method chooser screen. Or you an opt to go directly to registered or random repeat designer from here.
|
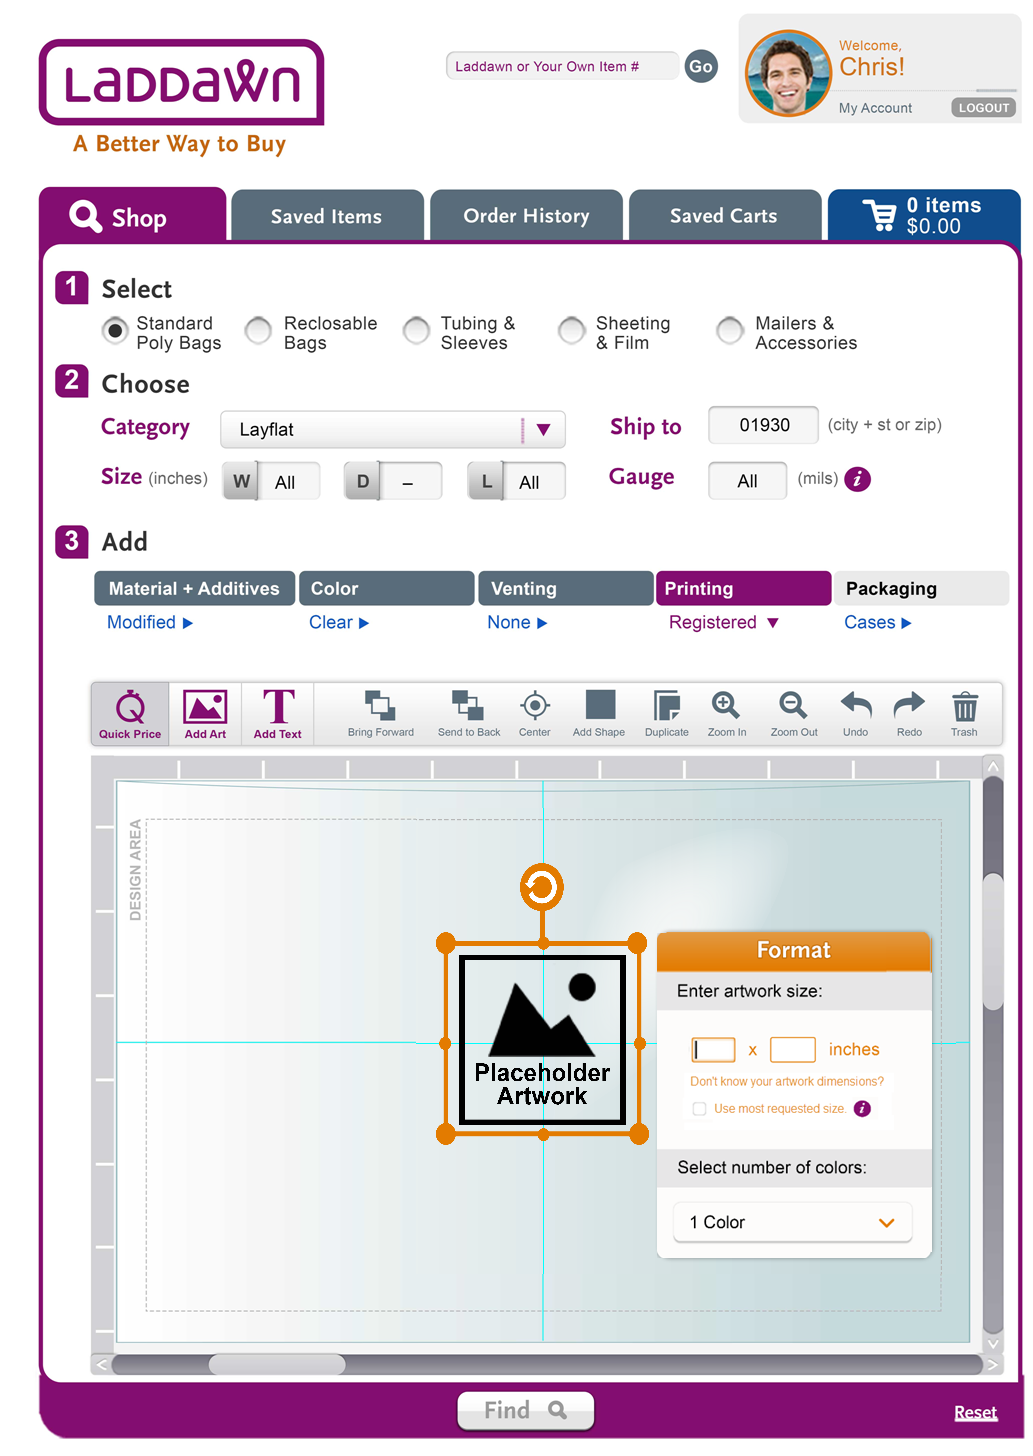
B. Entering the print designer
Upon clicking one of the "let's go" links above, the print menu breadcrumb will have changed from none to Registered or Random Repeat depending on your choice, as shown in both sets of flows below.
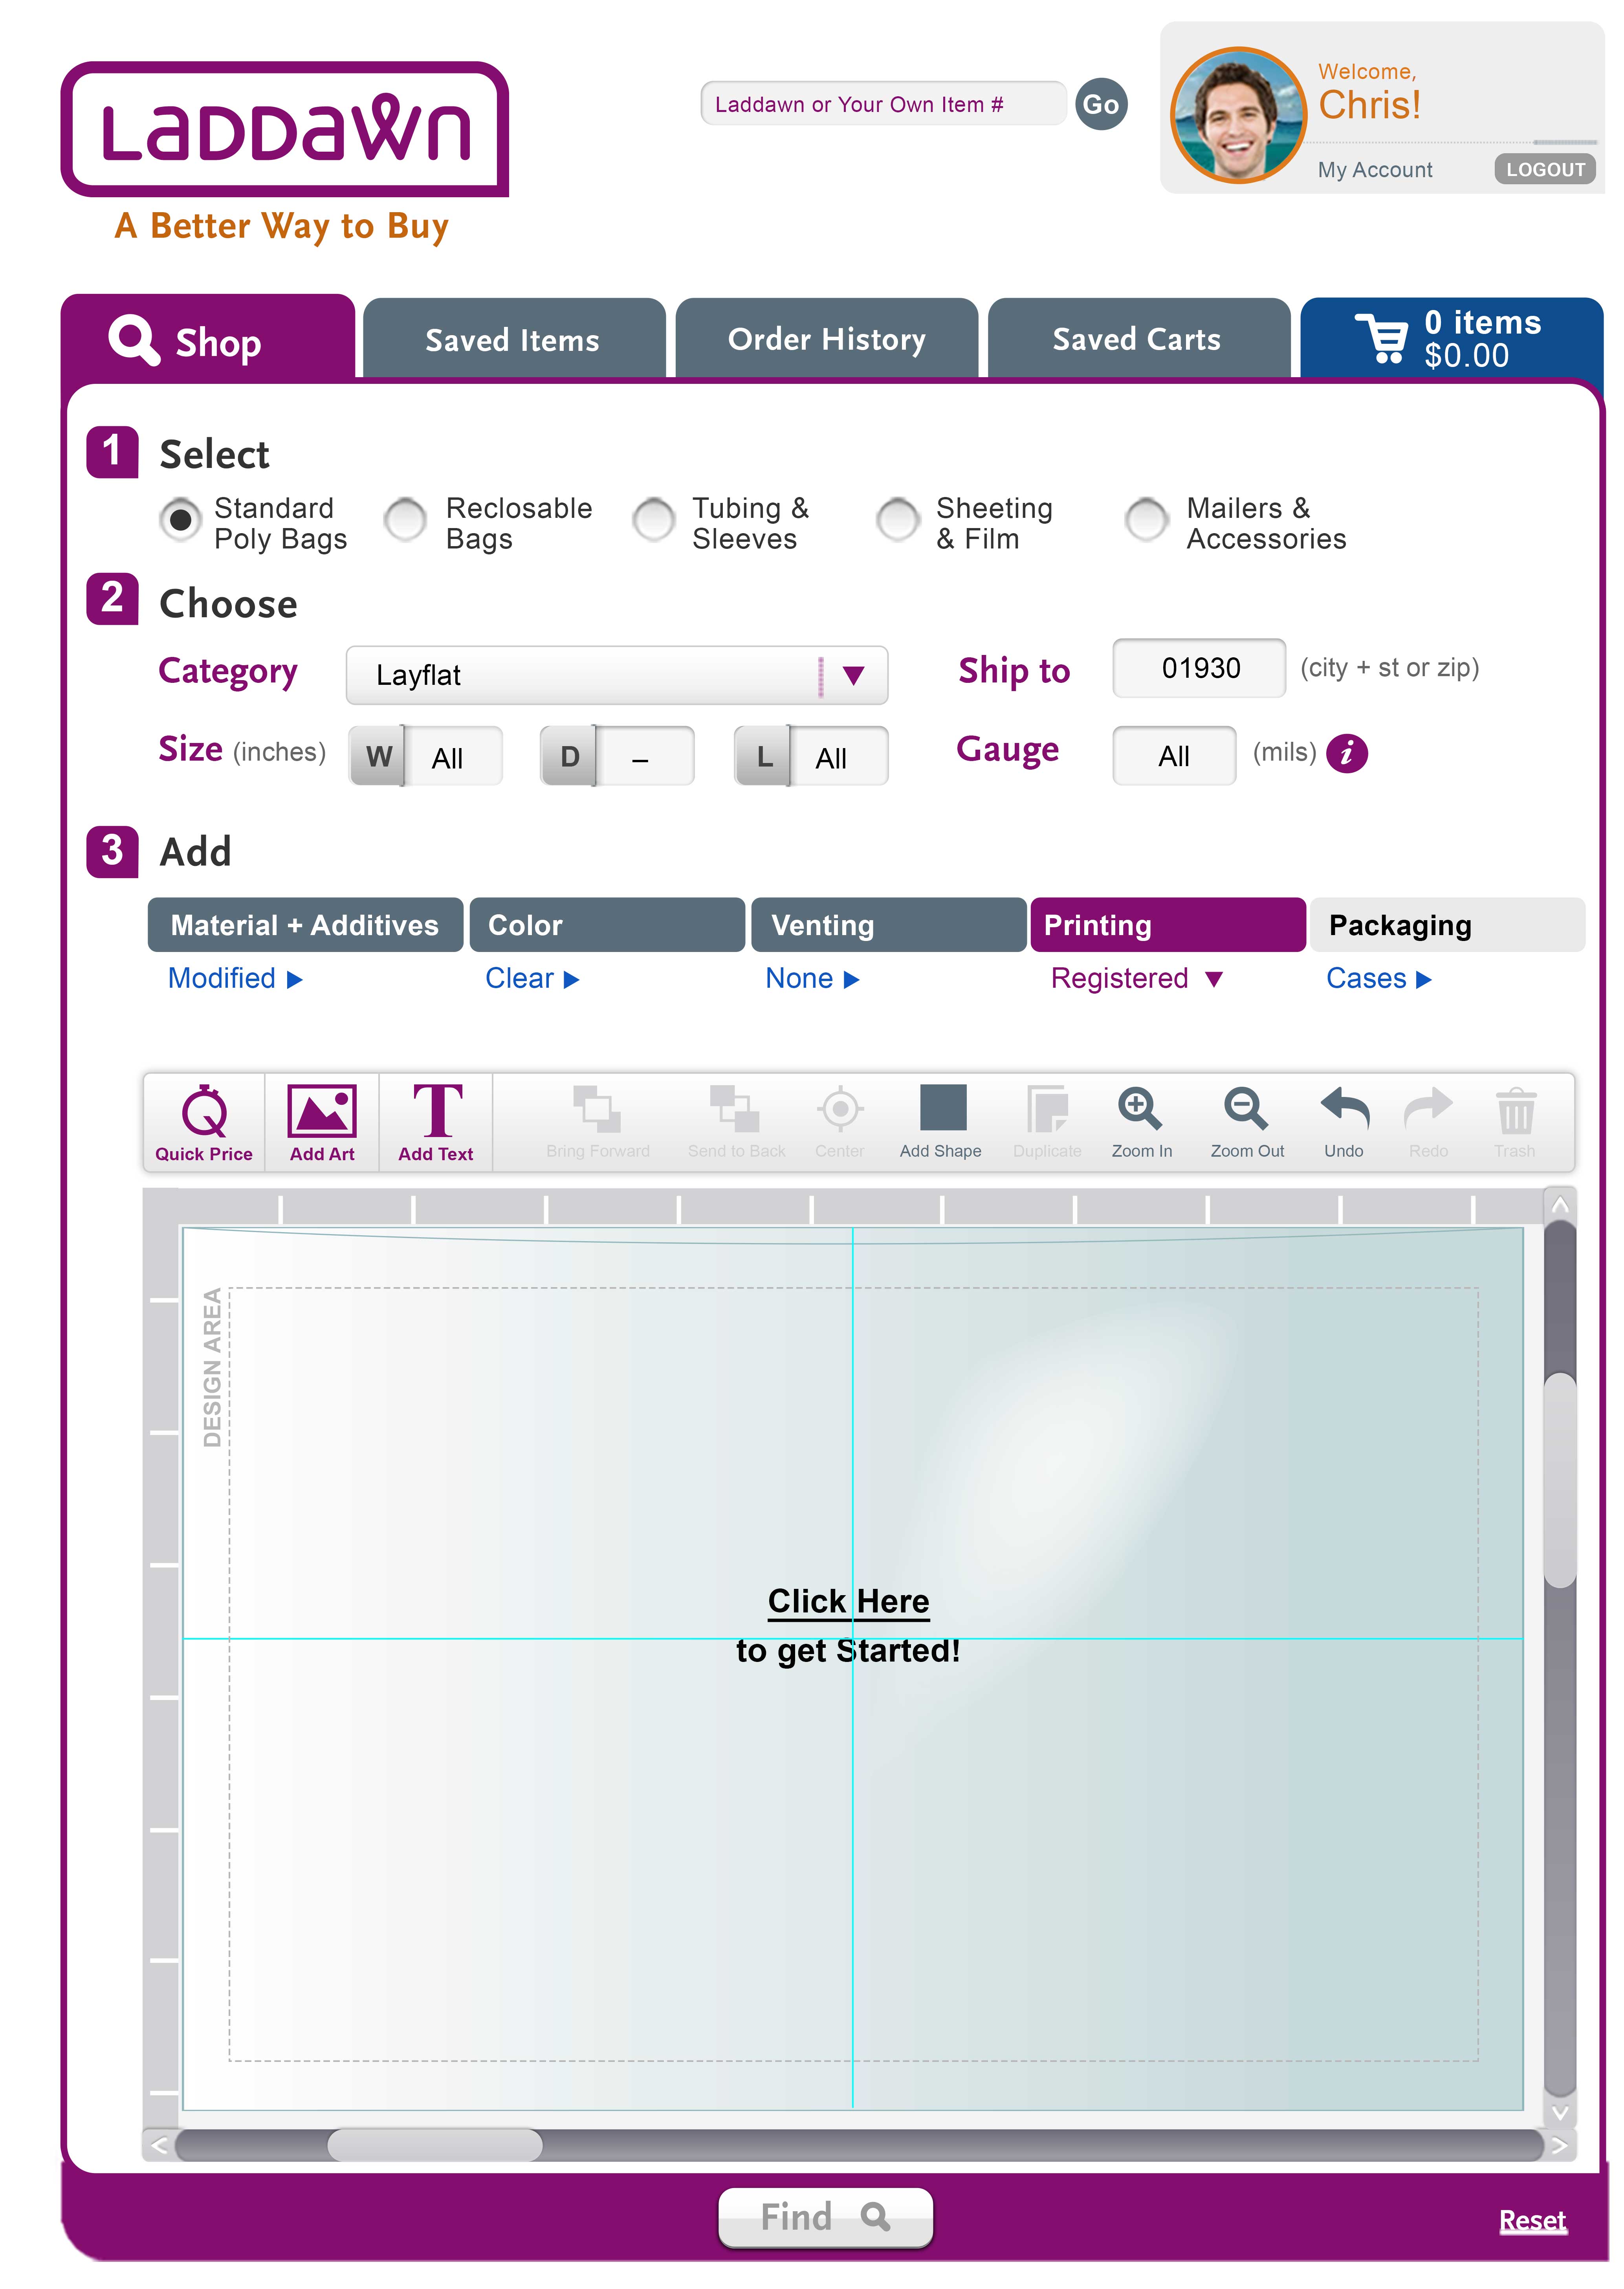
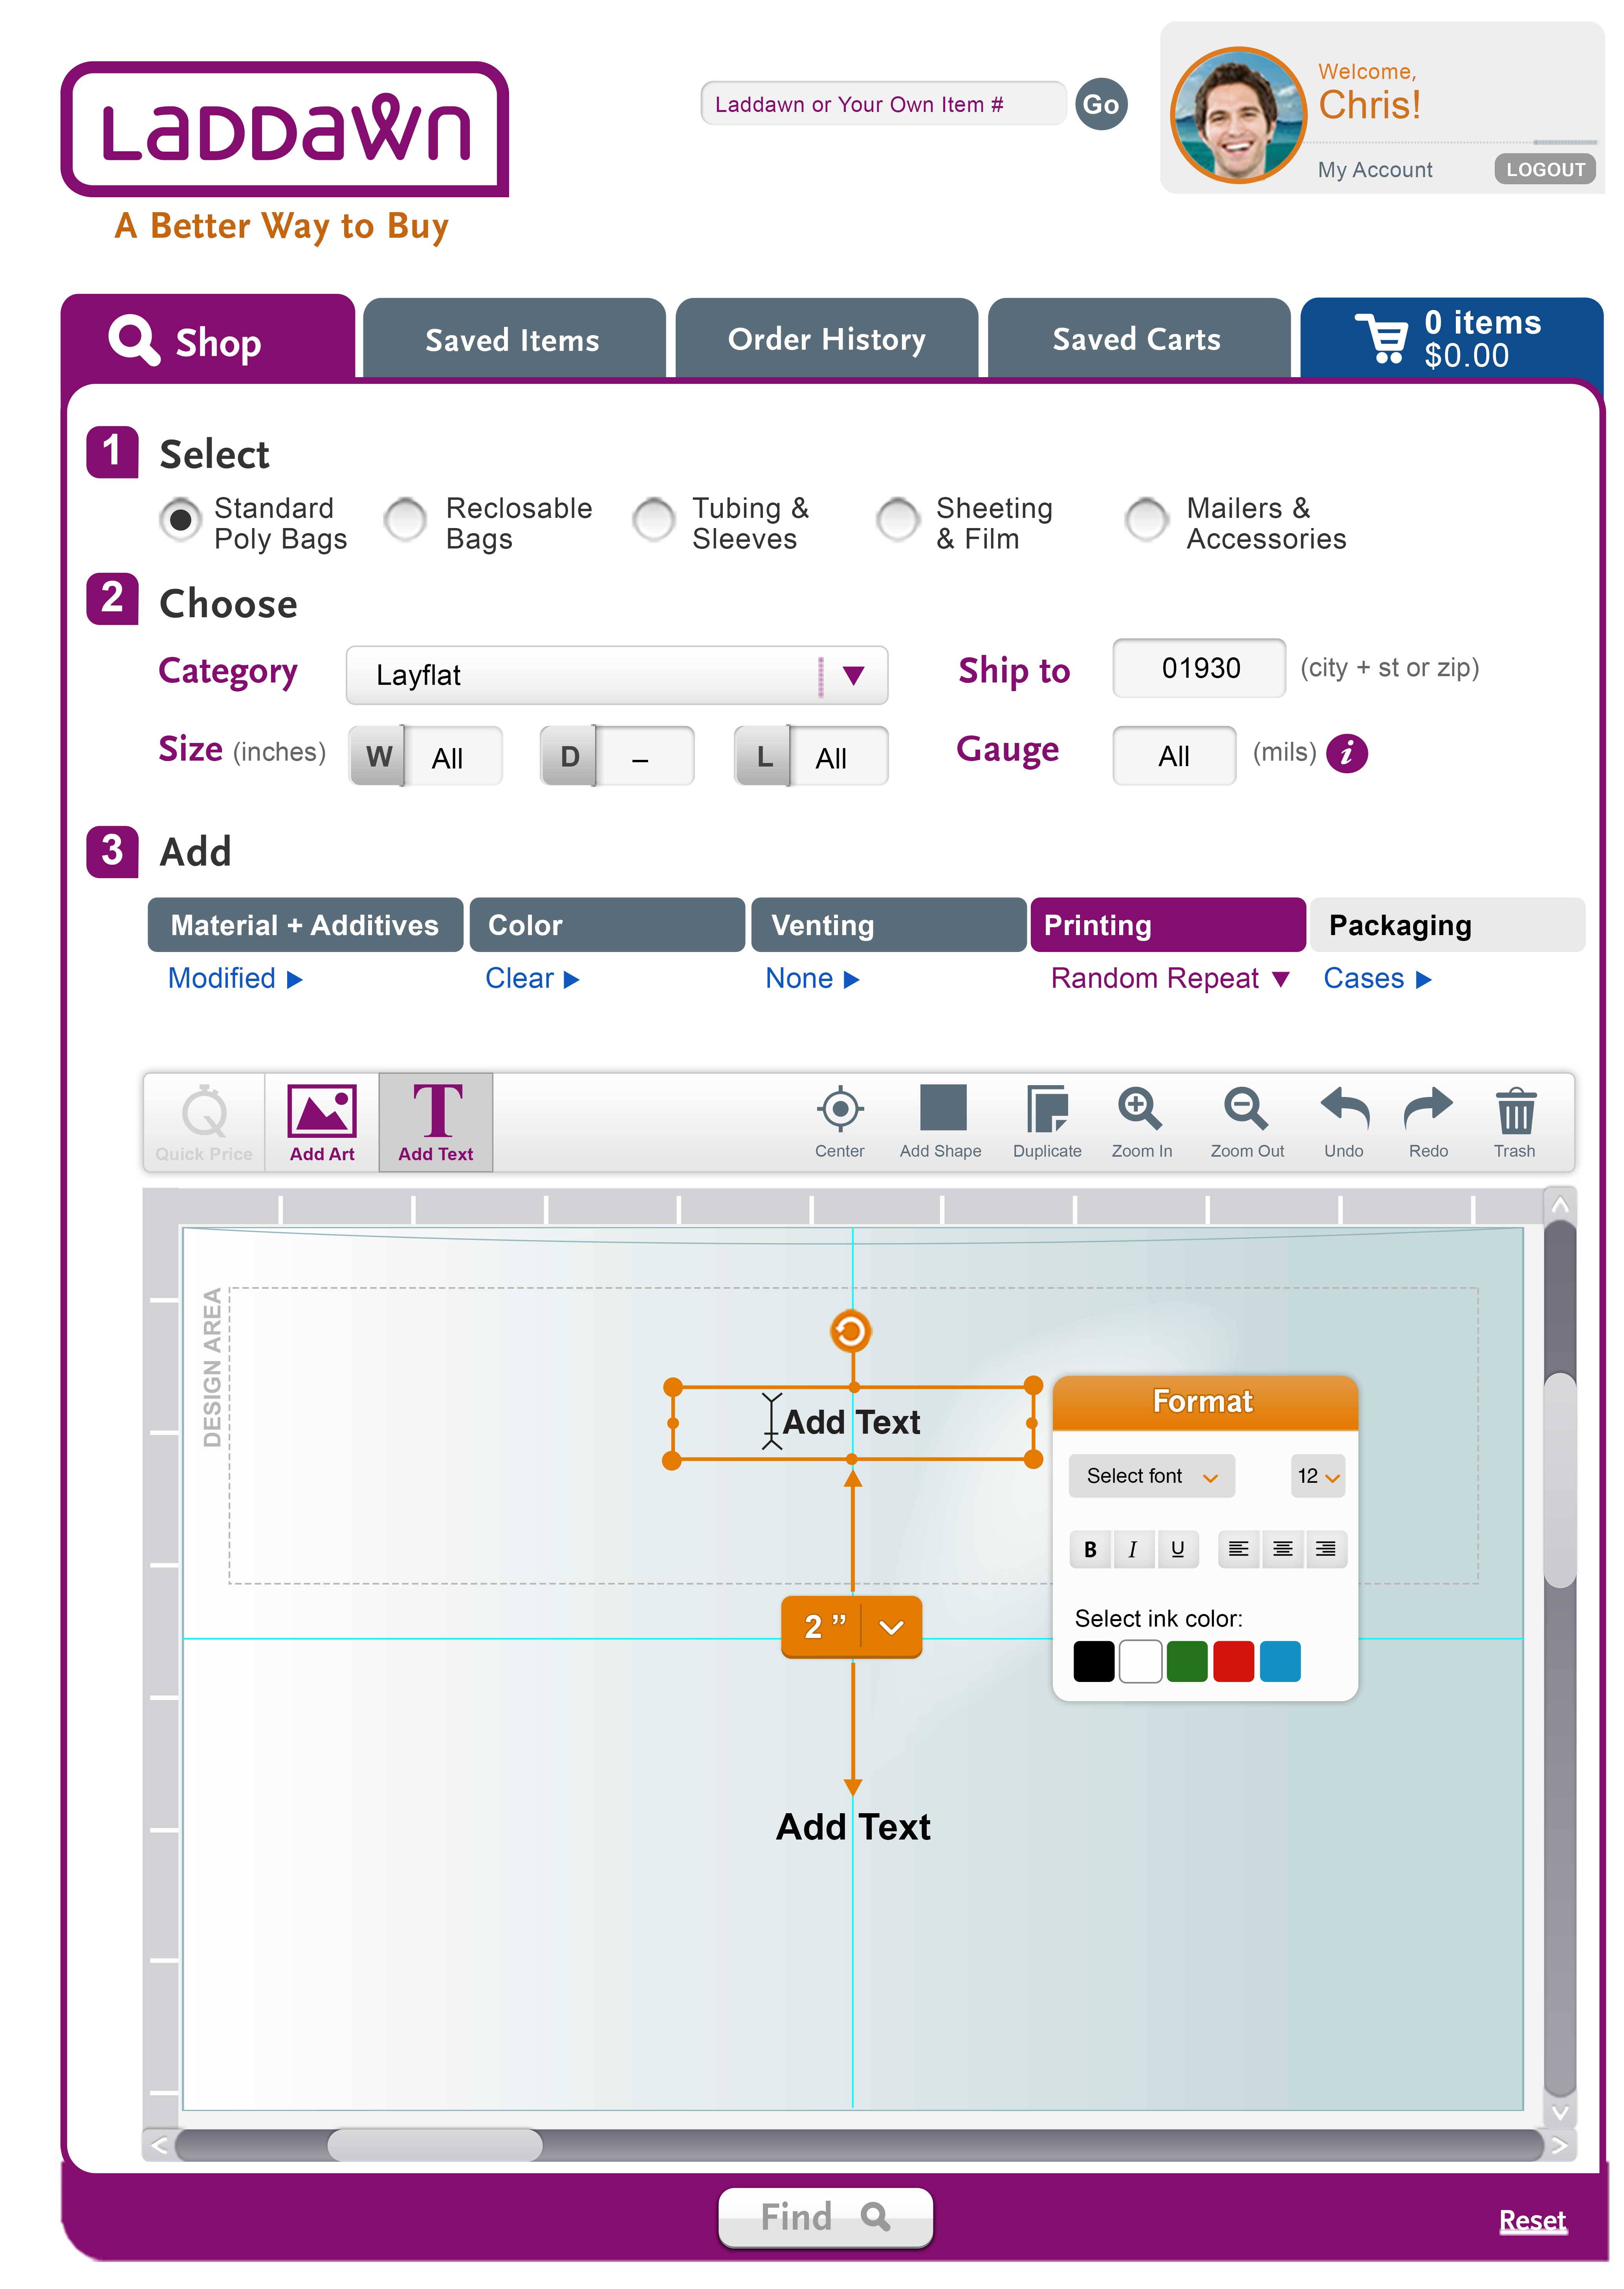
i. Registered flow and tools
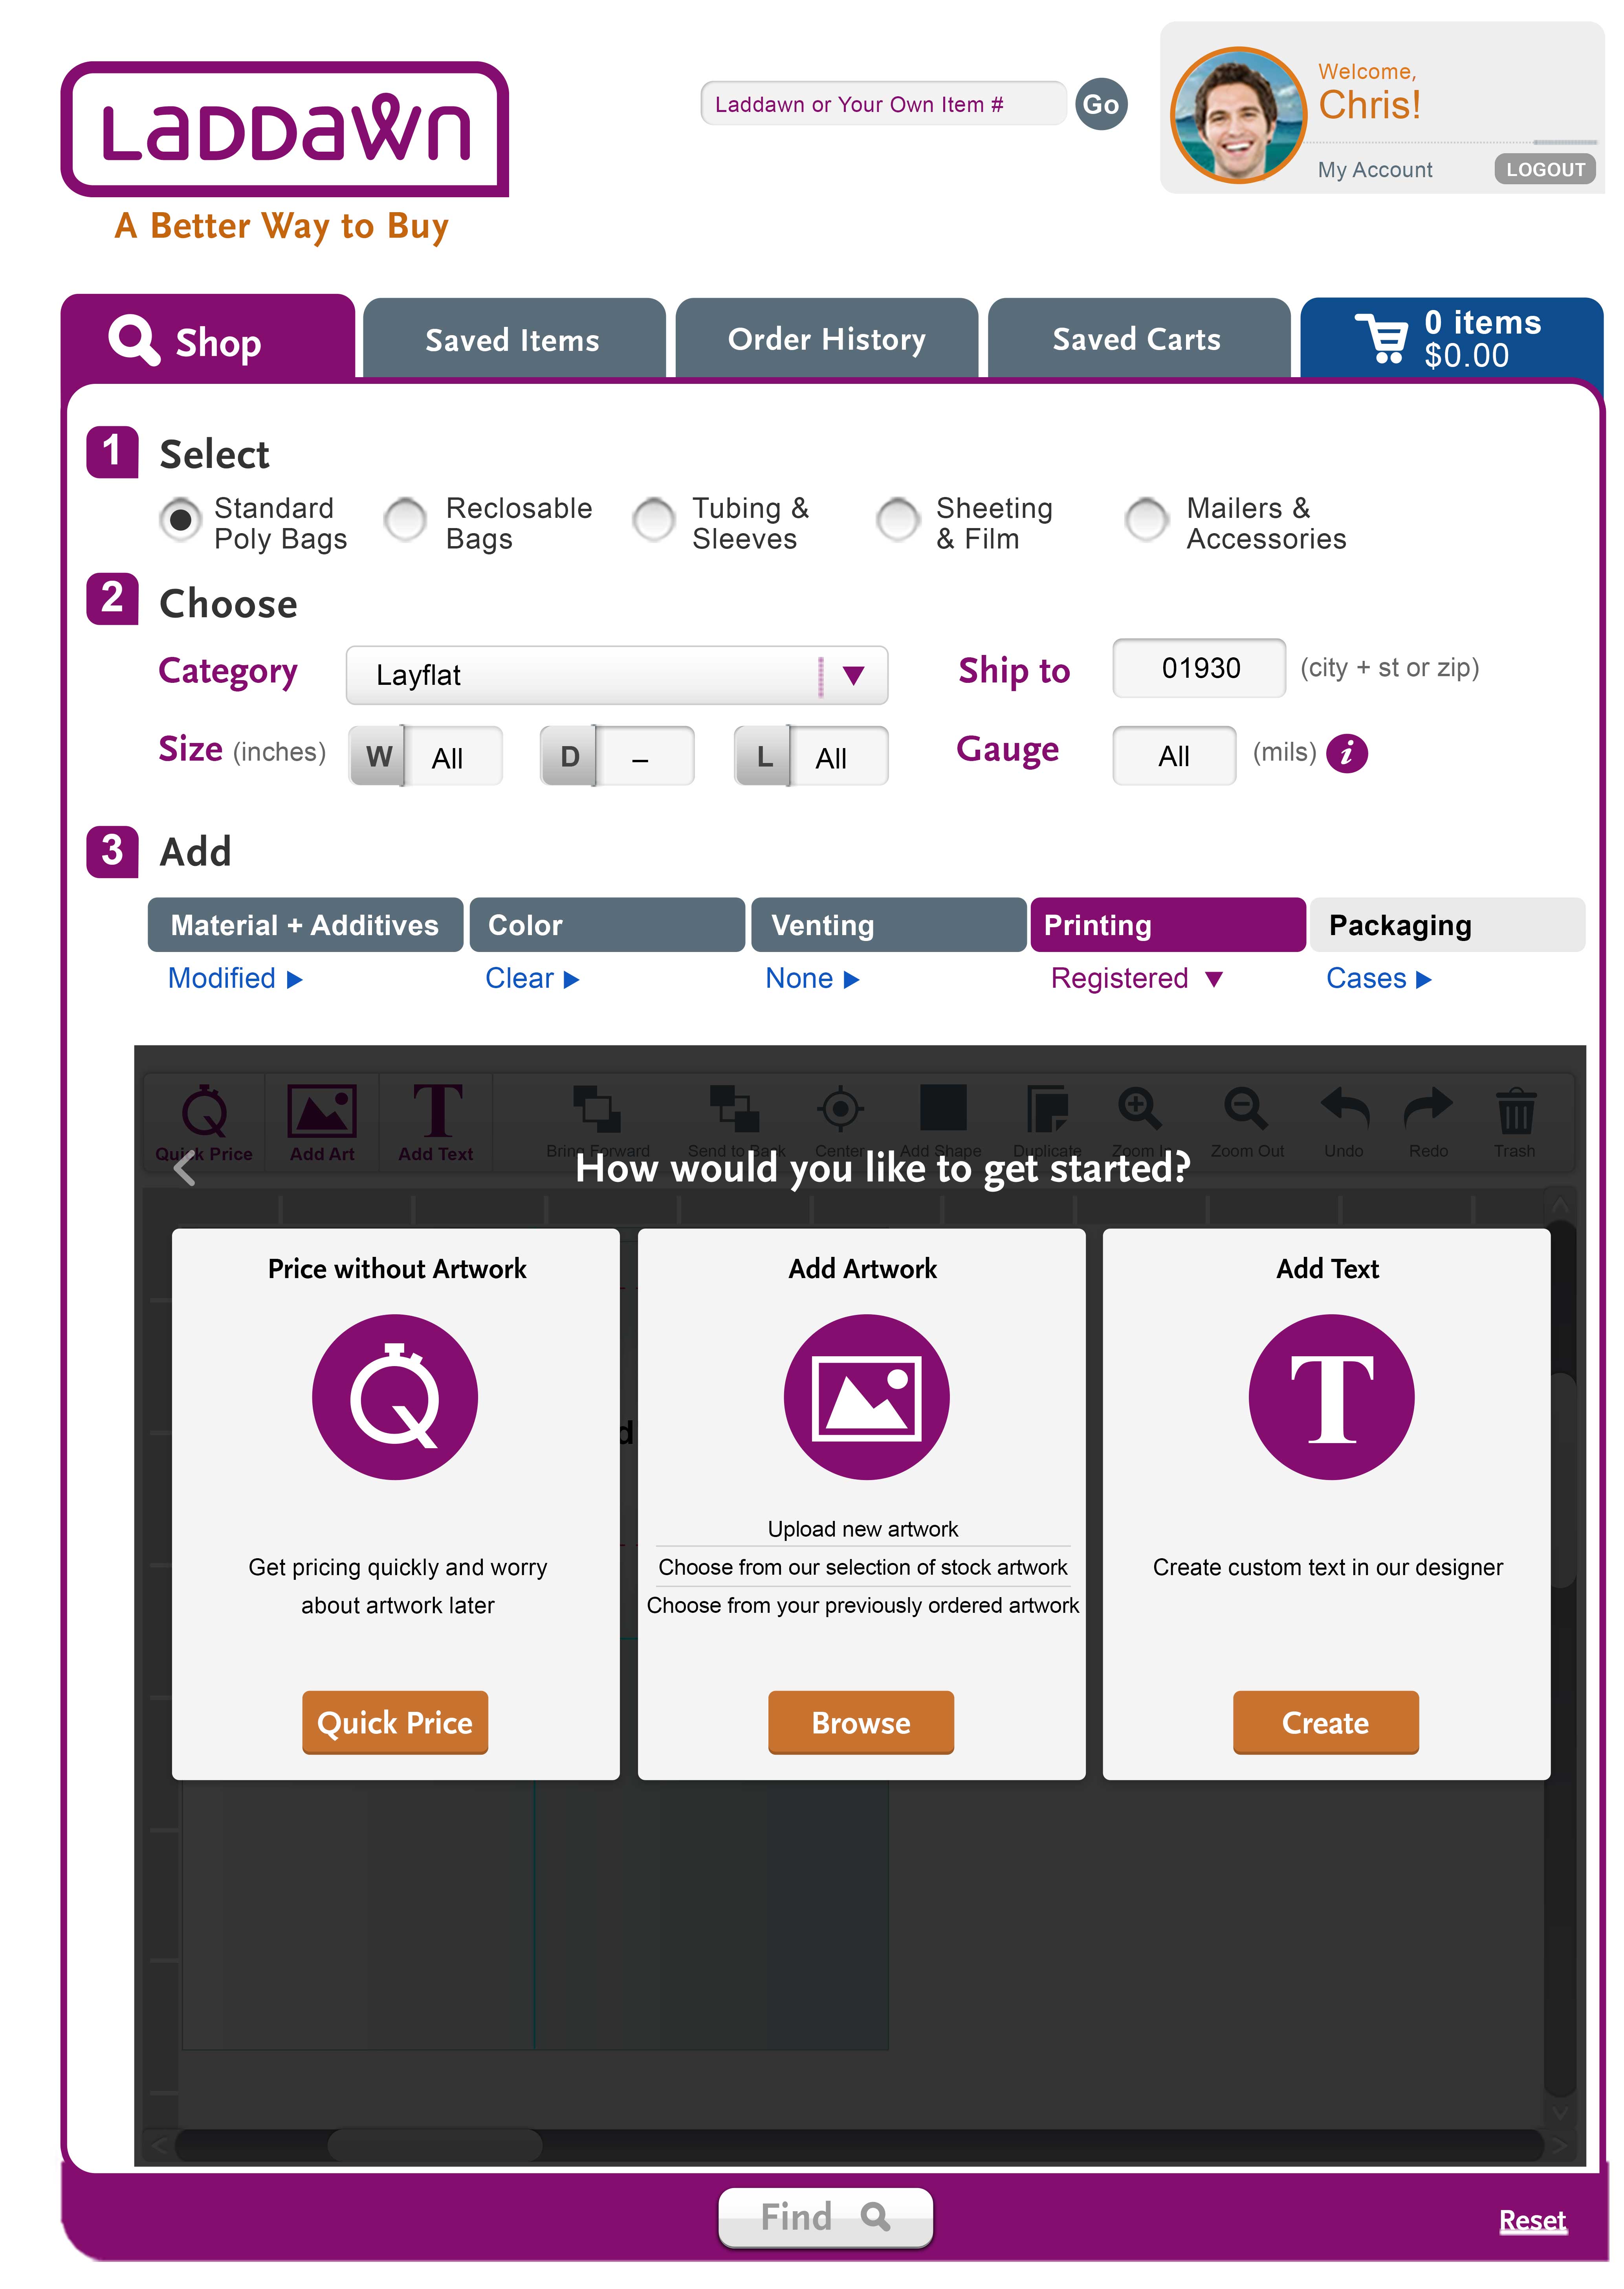
a. Initial screenThe user can start with either the Quick Price, Add Art or Add Text toolbar buttons on the left, or they can click link in center of designer. (Technically they can also start with the Add Shape toolbar button, which will place a white rectangle in the center.) | b. Get started popupAfter clicking link in center to get started, user is presented with an expanded version of the three toolbar choices (quick price, add art, add text) in a shadow box. |
|
|
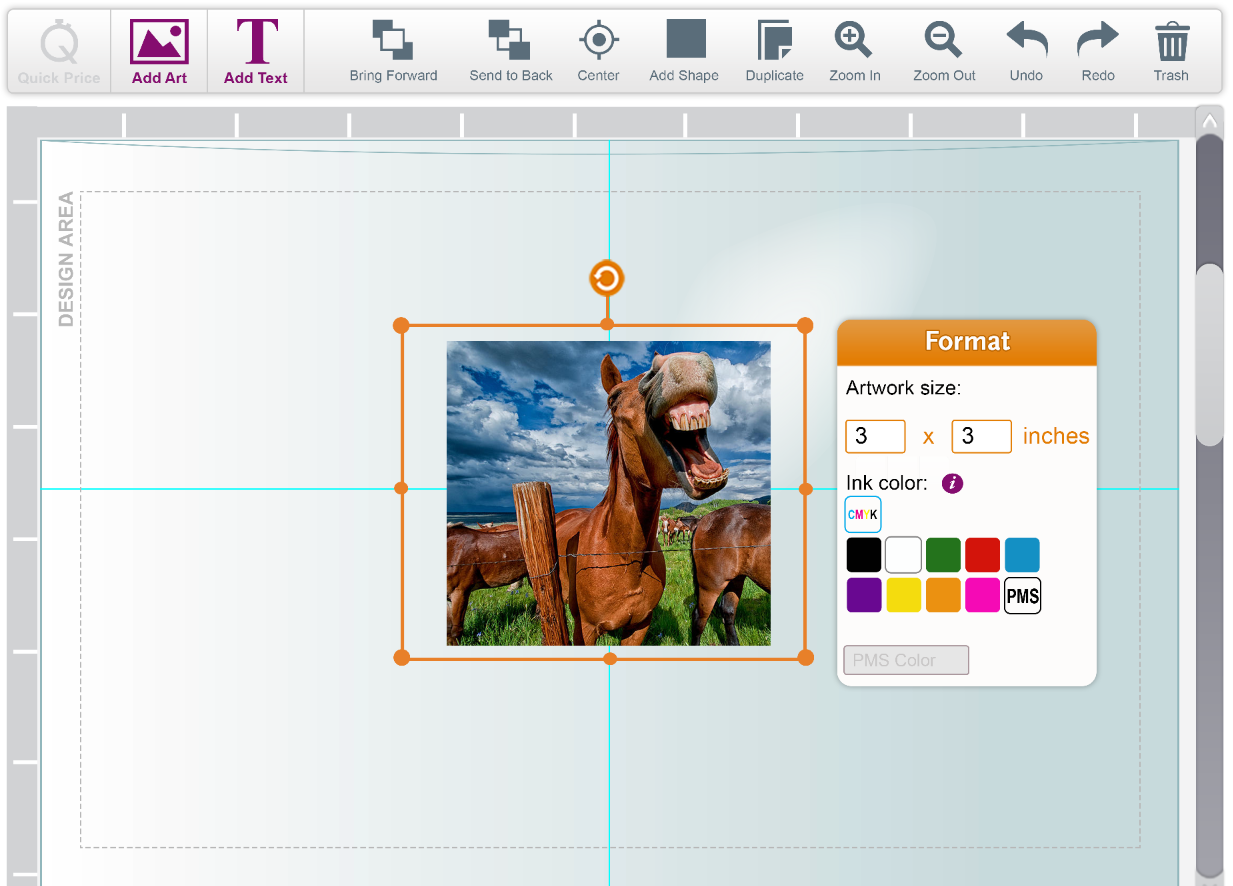
For all of the options below, clicking outside of the selection (actual or placeholder artwork or text) makes the design area dotted line, the orange sizer/rotate tool, and Format popup go away, in effect, creating a preview of the design on the bag/product. Clicking back on the artwork/text restores all of these features.
REVISED, 9/8/16:
Struck references to disabling of quick price if art is placed, and disabling of image/text/shape buttons if quick price is used. Instead:
- Keep all buttons enabled regardless of what gets chosen first.
- If you choose quick price first, and then go to add art, text or shape, we will remove the placeholder without warning or explanation.
- If you choose art/text/shape first, and then click quick price, we will open popup: “Are you sure? We will remove your artwork from this design. OK/Cancel.”
These changes apply to both Reg and RRP. These changes are not reflected in mockups below.
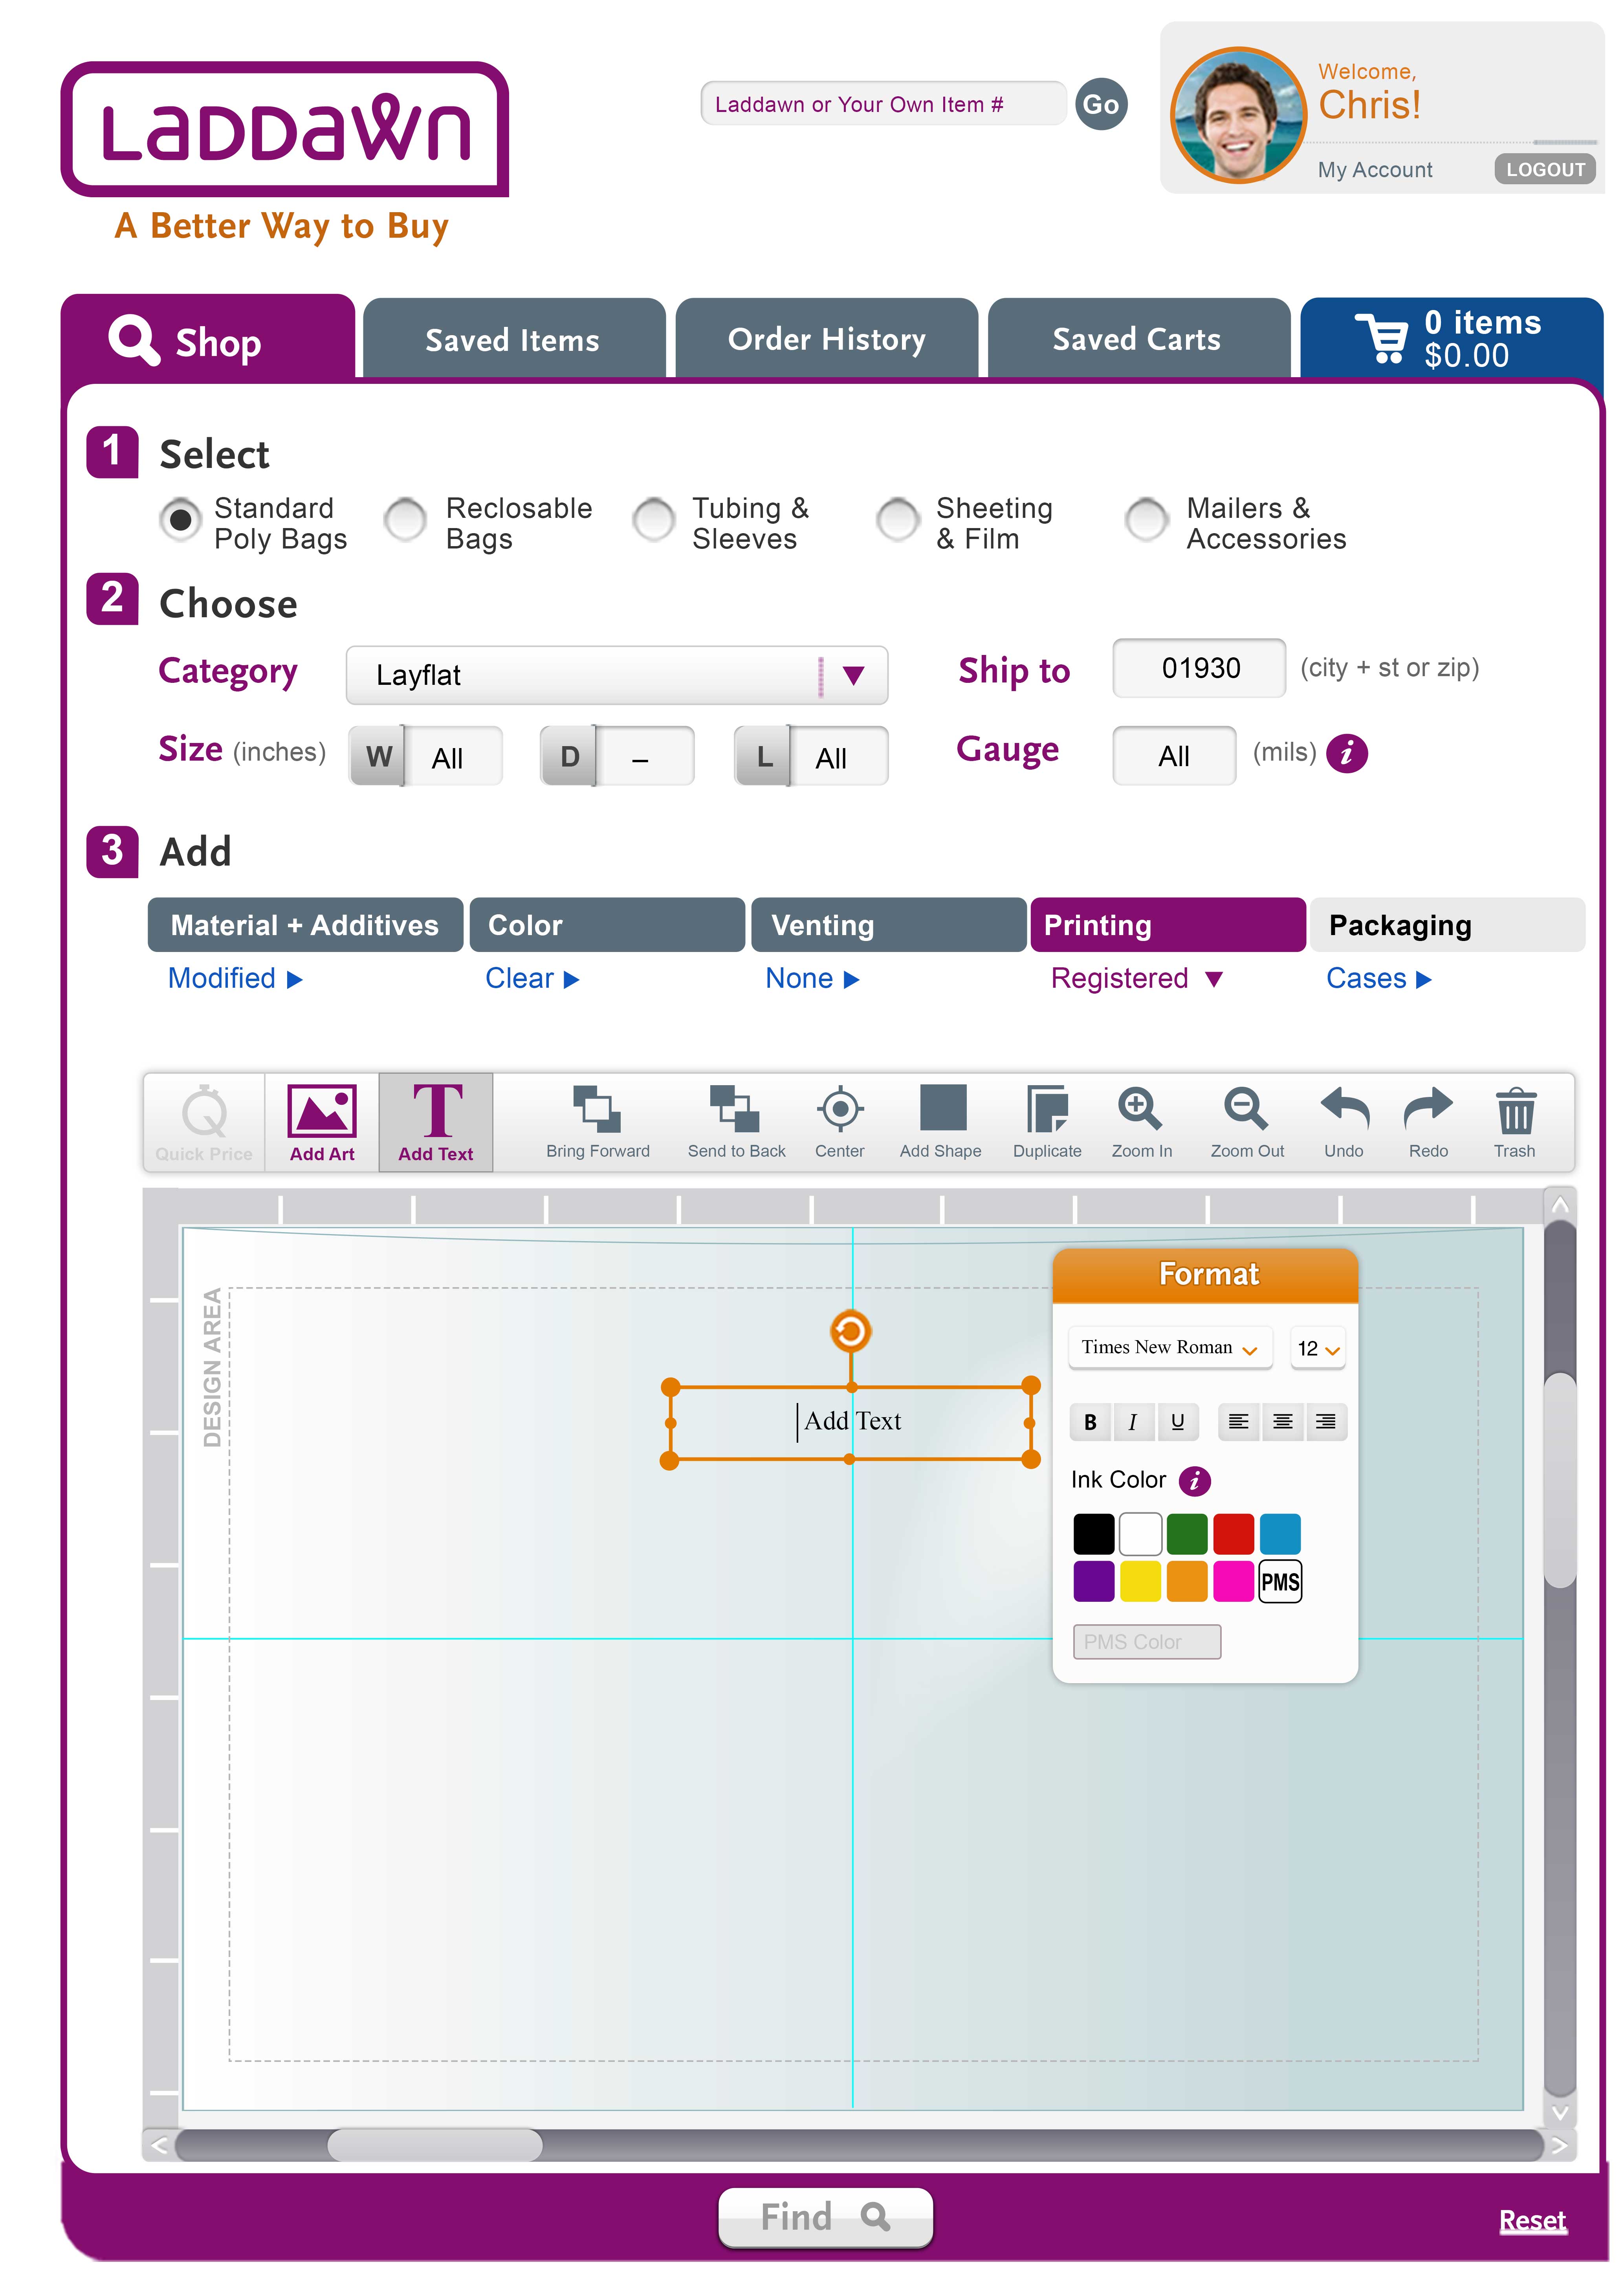
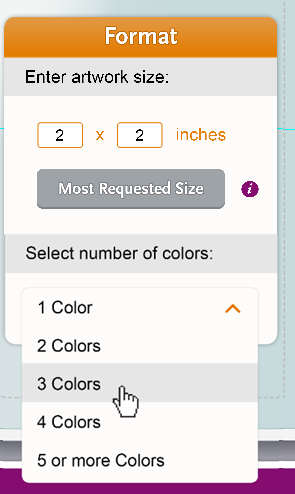
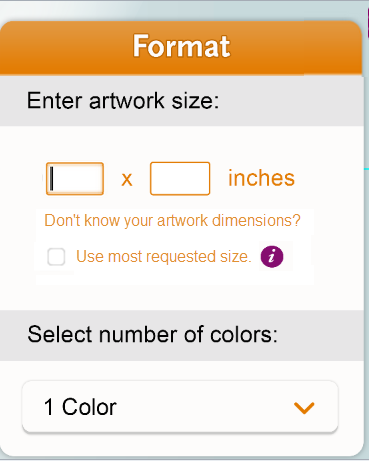
c. Quick Price | d. Add Art | e. Add Text |
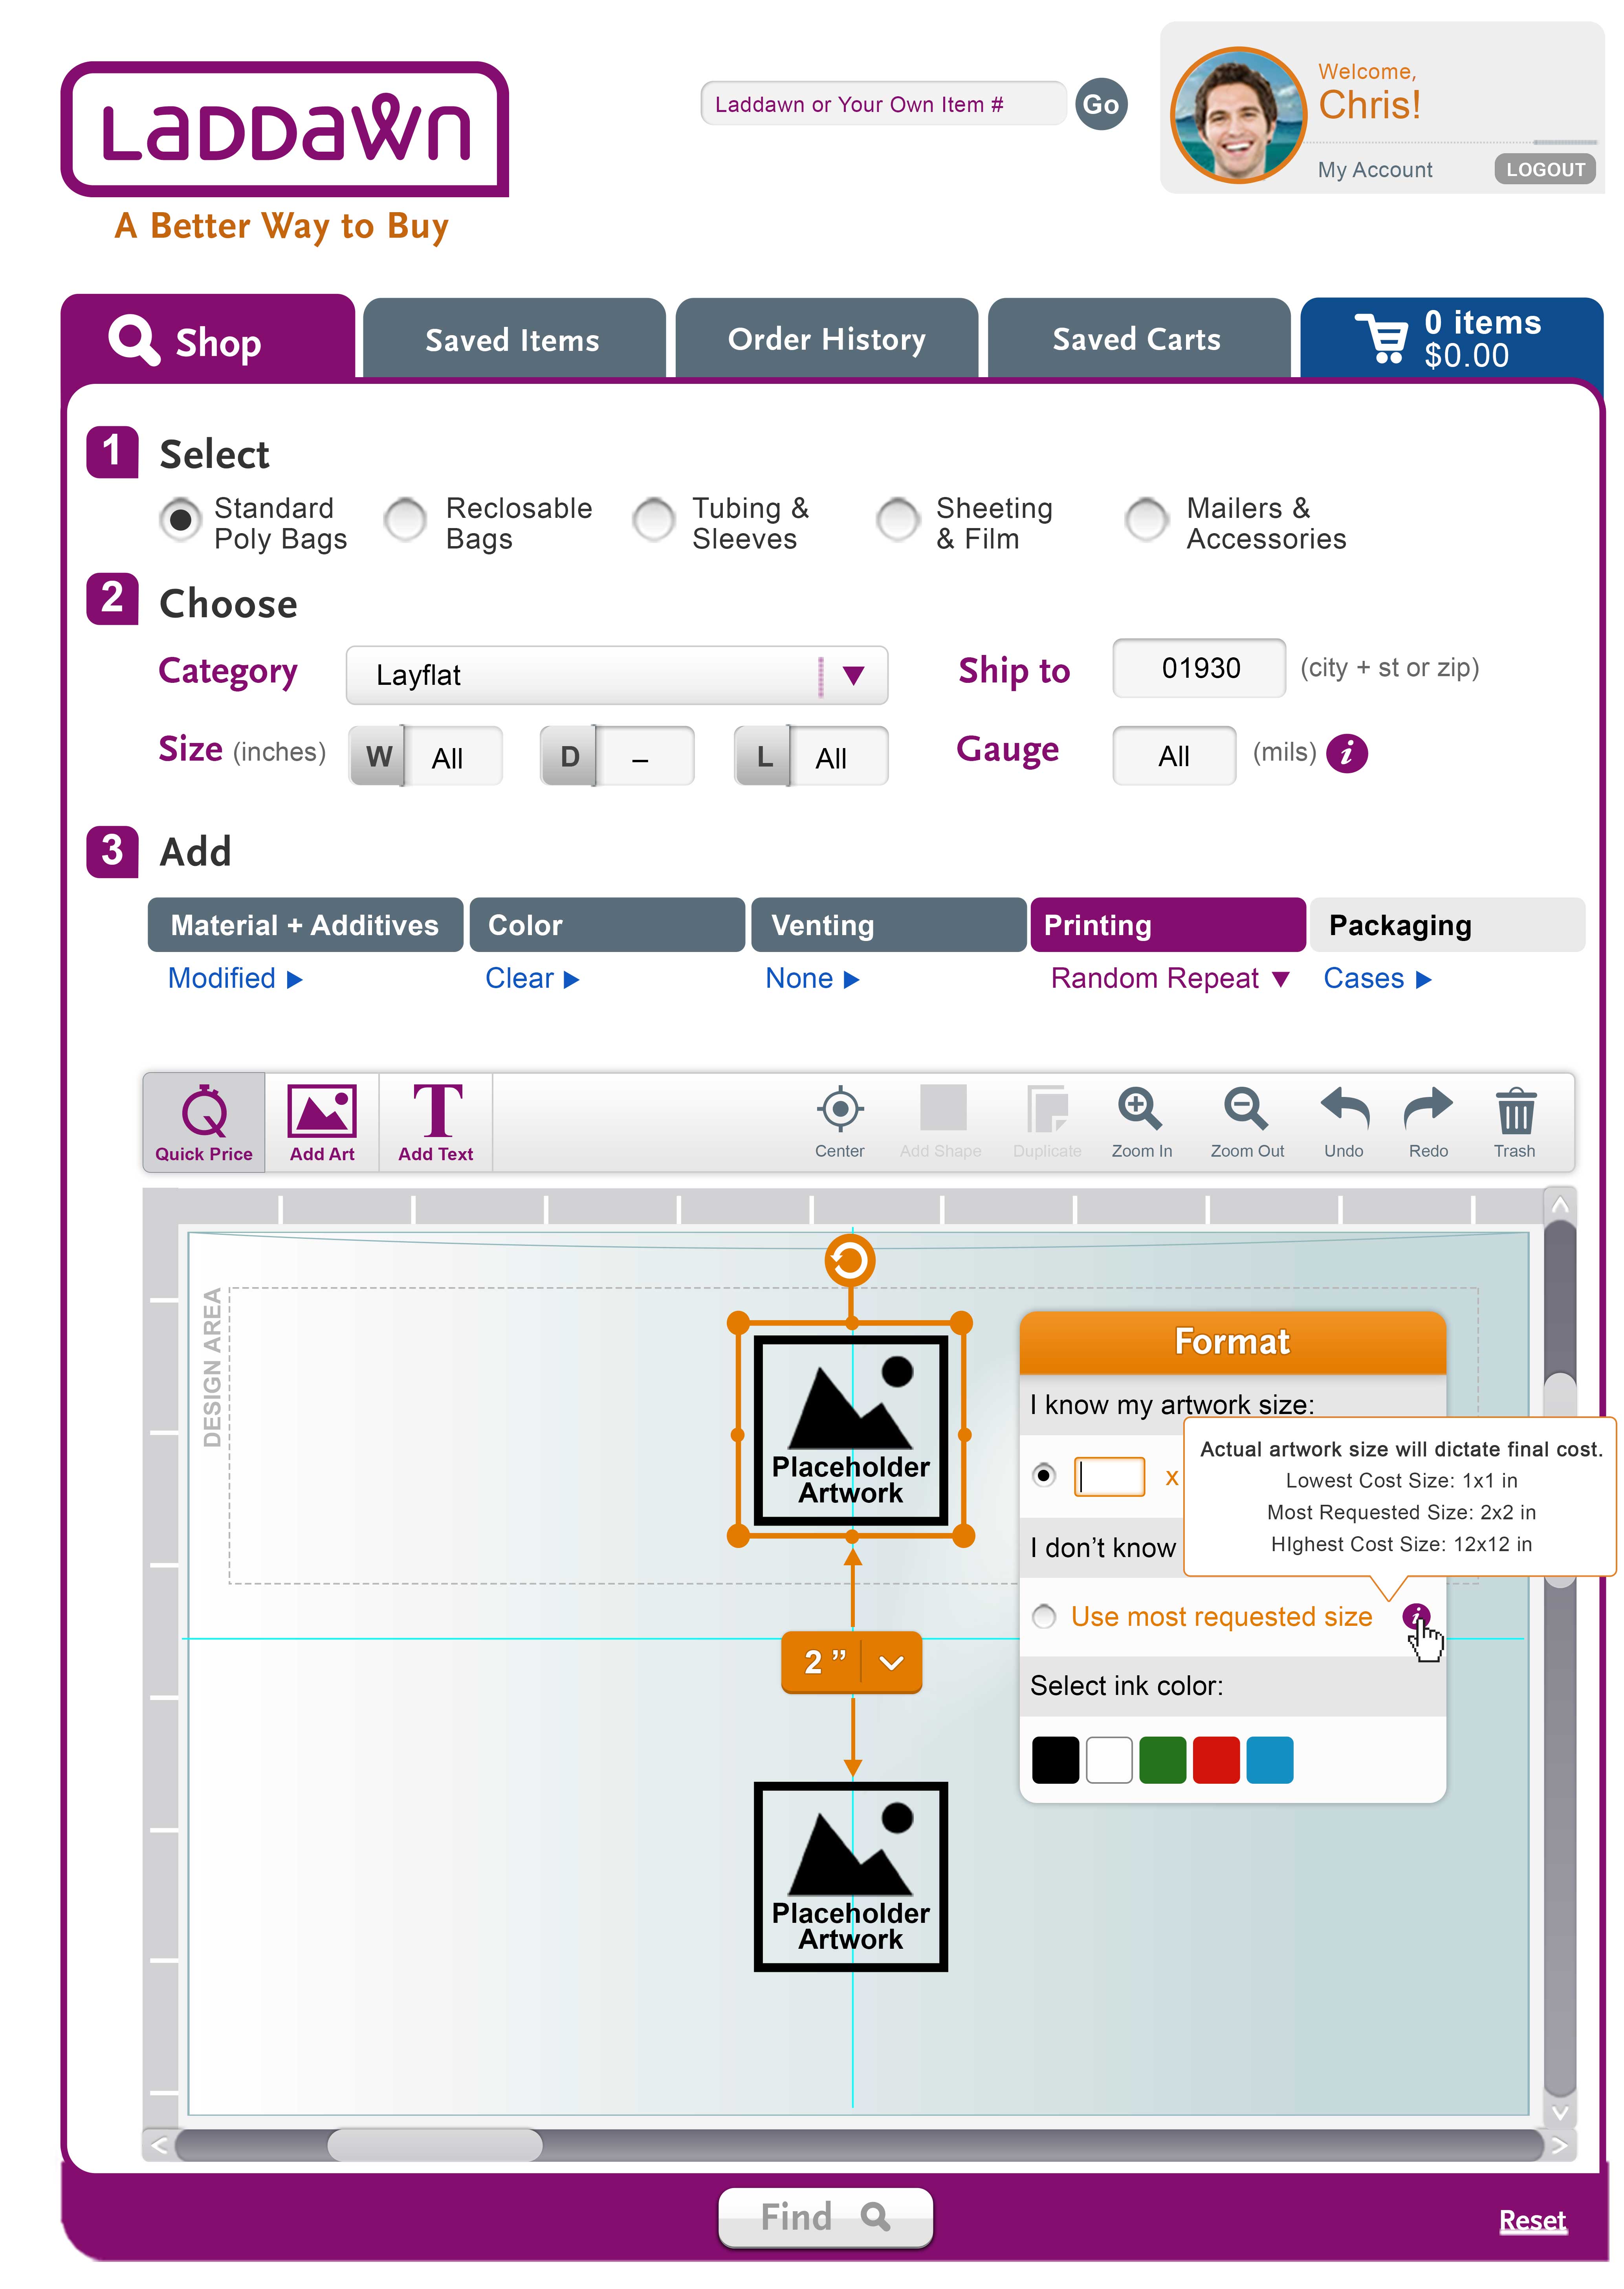
The placeholder artwork will show at "most requested size" even though we're not defaulting to any size in the dimension fields. In order to be able to execute a Find, the user must provide a size - via dimension fields, using resizer tool, or checking "most requested size" checkbox. Checking the box populates dimension fields with most requested size. "Most requested size" will be calculated based on algorithm to be supplied by Tom B. Color menu expanded:
|
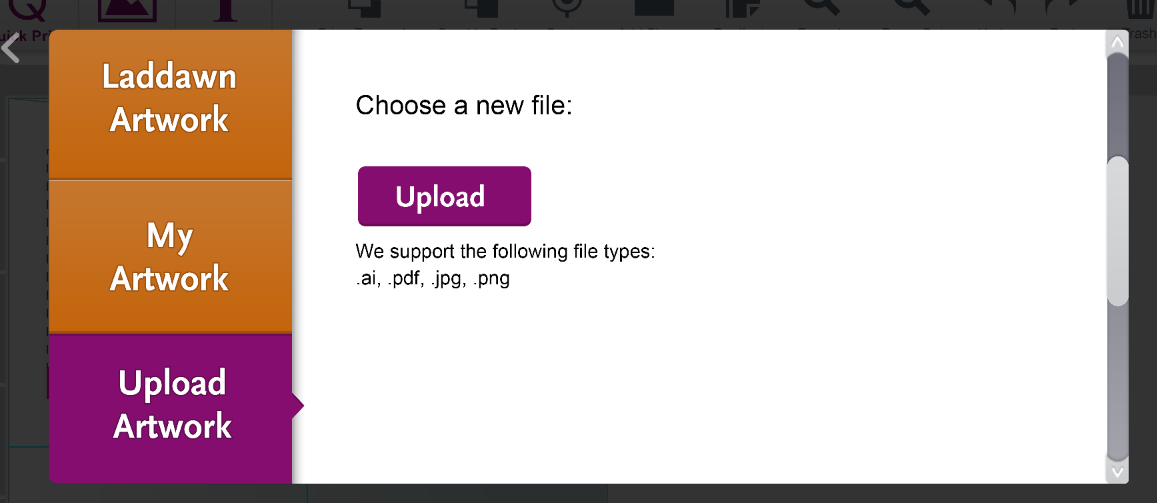
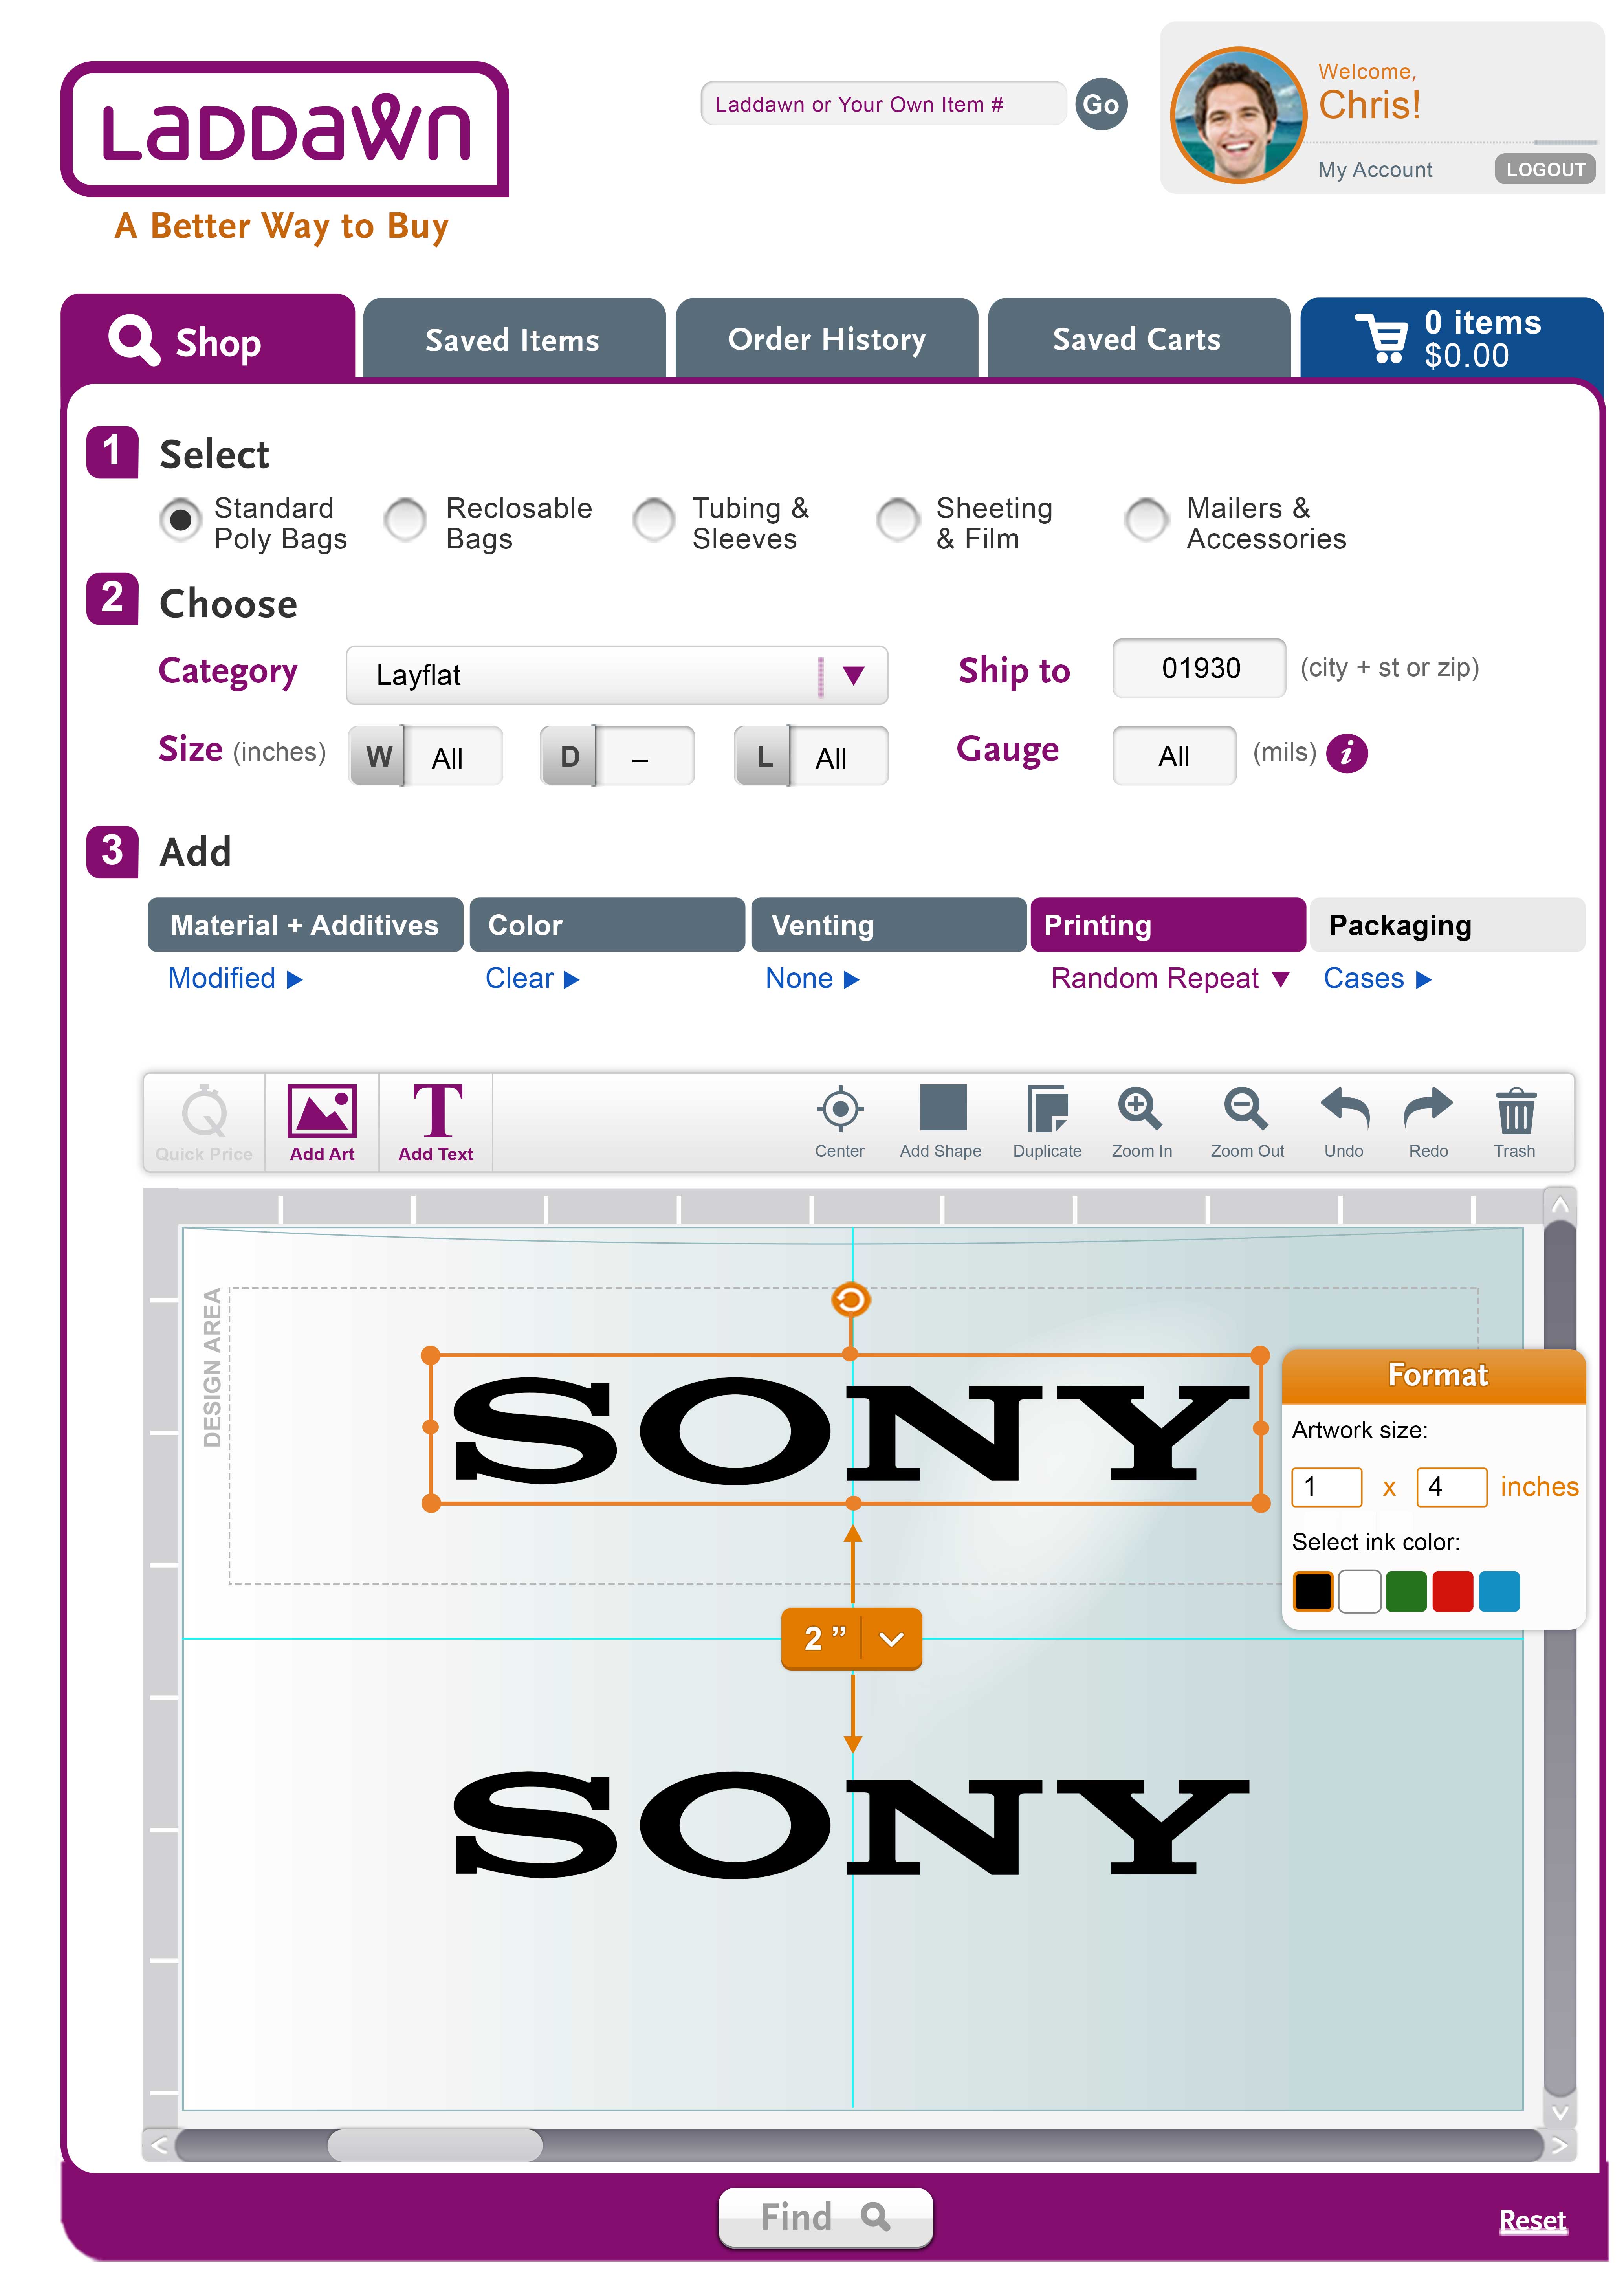
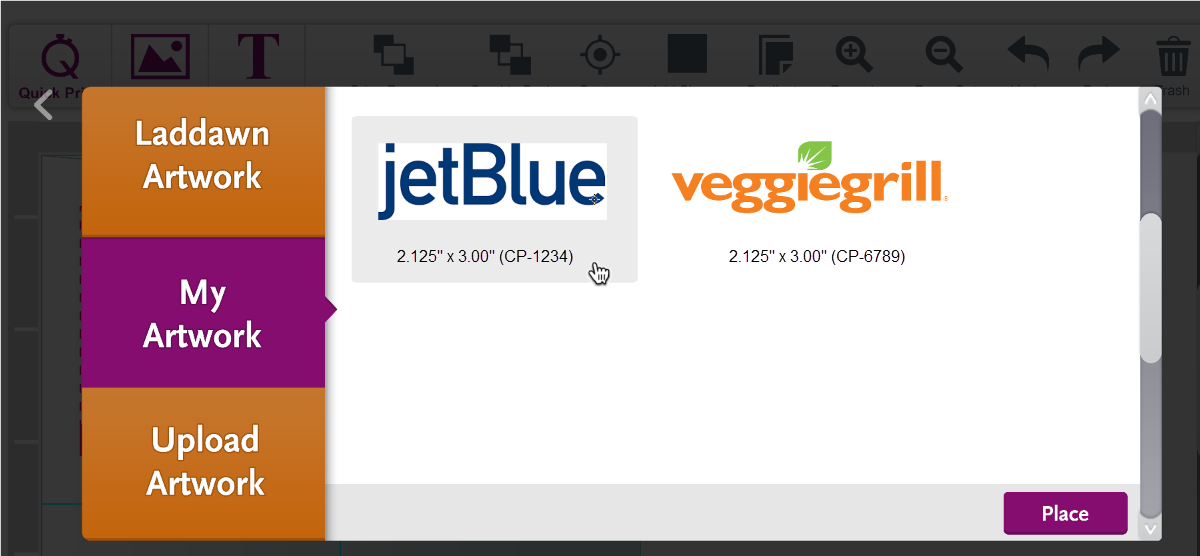
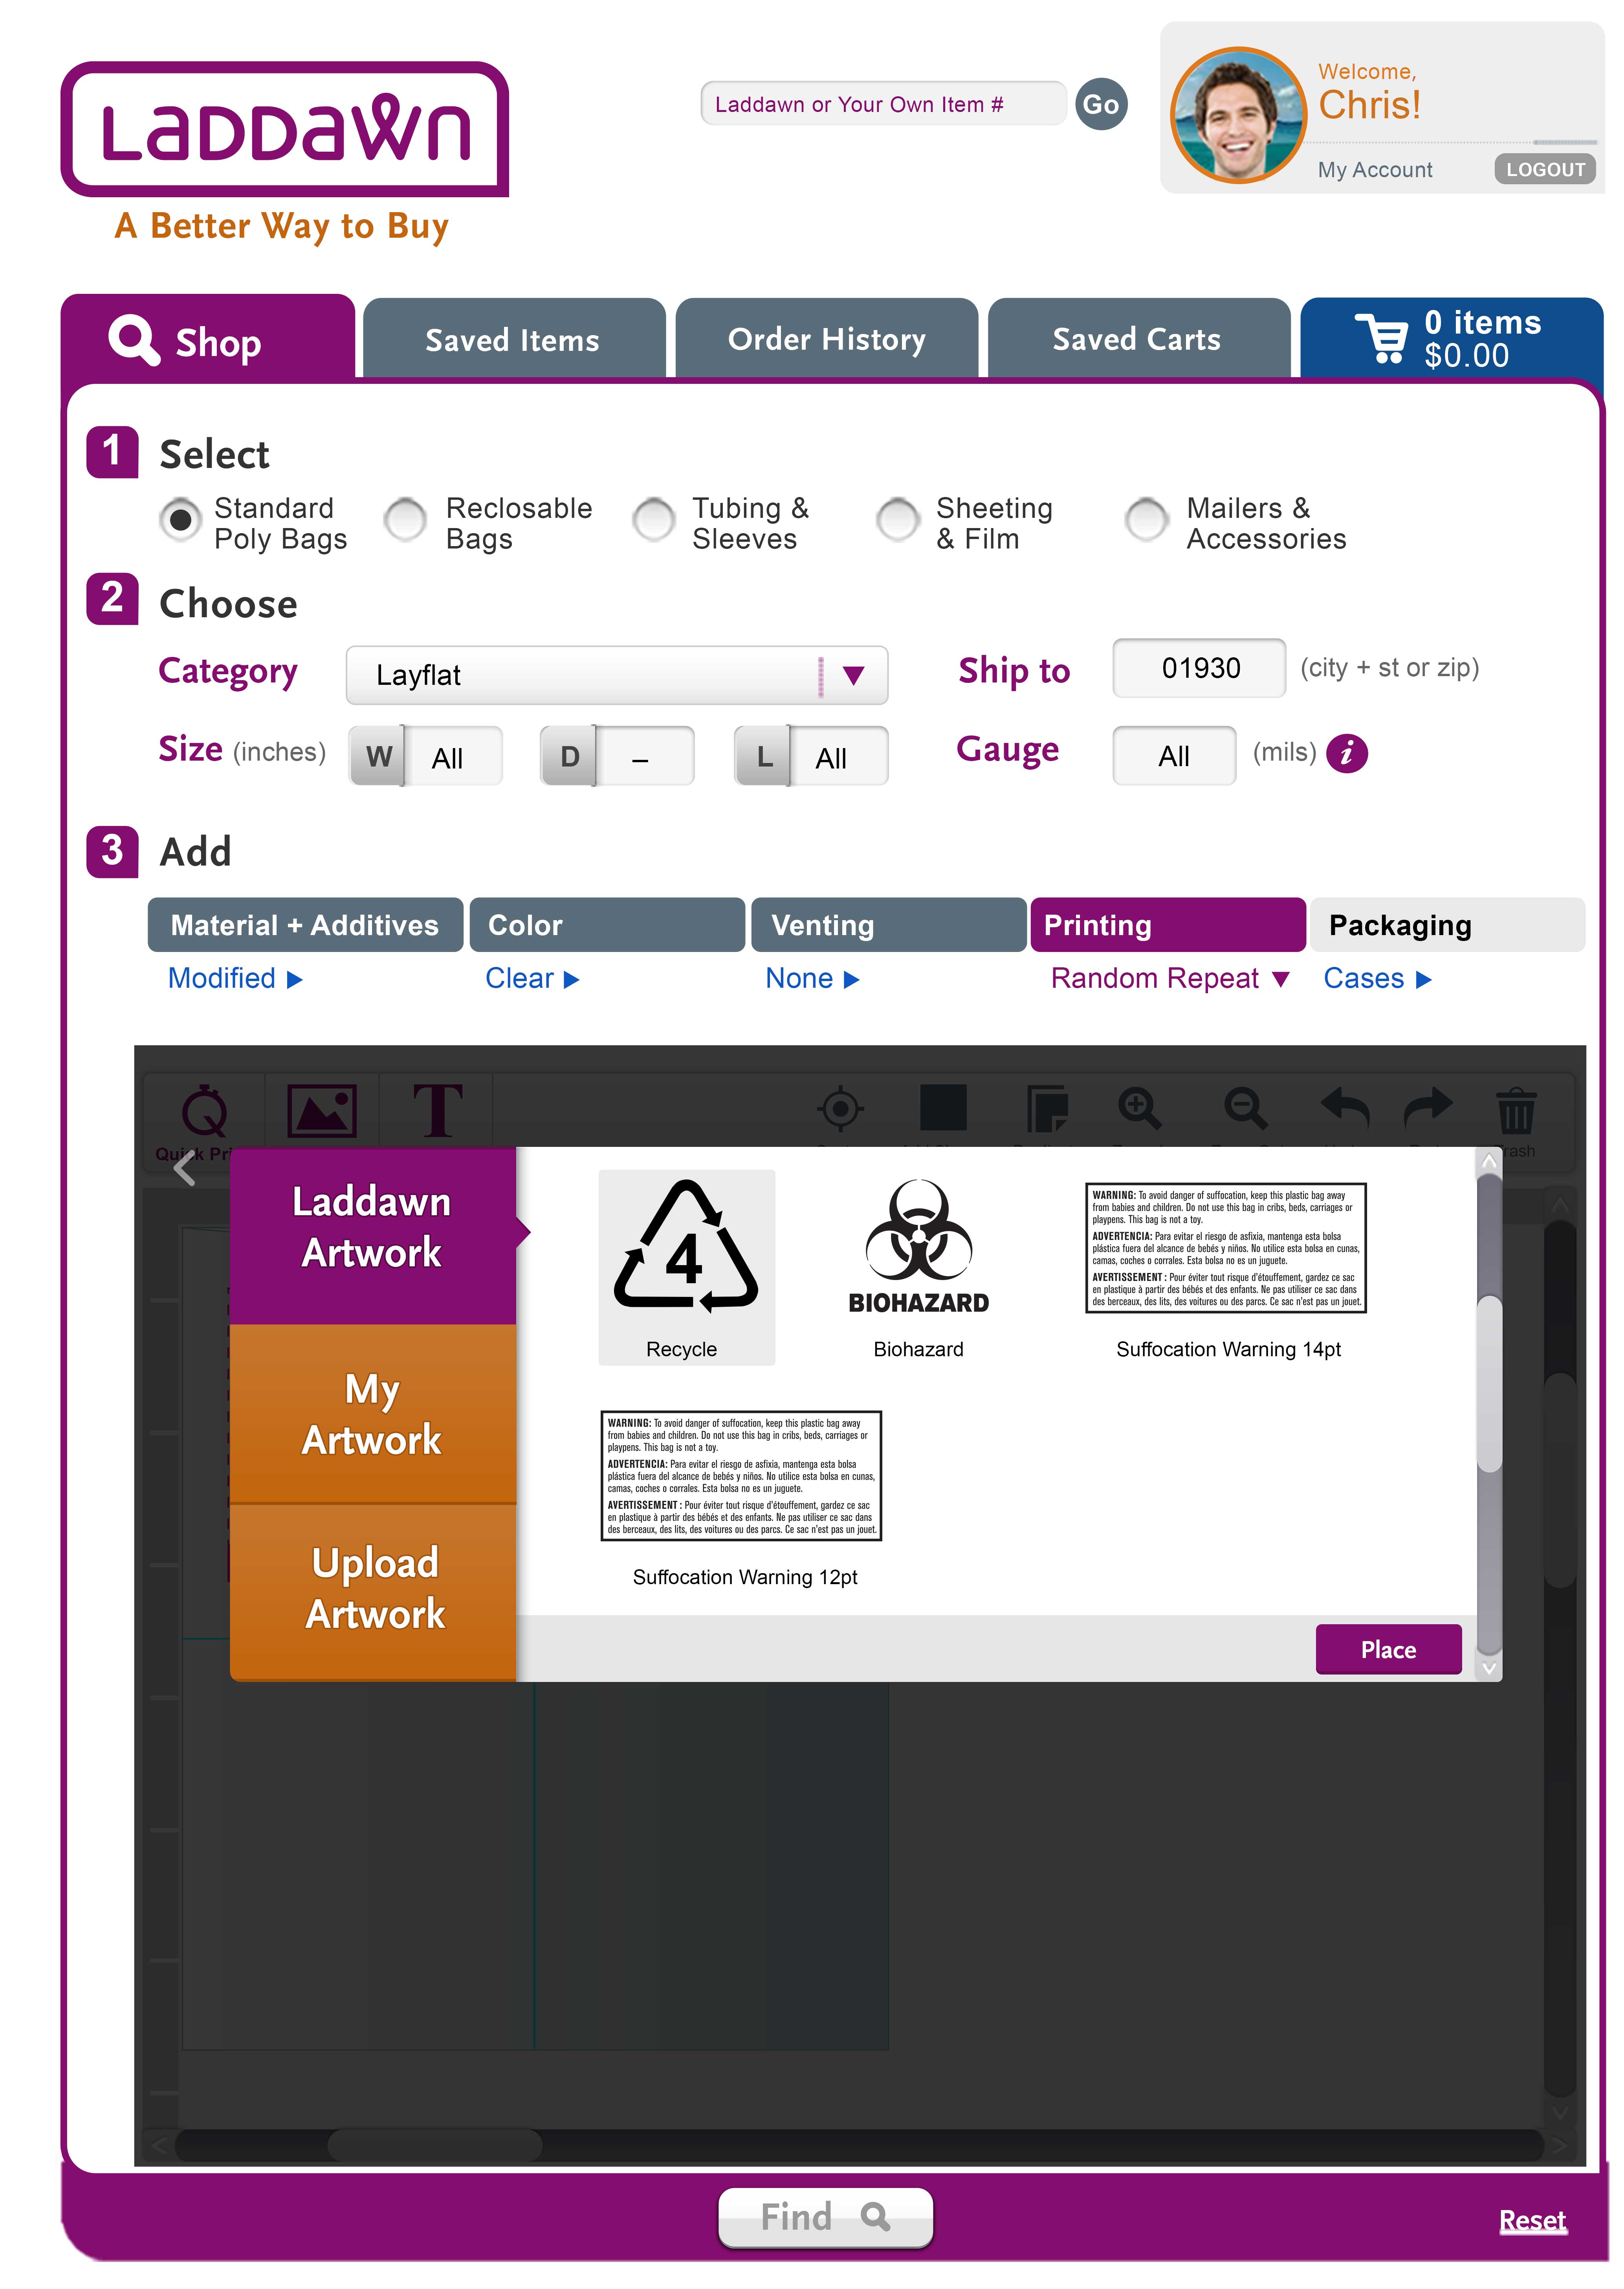
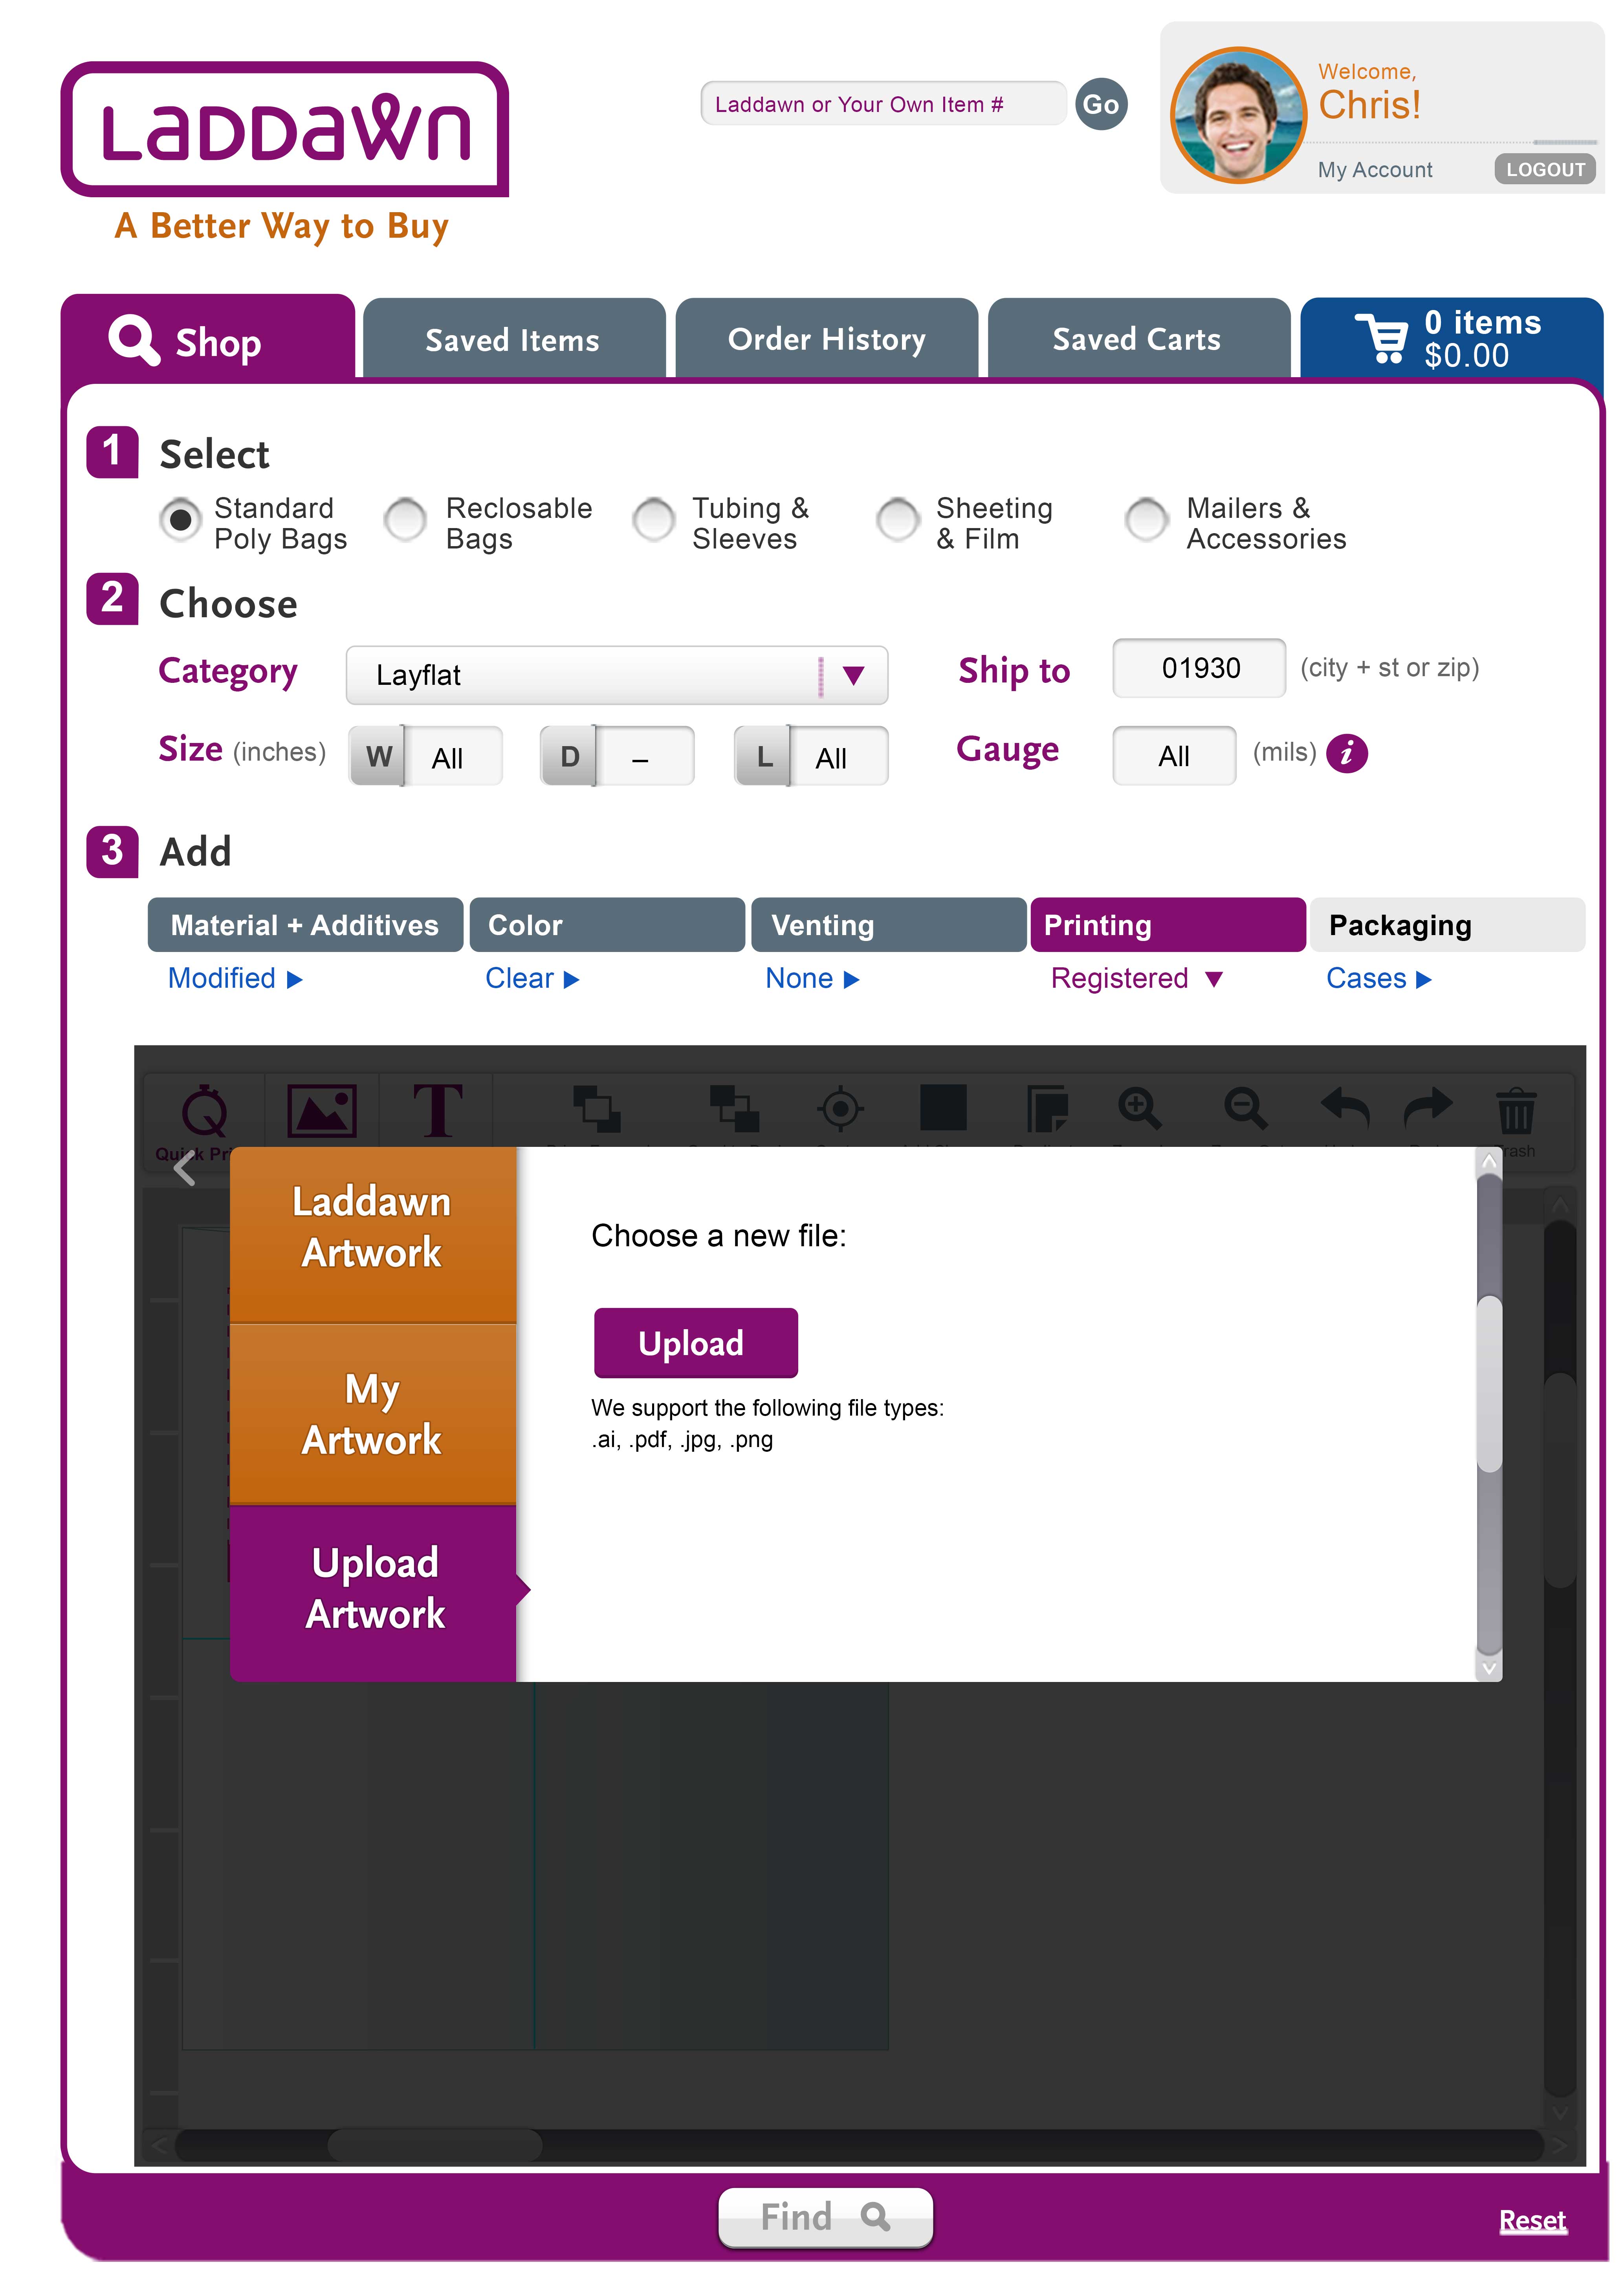
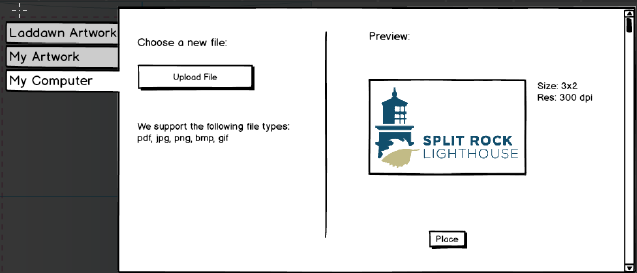
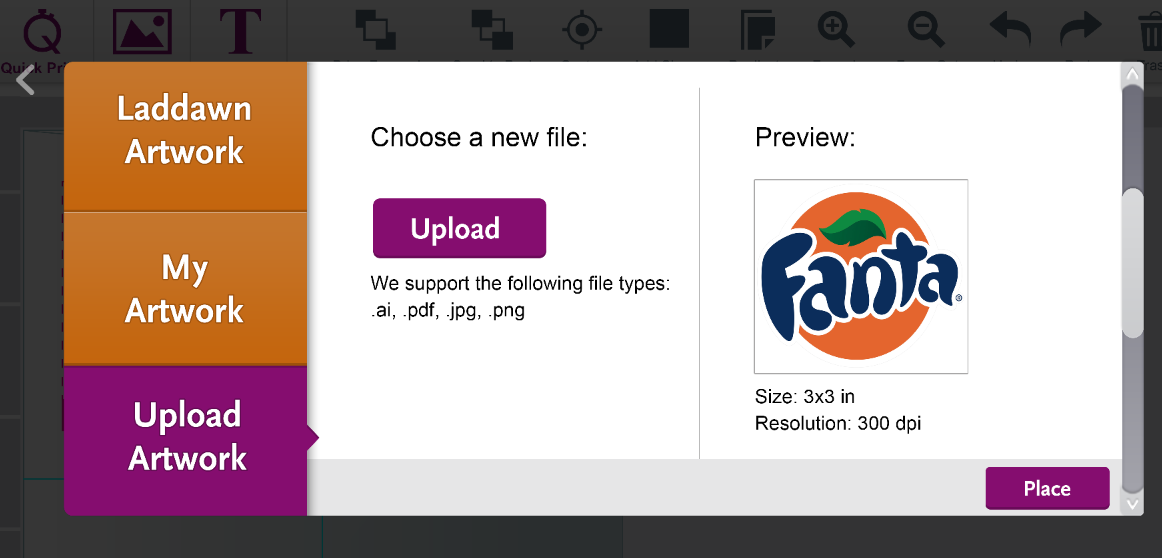
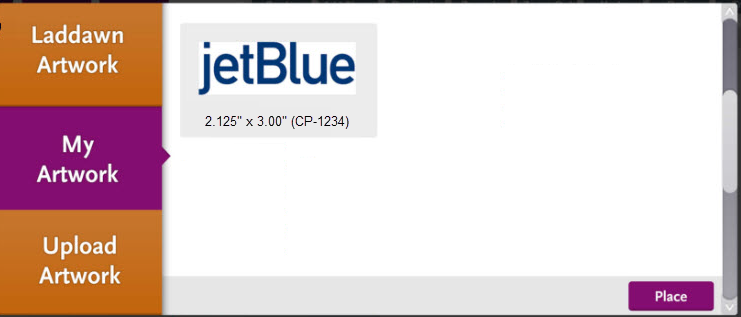
Click Add Art toolbar button (or Browse button from modal) to land here. Defaulted to Laddawn Artwork (stock plates). The back arrow in top left brings you back to where you started. Q: Did we deliberately change "my computer" to "upload artwork"? I think "upload artwork" is clear, but we lose the parallel structure. (HB) I would argue for upload artwork since they will be performing that action within this field. |
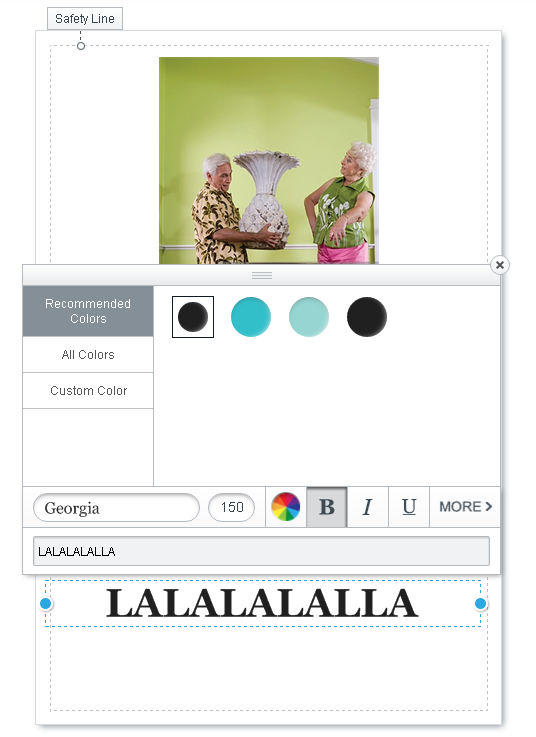
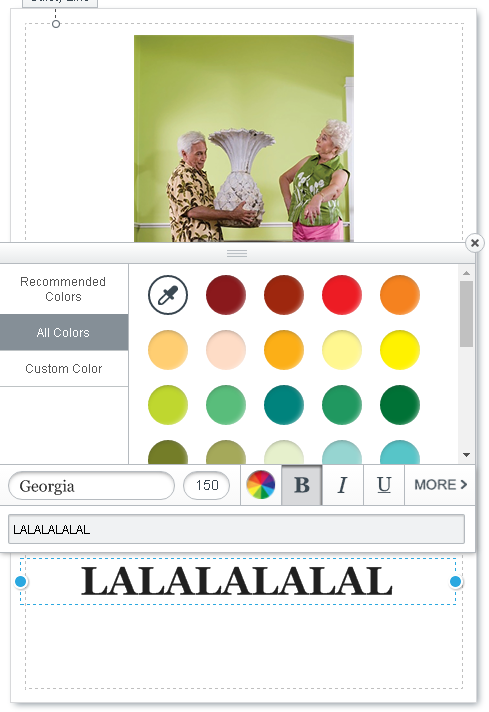
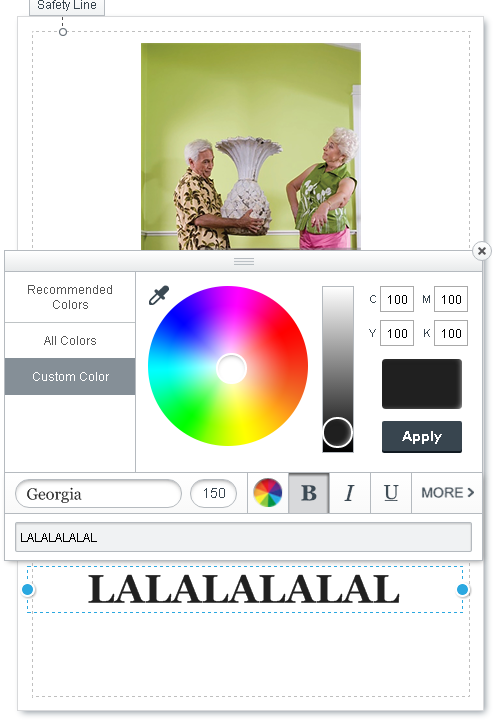
Click the Add Text toolbar button (or the Create button from modal) to land here. (Bill) There should be a decision on what fonts show in this dropdown. Right now, the plan is to support the standard set of web-safe fonts. If we want other fonts, we will have to purchase them and get them set up to be downloaded on the site. (SP) I would like Haley and Chris to answer this and default question. For now just go with web safe. (HB) Here is what we think for now (we can expand later - or will it slow down the designer?):
(SP) Since we have bold and italic buttons, then the only fonts we need to show in the dropdown are Arial, Arial Black, Impact, Palatino, and Times New Roman. Is that correct? What about the other web-safe fonts? (Verdana, Georgia, etc.) Ink Color:We show black, white, and the same 5 standard colors shown in artwork Format popup, plus one PMS color entry field. We also show up to 4 auto detected colors if colored artwork has been uploaded prior to addition of text. Selecting a color (or entering a PMS#) will recolor the entire string of text, if no specific portion of text selected; if a specific portion is selected, it will only color the selected portion. Text color defaults to first color that is allowed on this color film (in this example, black). |
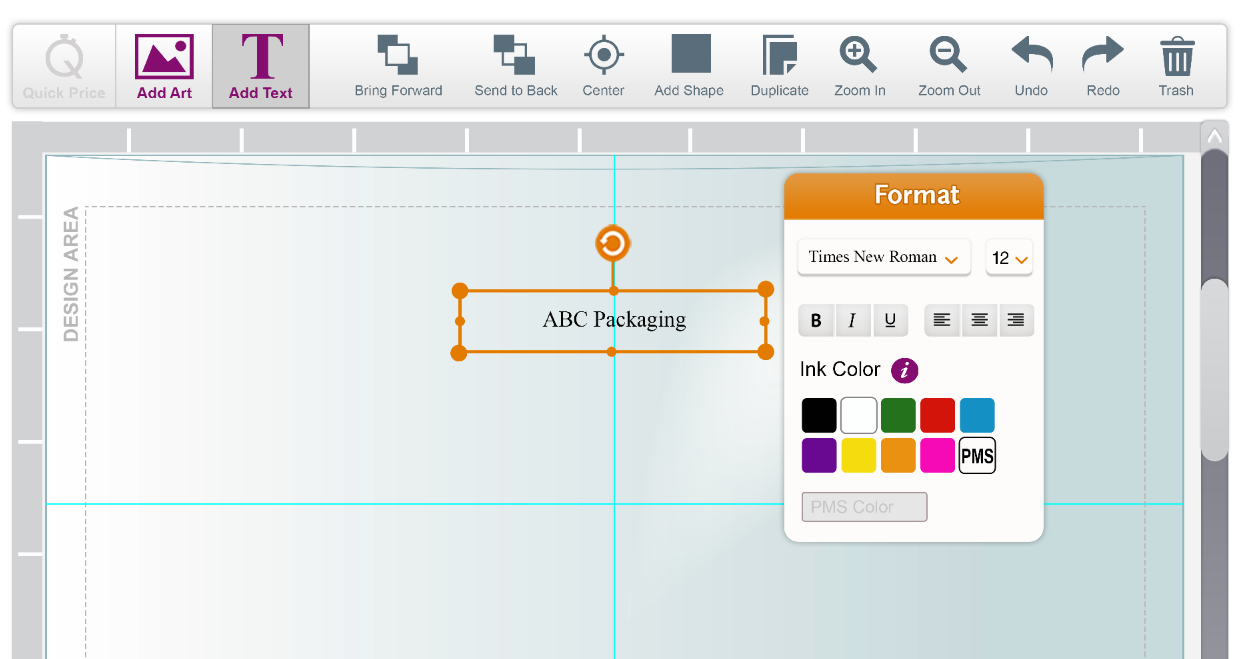
Text on hover over 'i' symbol to show min/max most requested sizes. |
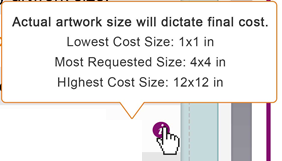
| Text Added
Once you have placed |
| ||
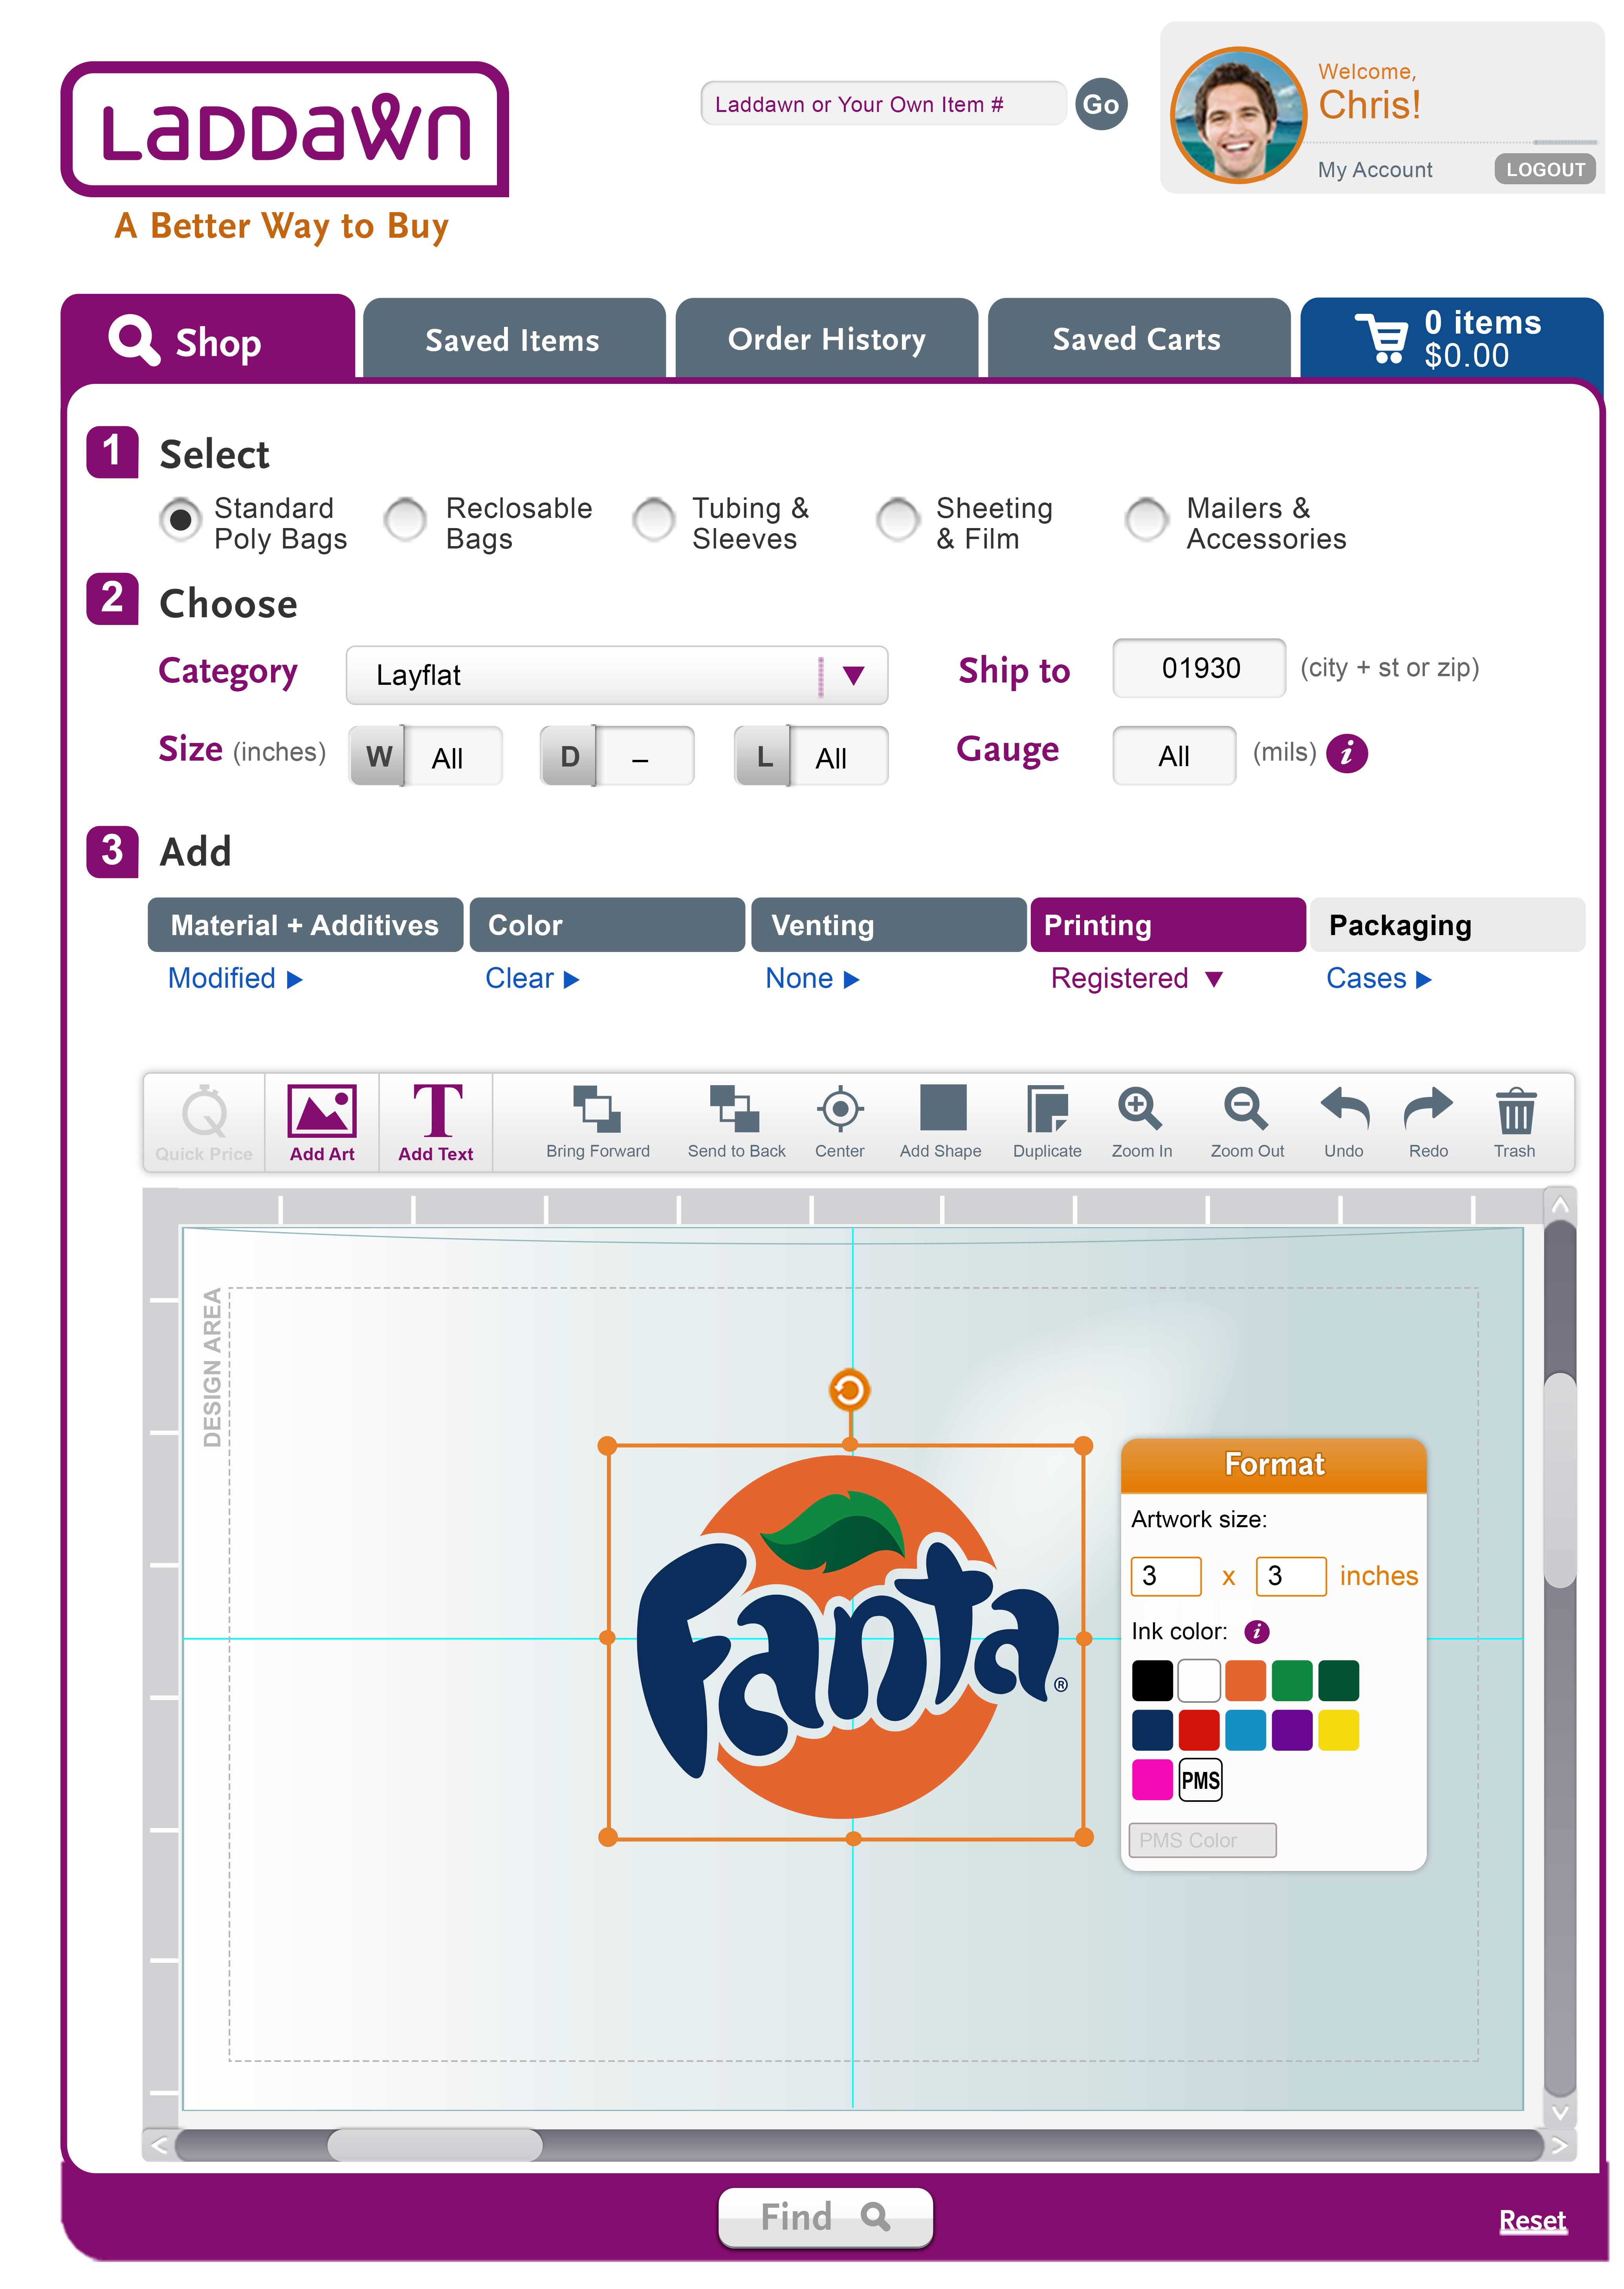
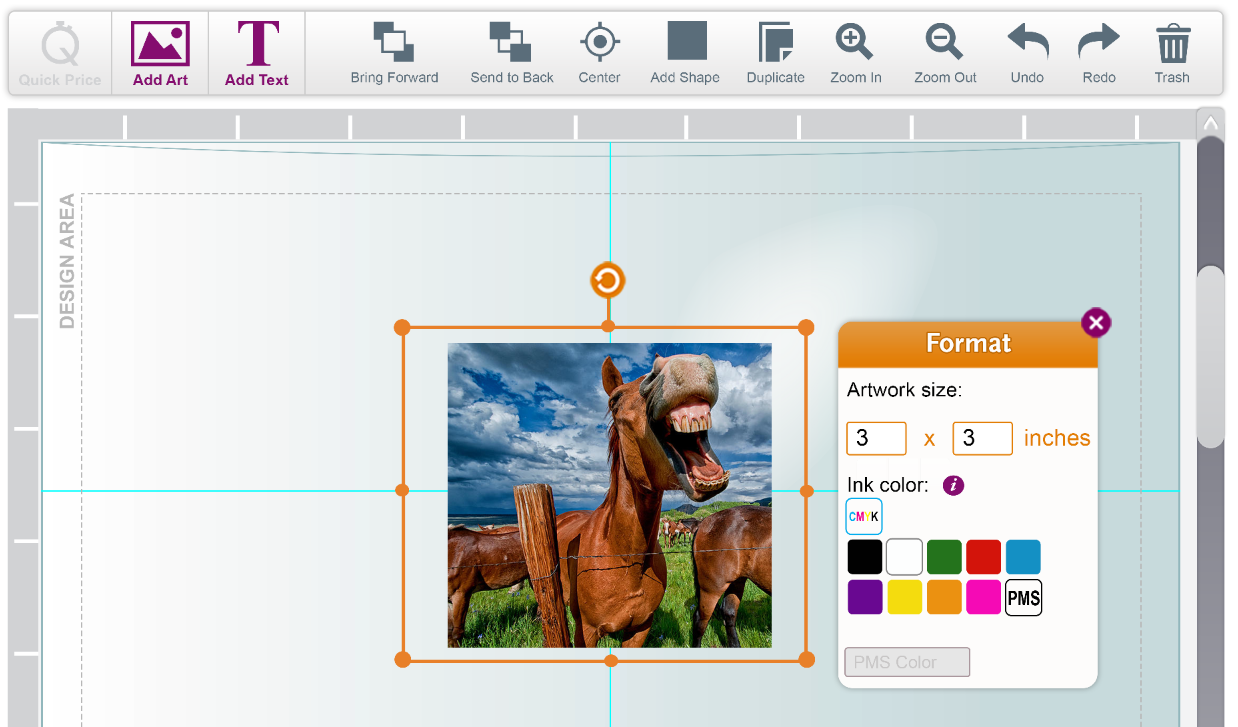
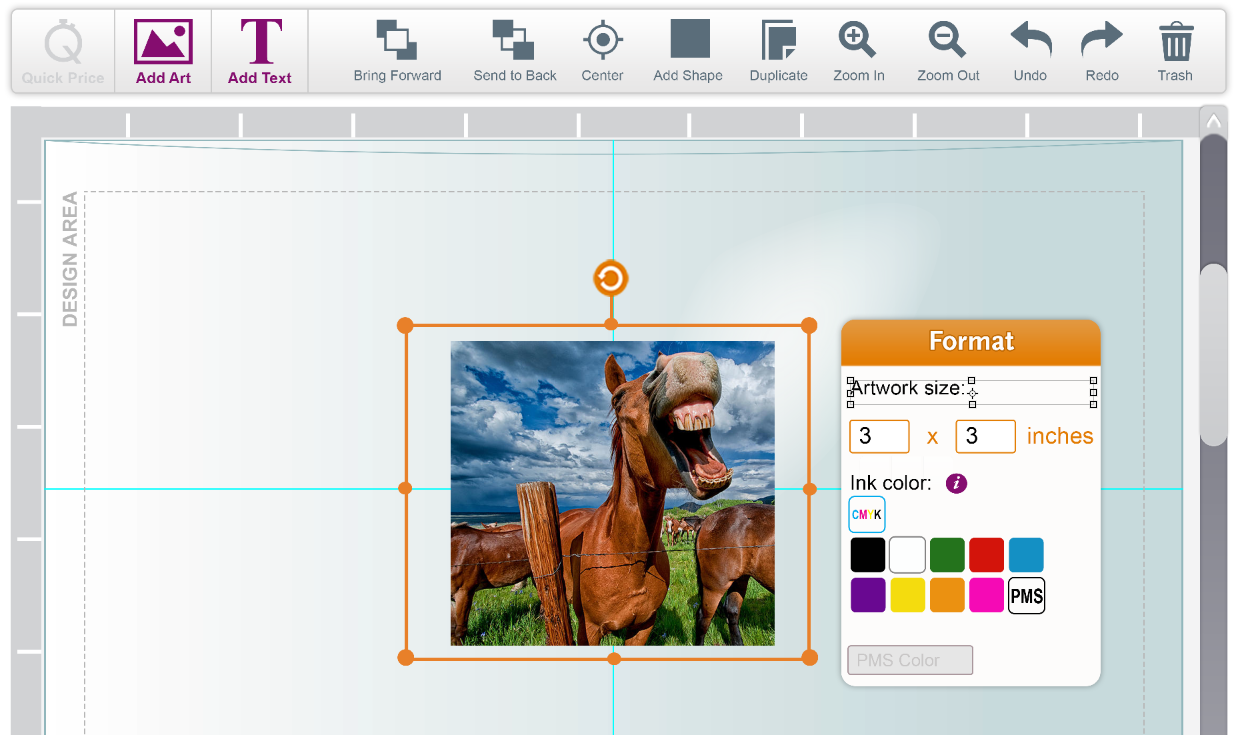
Clicking "Place" from any of the Add Artwork modal tabs lands you back here in the designer, with the artwork in a selected state, centered in the design area, with the Format popup open. The dimension fields are pre-filled with artwork dimensions.
Bill, if artwork exceeds print area, do we automatically downsize it to the max allowed??? Should there be a warning back in the preview-and-place-the-art-I-just-uploaded-screen above? (Bill) Depends on the artwork - if it's a raster image (png, jpg, bmp, etc.) then the image will be resized to fit properly in the area, if it is possible to do so and maintain 300dpi. If it's a vector image, I think the behavior should be to maintain its intended size. If you are trying to put a 12 inch image on a 10 inch bag, it should be obvious to you that it won't fit. (SP) Helpful re raster v. vector. RE "Obvious" - obvious in what sense? Of course, it's obvious if you know it's 12" image you're putting on a 10" bag but what if a) it's close to fitting, and not obvious it won't; b) you're just uploading something from a file and you really don't know it's size (maybe when you viewed it in the file you were seeing it at less than 100%) - I just want to know if there's something we need to design to show what would happen if such attempts are made. We can also just cross that bridge later when we get to it in the programming. Ink color for added art, my art:We show black, white, then up to 4 auto-detected colors. (When greater than 4 colors are detected - including a photograph or CMYK image, we show 4 most dominant colors.) In addition, the auto-detected colors are followed by 5 standard colors (provided by Marketing), and one PMS color entry field. Selecting any one color (or entering a PMS#) will recolor the entire image. Ink color for stock art and add rectangle:We show black, white, the same 5 standard colors as above, and one PMS color entry field. In addition, if other colored art has been placed on the bag, we show up to 4 auto-detected colors from that art. Selecting any one color (or entering a PMS#) will recolor the entire image. If a rectangle is the first image placed, it will default to white, unless the bag is white film, in which case it will default to black. | ||
Content for tooltip is TBD. For now, just show a blank tooltip. | ||
(???) Need screenshot showing what happens when you have selected stock art and change it, or select art that has been converted (plate made), and change it - warning of new plate charge. Or do we need to warn? I think we might have discussed not needing to do this, either ever, or under certain circumstances. Owen, Bill, Haley do you remember? On one hand it might be nice to be notified, at least with stock art, that if you leave as is, your job will cost less. Less sure about "my artwork." Does it matter if it's Reg v. RRP; I thought I've heard someone (Tom?) say that most Reg jobs require new plates even if you're using the same art w/out any changes, so a warning is not helpful. If we're going to warn, we need to capture here (or section v-d below) not just the design/verbiage, but the exact conditions under which we do it. (Bill) I feel like we were going to pop a warning when they selected an existing plate (stock or custom) and did something that was going to require a new plate (rotate <> 180 degrees, stretch, etc.). (SP) Yep, that's my recollection from earlier convesrations, but then in later conversations with Ladd and Dawn I thought we might have entertained not doing this. I could be mistaken. (HB) I feel like Ladd and Dawn were not fans of the warning upon editing the stock or re-ordered art. Did they decide we would put in text in the results and on the quote? Not sure. |


ii. Random Repeat flow and tools
| f. Initial screen | g. get started popup |
Same as Registered above in many respects, with following differences:
|
(Same as Registered above, except with RRP designer in background.) |


h. Quick Price
Same as Registered Quick Price except:
Text on hover over 'i' symbol to show min, max and most requested sizes same as for Registered above. | i. Add Art
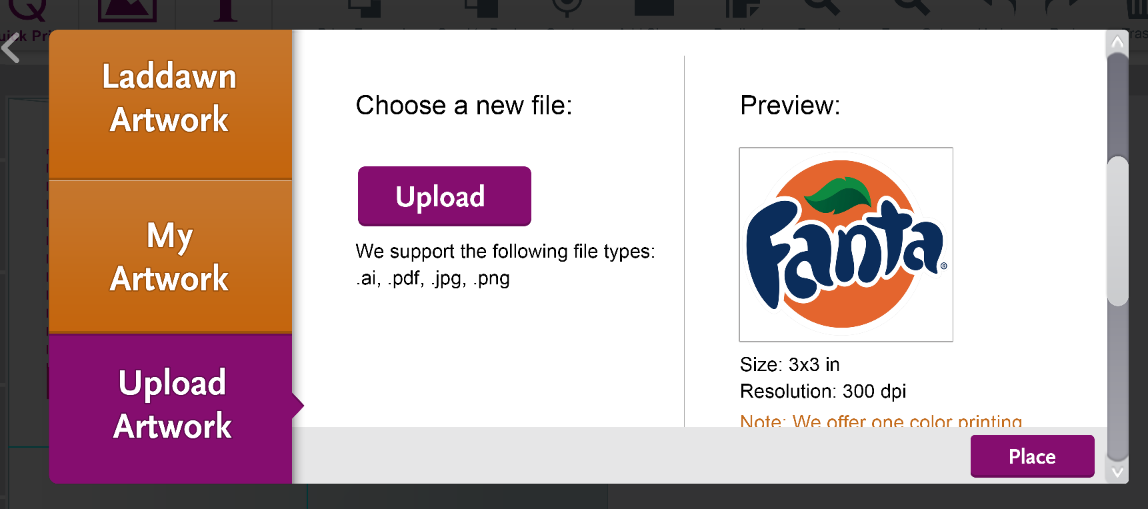
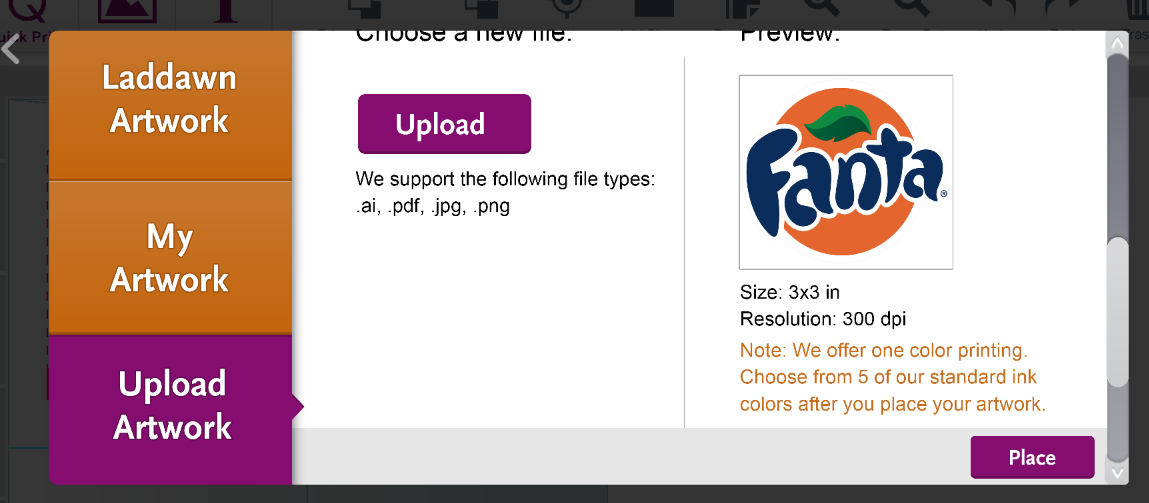
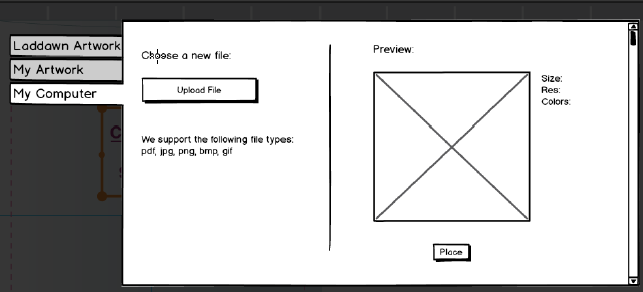
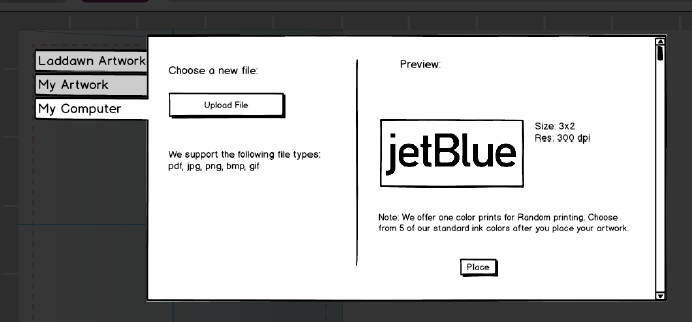
Everything is the same as for Registered Add Artwork popup above (on all 3 tabs), except for verbiage we added to the upload/preview/place screen (verbiage shown in 2d and 3d screenshots below).
Preview will reflect the actual colors of the artwork. When we bring it into the RRP designer, it will be defaulted to the first available color (black for most film colors; white if the film is black).
| j. Add Text
Behavior similar to Add Text for Registered, except for all the RRP differences (design area, repeat image, spacer tool, ink colors). If text is the first art placed on the bag, ink color defaults to first color that is allowed this this color film (in this example, black).
|
After placing uploaded artwork. Size of uploaded image is detected. Color defaults to first ink color that is allowed this this color film (in this example, black). Spacing defaults to minimum increment. If additional art, text or a rectangle is placed, it defaults to the color of the last image placed. Changing color on one image (art, text, rectangle) changes the color on any other images within the design. If a rectangle is the first image placed, it will default to white, unless the bag is white film, in which case it will default to black. | ||

iii. Tools
Rotate tool
When the user hovers over the rotate tool, and when they click and drag it, the mouse pointer appears as a semi-circular, two-pointed arrow.
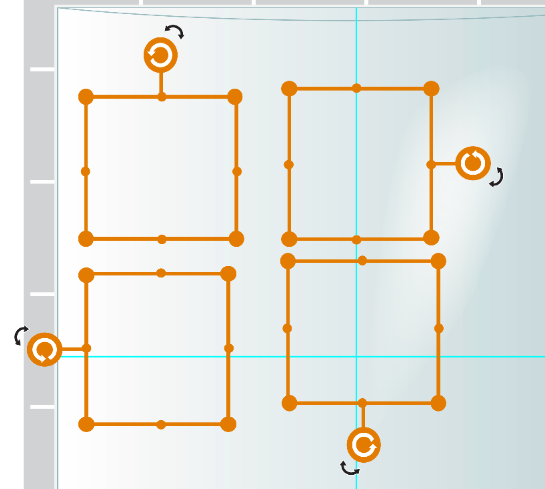
After clicking and dragging, the rotation position will snap to the closest 15 degree increment. If the user rotates an image, for which a plate exists, 180 degrees, they will not need a new plate. Any other rotation necessitates the creation of a new plate.
Toolbar buttons - functions and states
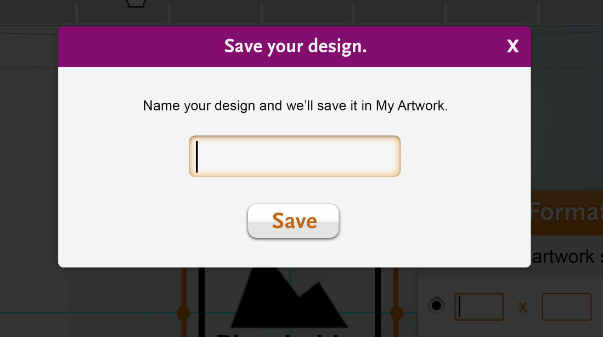
iv. Saving user-generated artwork
If the user has placed their own art and/or text on the product in the designer, or used Laddawn stock art and modified it, upon clicking "Find," the entire artwork composition will be saved to "My Artwork." At this time, a custom plate number will be assigned to the art. NOTE: We will no longer require users to provide a name (aka description).On 7/20, we reversed an earlier decision to include a save button in the tool bar, and to require the act of saving as well as giving the artwork a name (description).
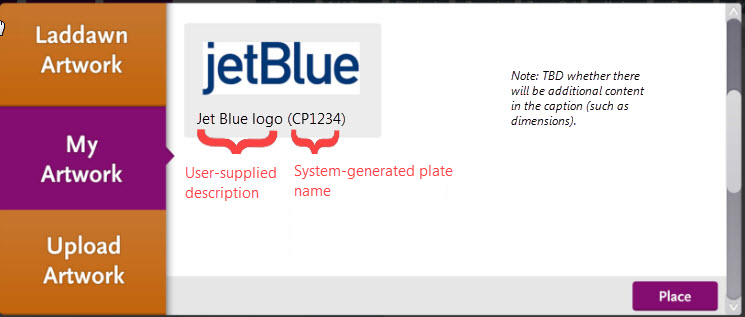
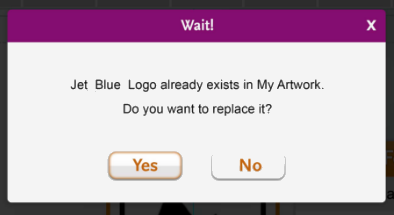
Until a quote is created and converted with this art, or a second quote is created, the user can continue to make changes to this artwork under the same plate number (CP####). After a second quote is created or the first quote is converted (whichever comes first), the user may reuse the art and plate on other products, but they will not be able to make any changes to that artwork under the same plate number. If changes are made on art that has been converted or used on more than one quote, this is treated as new art and it will be assigned a new plate number and become its own entry in "My Artwork." Q: It is my understanding that you can rarely reuse plates on registered jobs. What if there are no changes to the art, but new plates are still required? Will multiple plates be associated with a single artwork composition? I think Tom or Owen may have said that although technically a new plate is required, if we've charged them for one already, the new plate will be gratis. Need to confirm. -SP
The dimensions of the art, along with CP#, will show as a caption to a scaled version of the artwork in My Artwork; when hovering over artwork or selecting it the background will be gray.
v. Error messages
Don't know if the error messages should be in their own section or worked into the sections above. But for now wanted to list them out. -SP
a. Clicking Find without any design choice
"You chose <Random Repeat Printing/Registered Printing> but you have not made any printing selections. Would you like to revert to no printing?" Yes/No (Yes reverts to none, No, brings knucklehead back to designer in its "Click to here to get started" state.)
b. Clicking Find without entering any dimensions for "Quick Price"
"We need some dimensions in order to provide a Quick Price." Simple "OK" button. Clicking it places you back the design with Format popup, with focus on first dimension field.
c. Warning when resizing artwork that is already on a physical plate
See questions above about whether or not we need these.
d. Other?
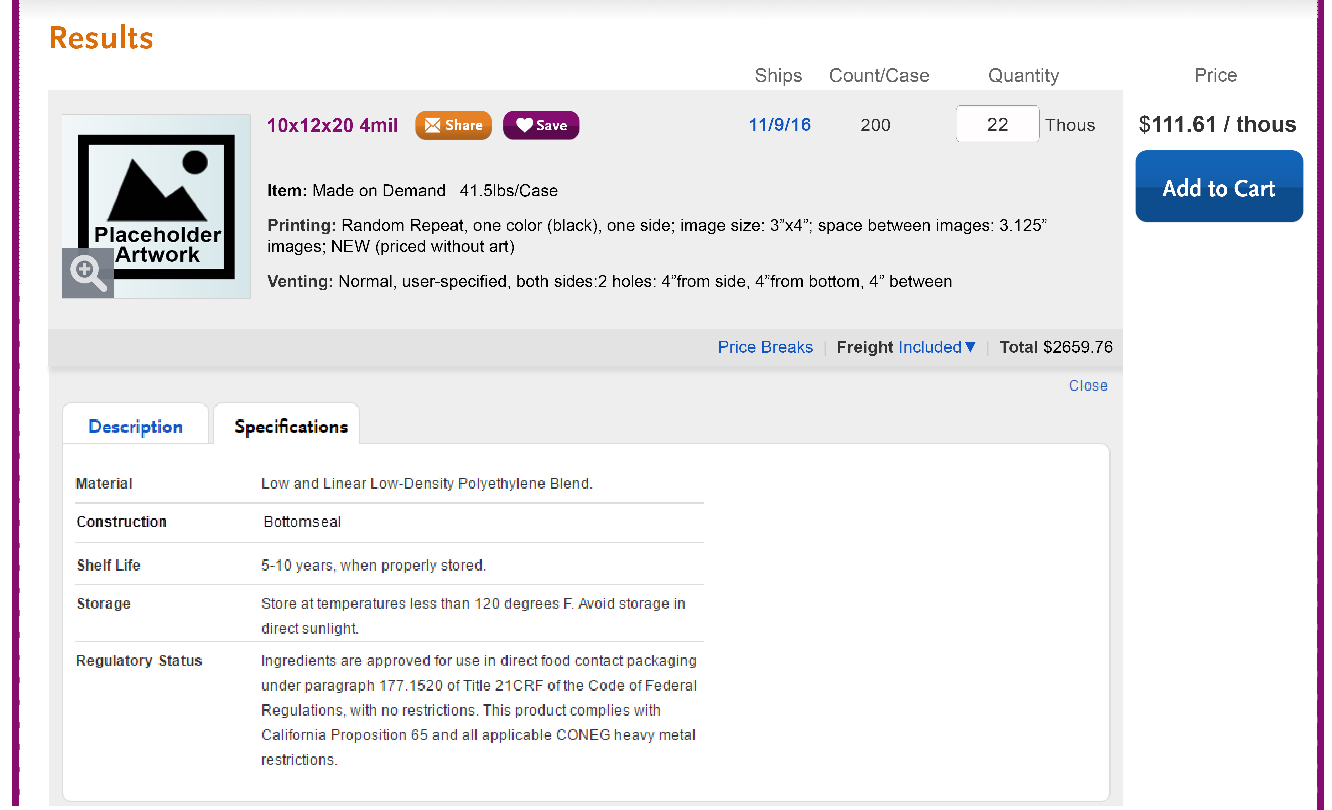
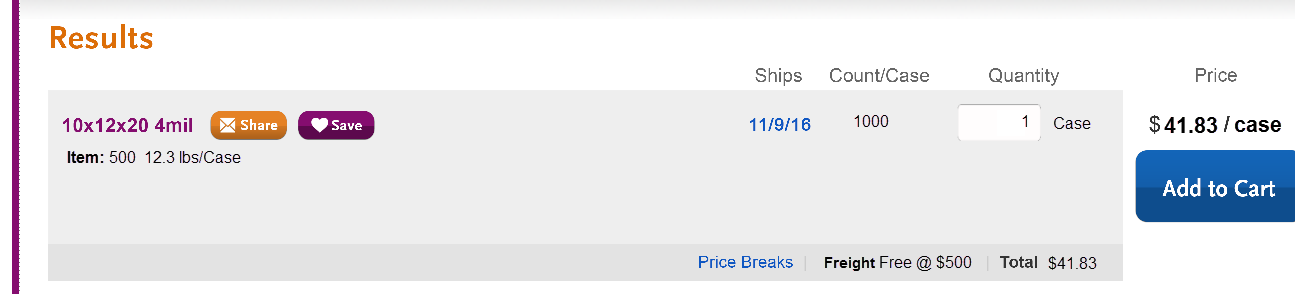
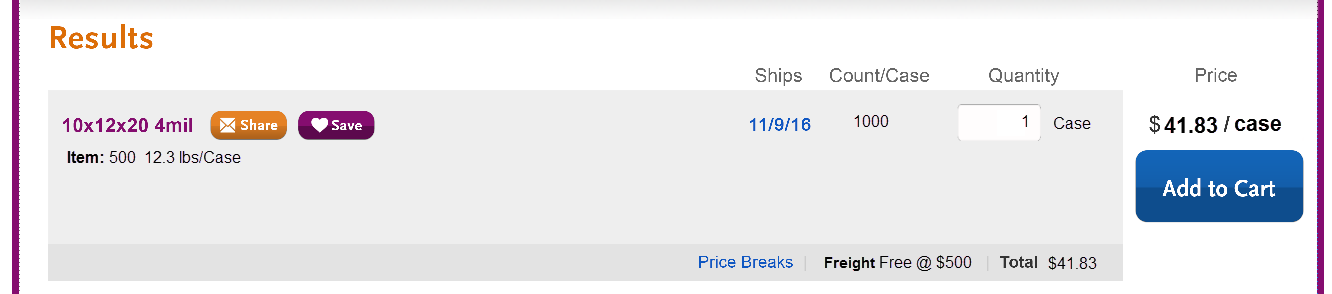
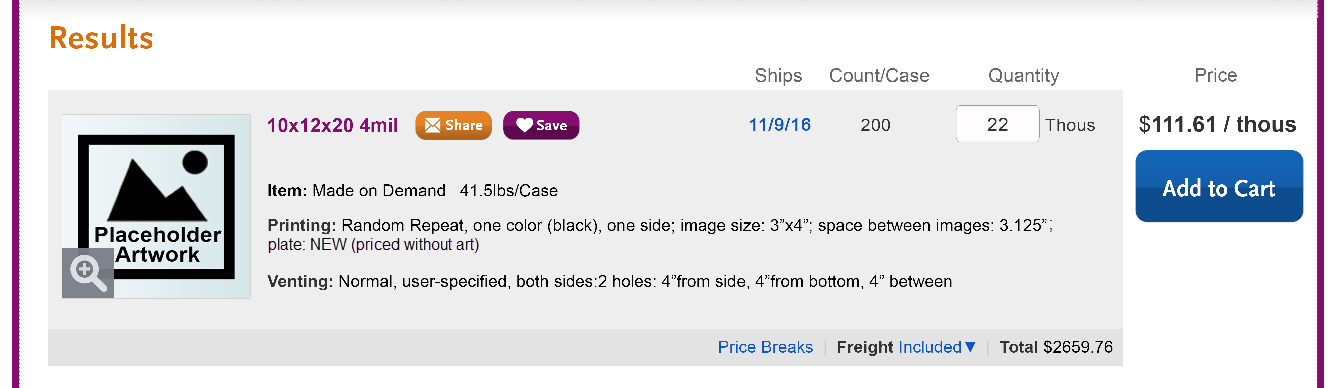
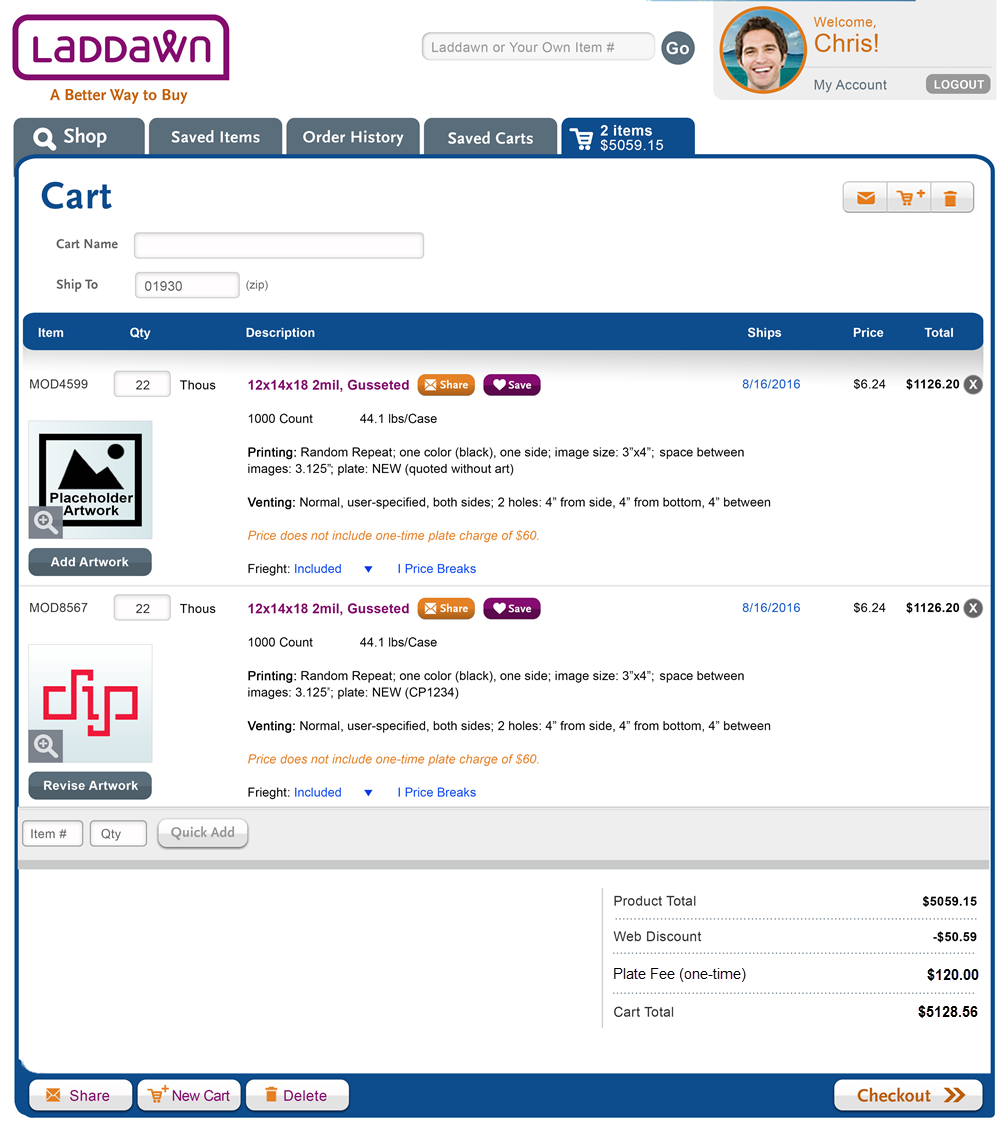
C. Results after clicking Find
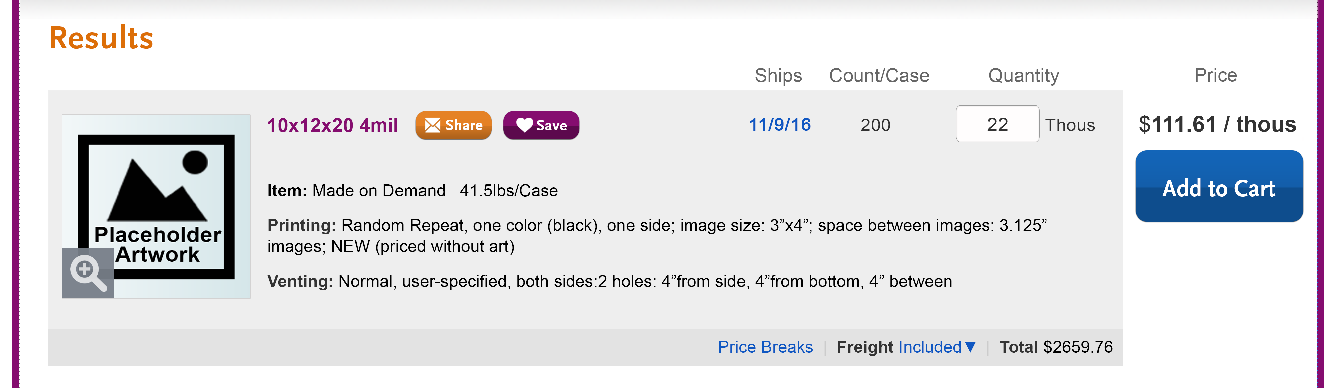
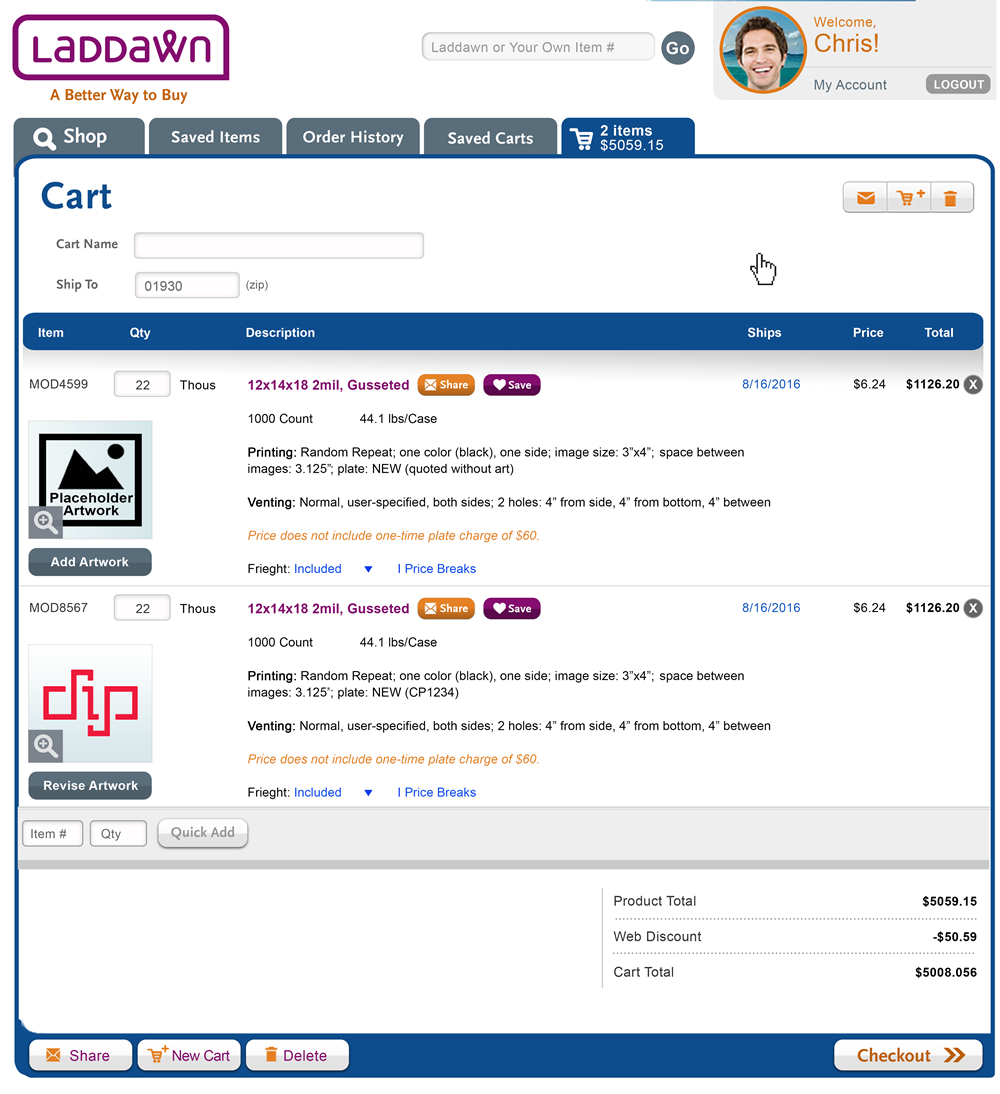
Changes to current design
- Wider width
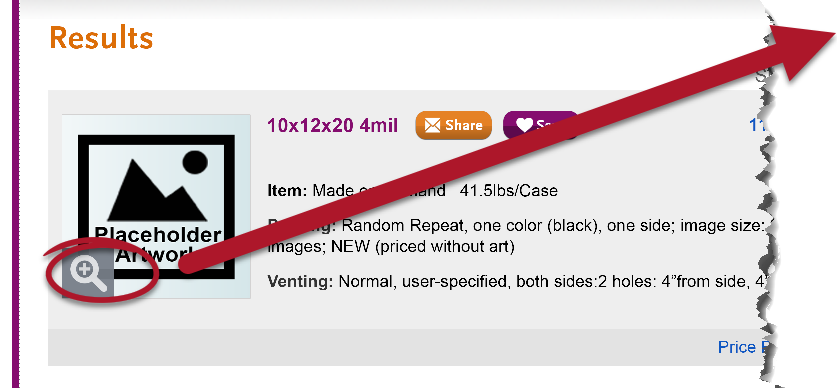
- Thumbnail to left of item details. Clicking on thumbnail opens technical drawing (details follow below). Thumbnail itself displays close up of art (not full schematic of bag); very wide or very tall graphics are cropped if necessary to show well within these small, square dimensions.
- Availability moved from item details to its own column; referred to as Ships. Bolded date opens current availability popups (display of date and content of popups to be revised after Release 1).
- Increased prominence of share and save through placement and button design.
- Rearrangement of various elements - price breaks, freight, total $.
- Enlarged add to cart and changed visual treatment.
- Eliminated column head for Unit; center Quantity over quantity + UOM.
- Spell out "thous"; "case" and "roll" for unit price in price column.

A result without printing
No thumbnails. All the content shifts to the left

Printing configuration details
Random Repeat
Printing: Random Repeat; one color <(ink color)>, one side; image size: <w”> x <h”>; space between images <n">; plate: <plate number> or NEW - (<"priced without art" or "CP####">)
Example – new plate, quoted without artwork:
Printing: Random Repeat; one color (black), one side; image size: 3" x 4"; space between images: 3.125"; plate: NEW (priced without art)
Example – new plate, quoted with artwork:
Printing: Random Repeat; one color (black), one side; image size: 3" x 4"; space between images: 3.125"; plate: NEW (CP1234)
Registered
Printing: Registered; <number> color(s); one side; image size: <w”> x <h”>; plate: <plate number> or NEW - (<"priced without art" or "CP####">)
Example – using existing plate:
Printing: Registered; two colors, one side; image size 3" x 4”; plate: CP0227
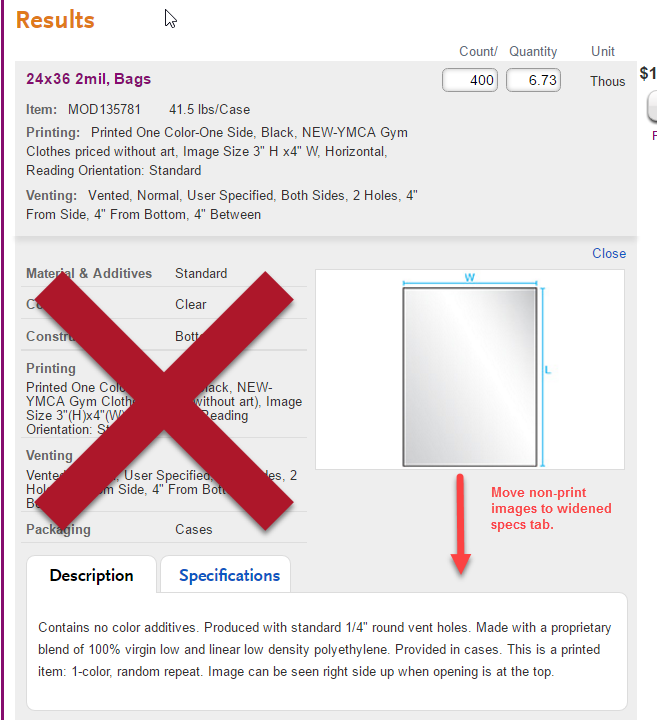
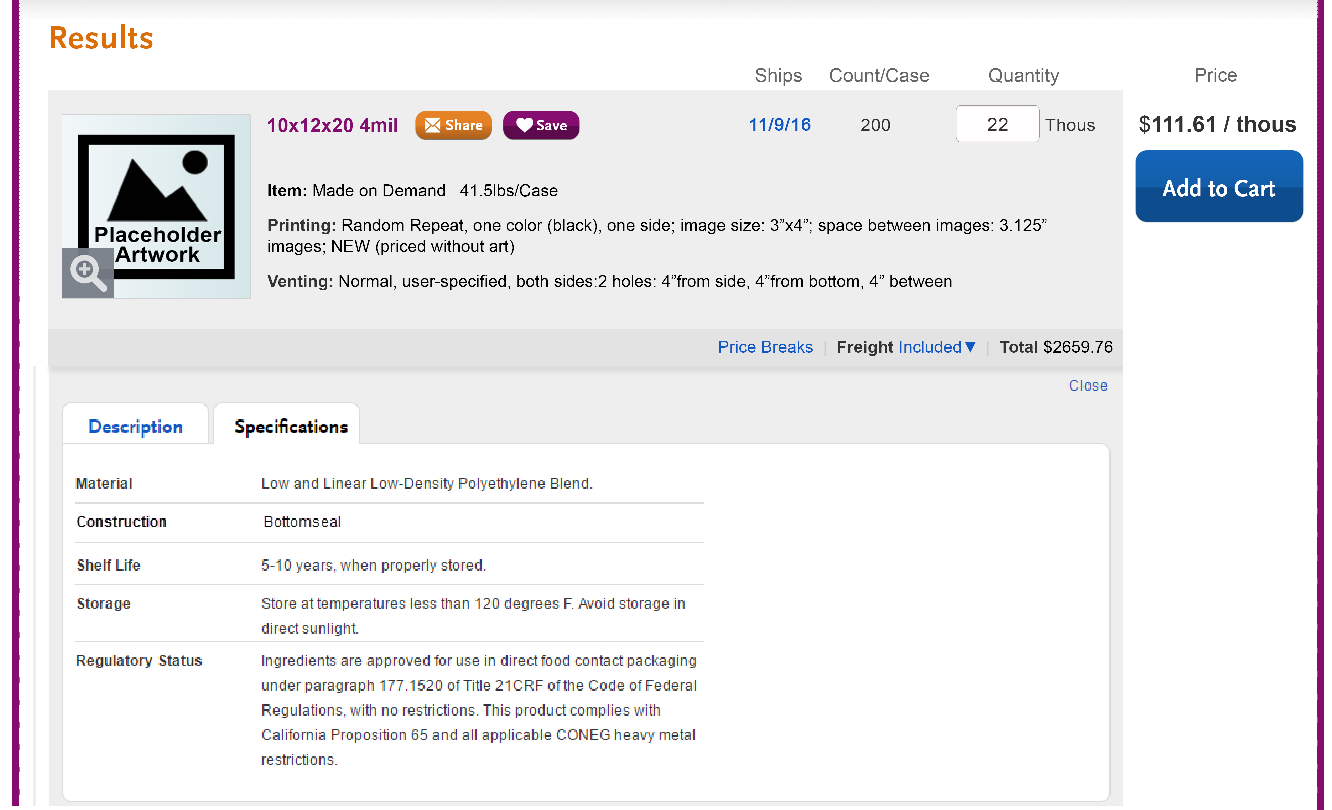
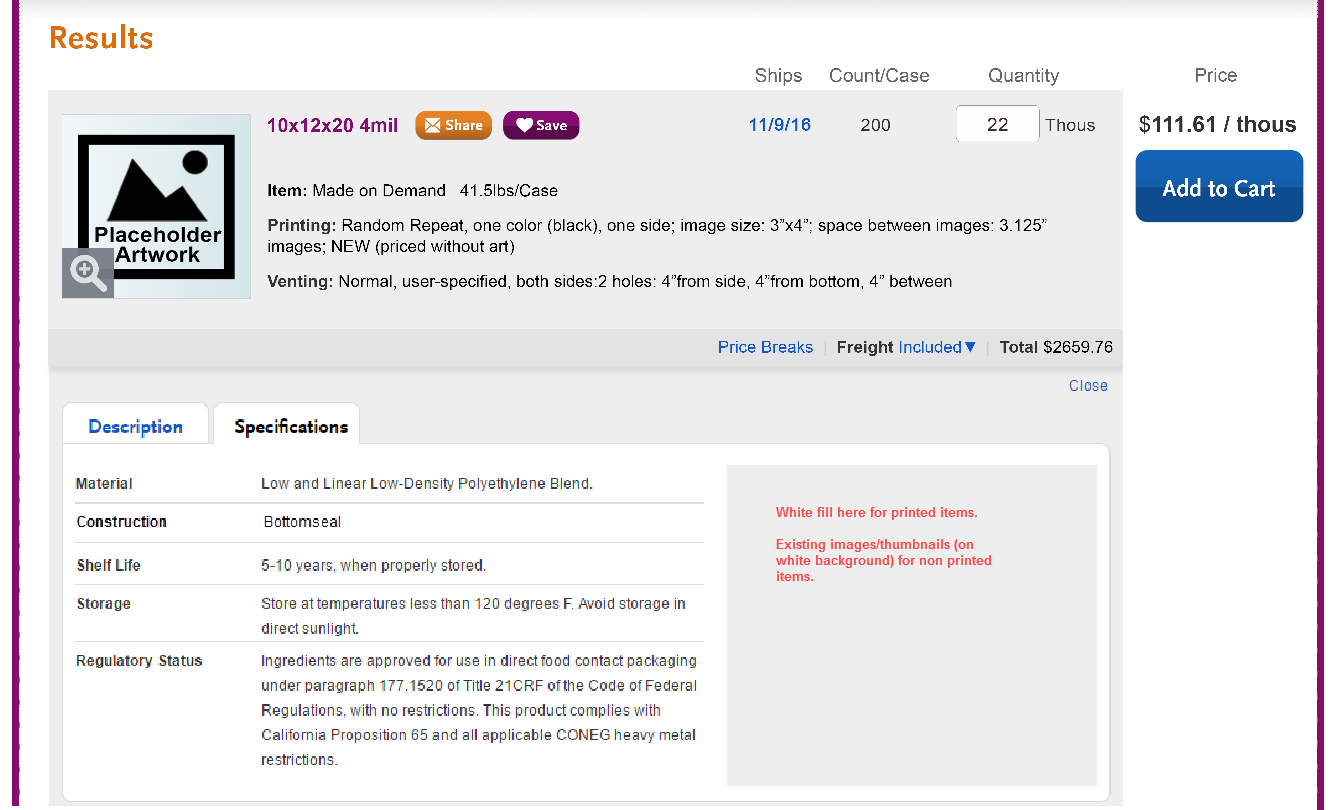
Changes to expanded results
- Eliminate second details section.
- For non-printed items only, move current thumbnails/drawings/photos ....
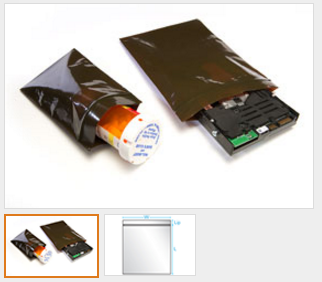
... to space within widened specifications tab (shown below).
- Add line for construction to specifications tab as shown below (after Material).
- Keep line with price breaks/freight/total above the expanded description.
| Current | Proposed |
|
|

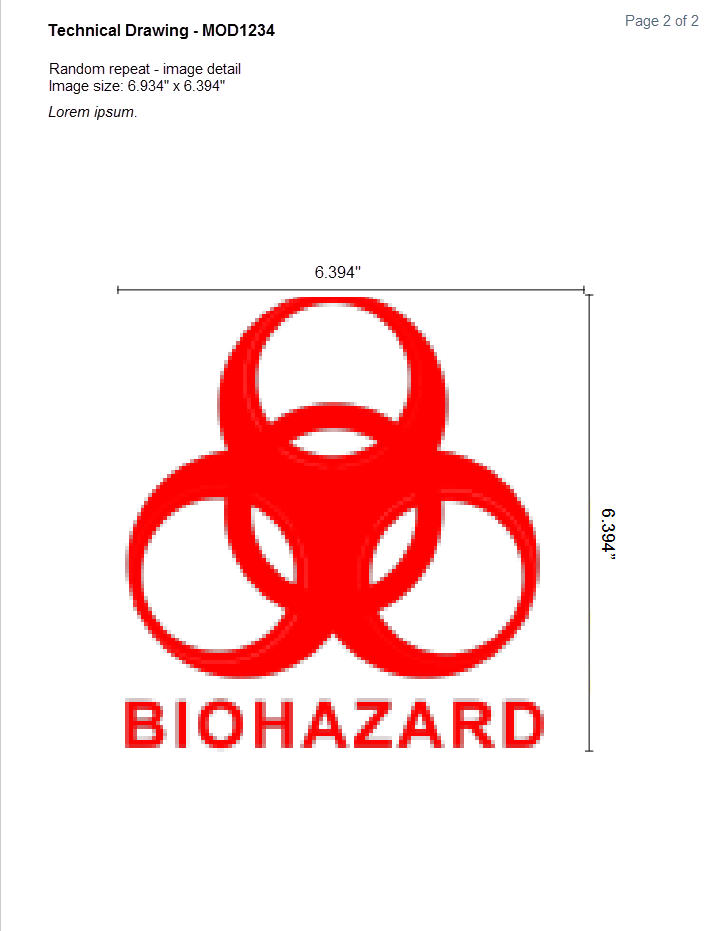
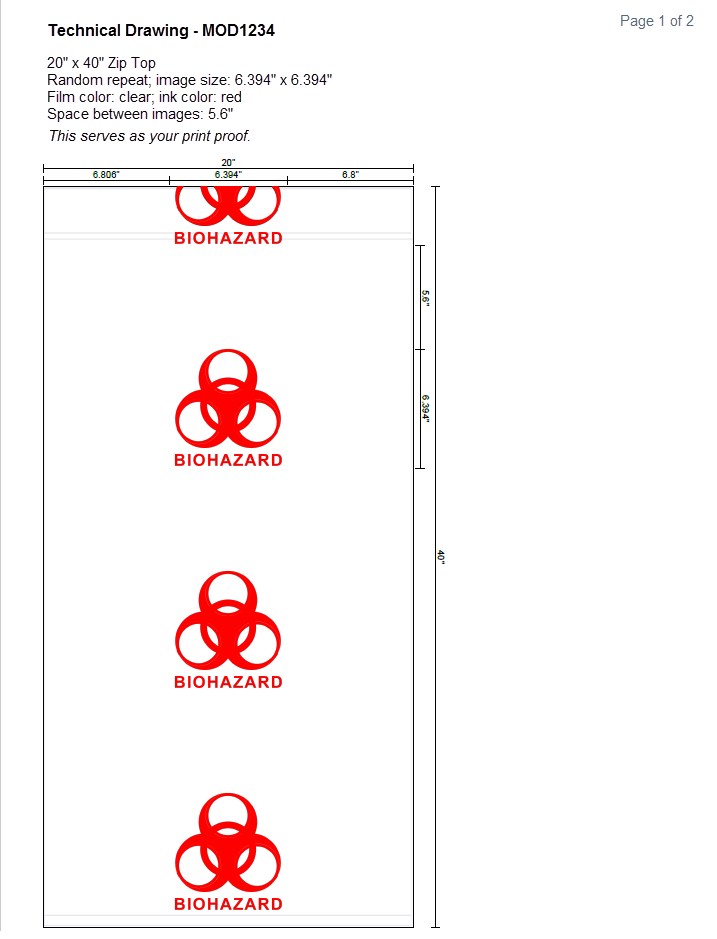
D. Technical drawing
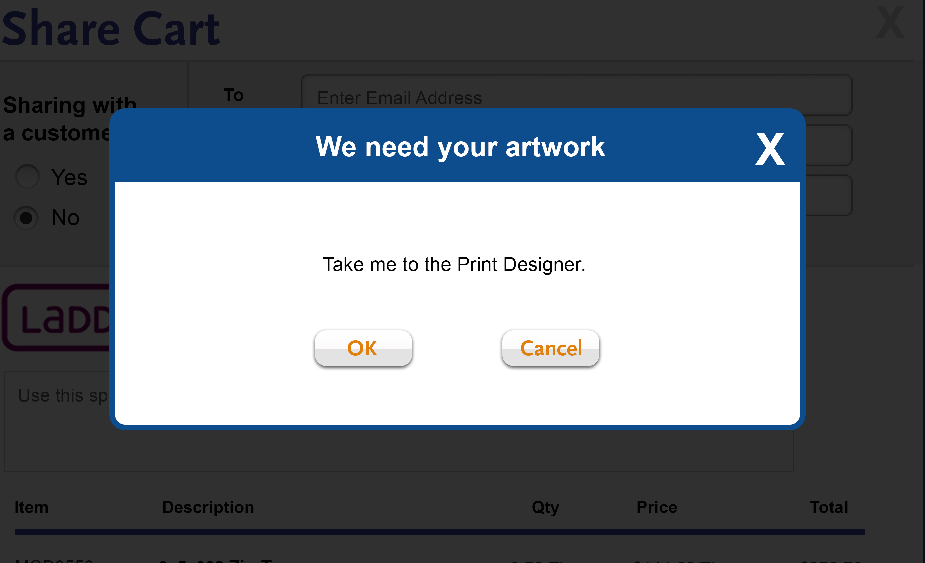
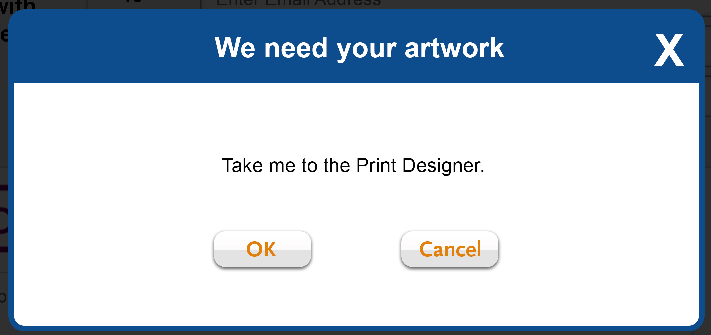
The technical drawing serves as the print proof. It will be served up online via popup, and via email as a PDF attachment.
Pop-up preview of technical drawing
Clicking the magnifying glass where it appears with the thumbnail...Please imagine that this thumbnail is a red biohazard symbol. | ...opens a pop-up that serves as a preview of the PDF.It includes some text guiding the user to share the item (as an item or in a cart), in order to get a PDF of the drawing. Please replace "Lorem Ipsum" with this generic scaling language: Larger images are scaled to fit the screen. Image will print to dimensions shown. |
|
|
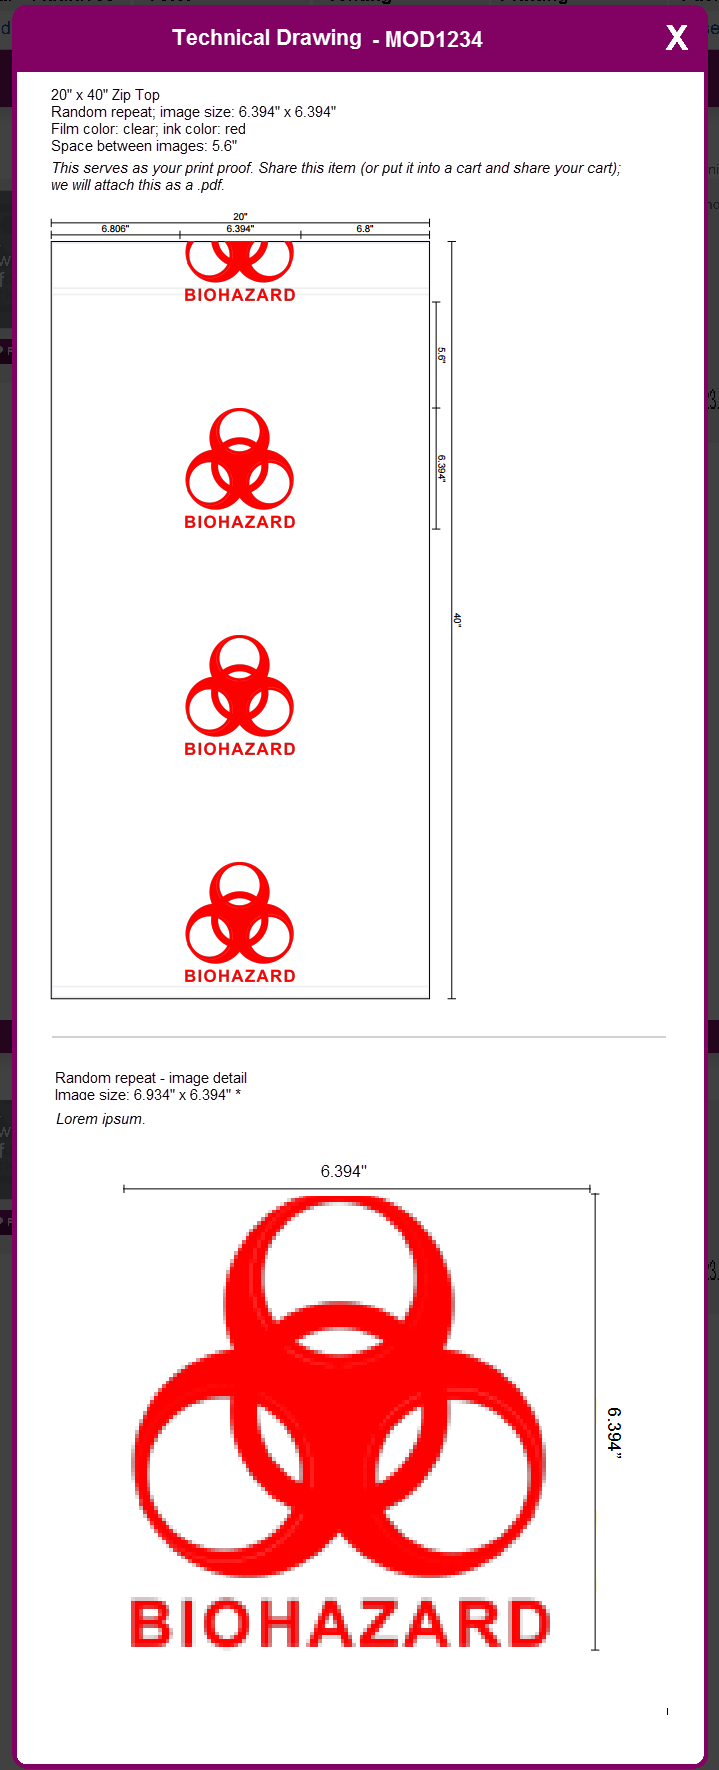
PDF version of technical drawing
Page 1 - product drawing | Page 2 - image detailWhen we know the art has been scaled down, please replace "Lorem ipsum" with this text: Image has been scaled to fit an 8.5" x 11" page. Image will print on the product to dimensions shown. When we know the art is actual size, please replace "Lorem ipsum" with this text: Image shown with actual dimensions. |
|
|

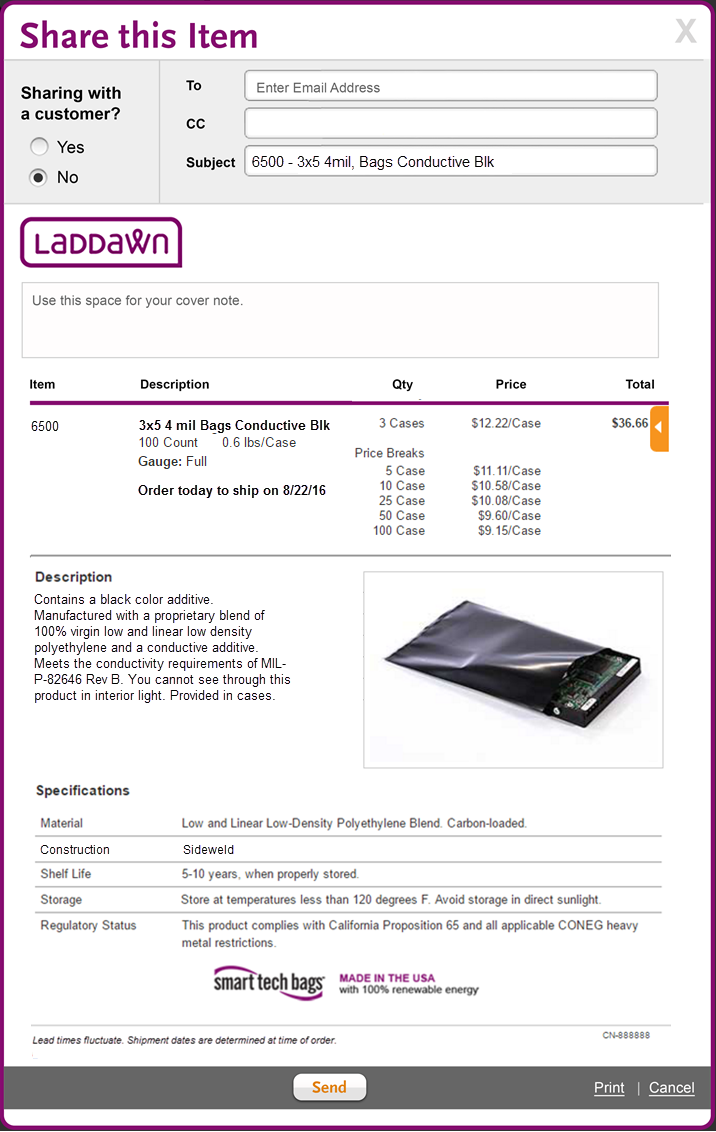
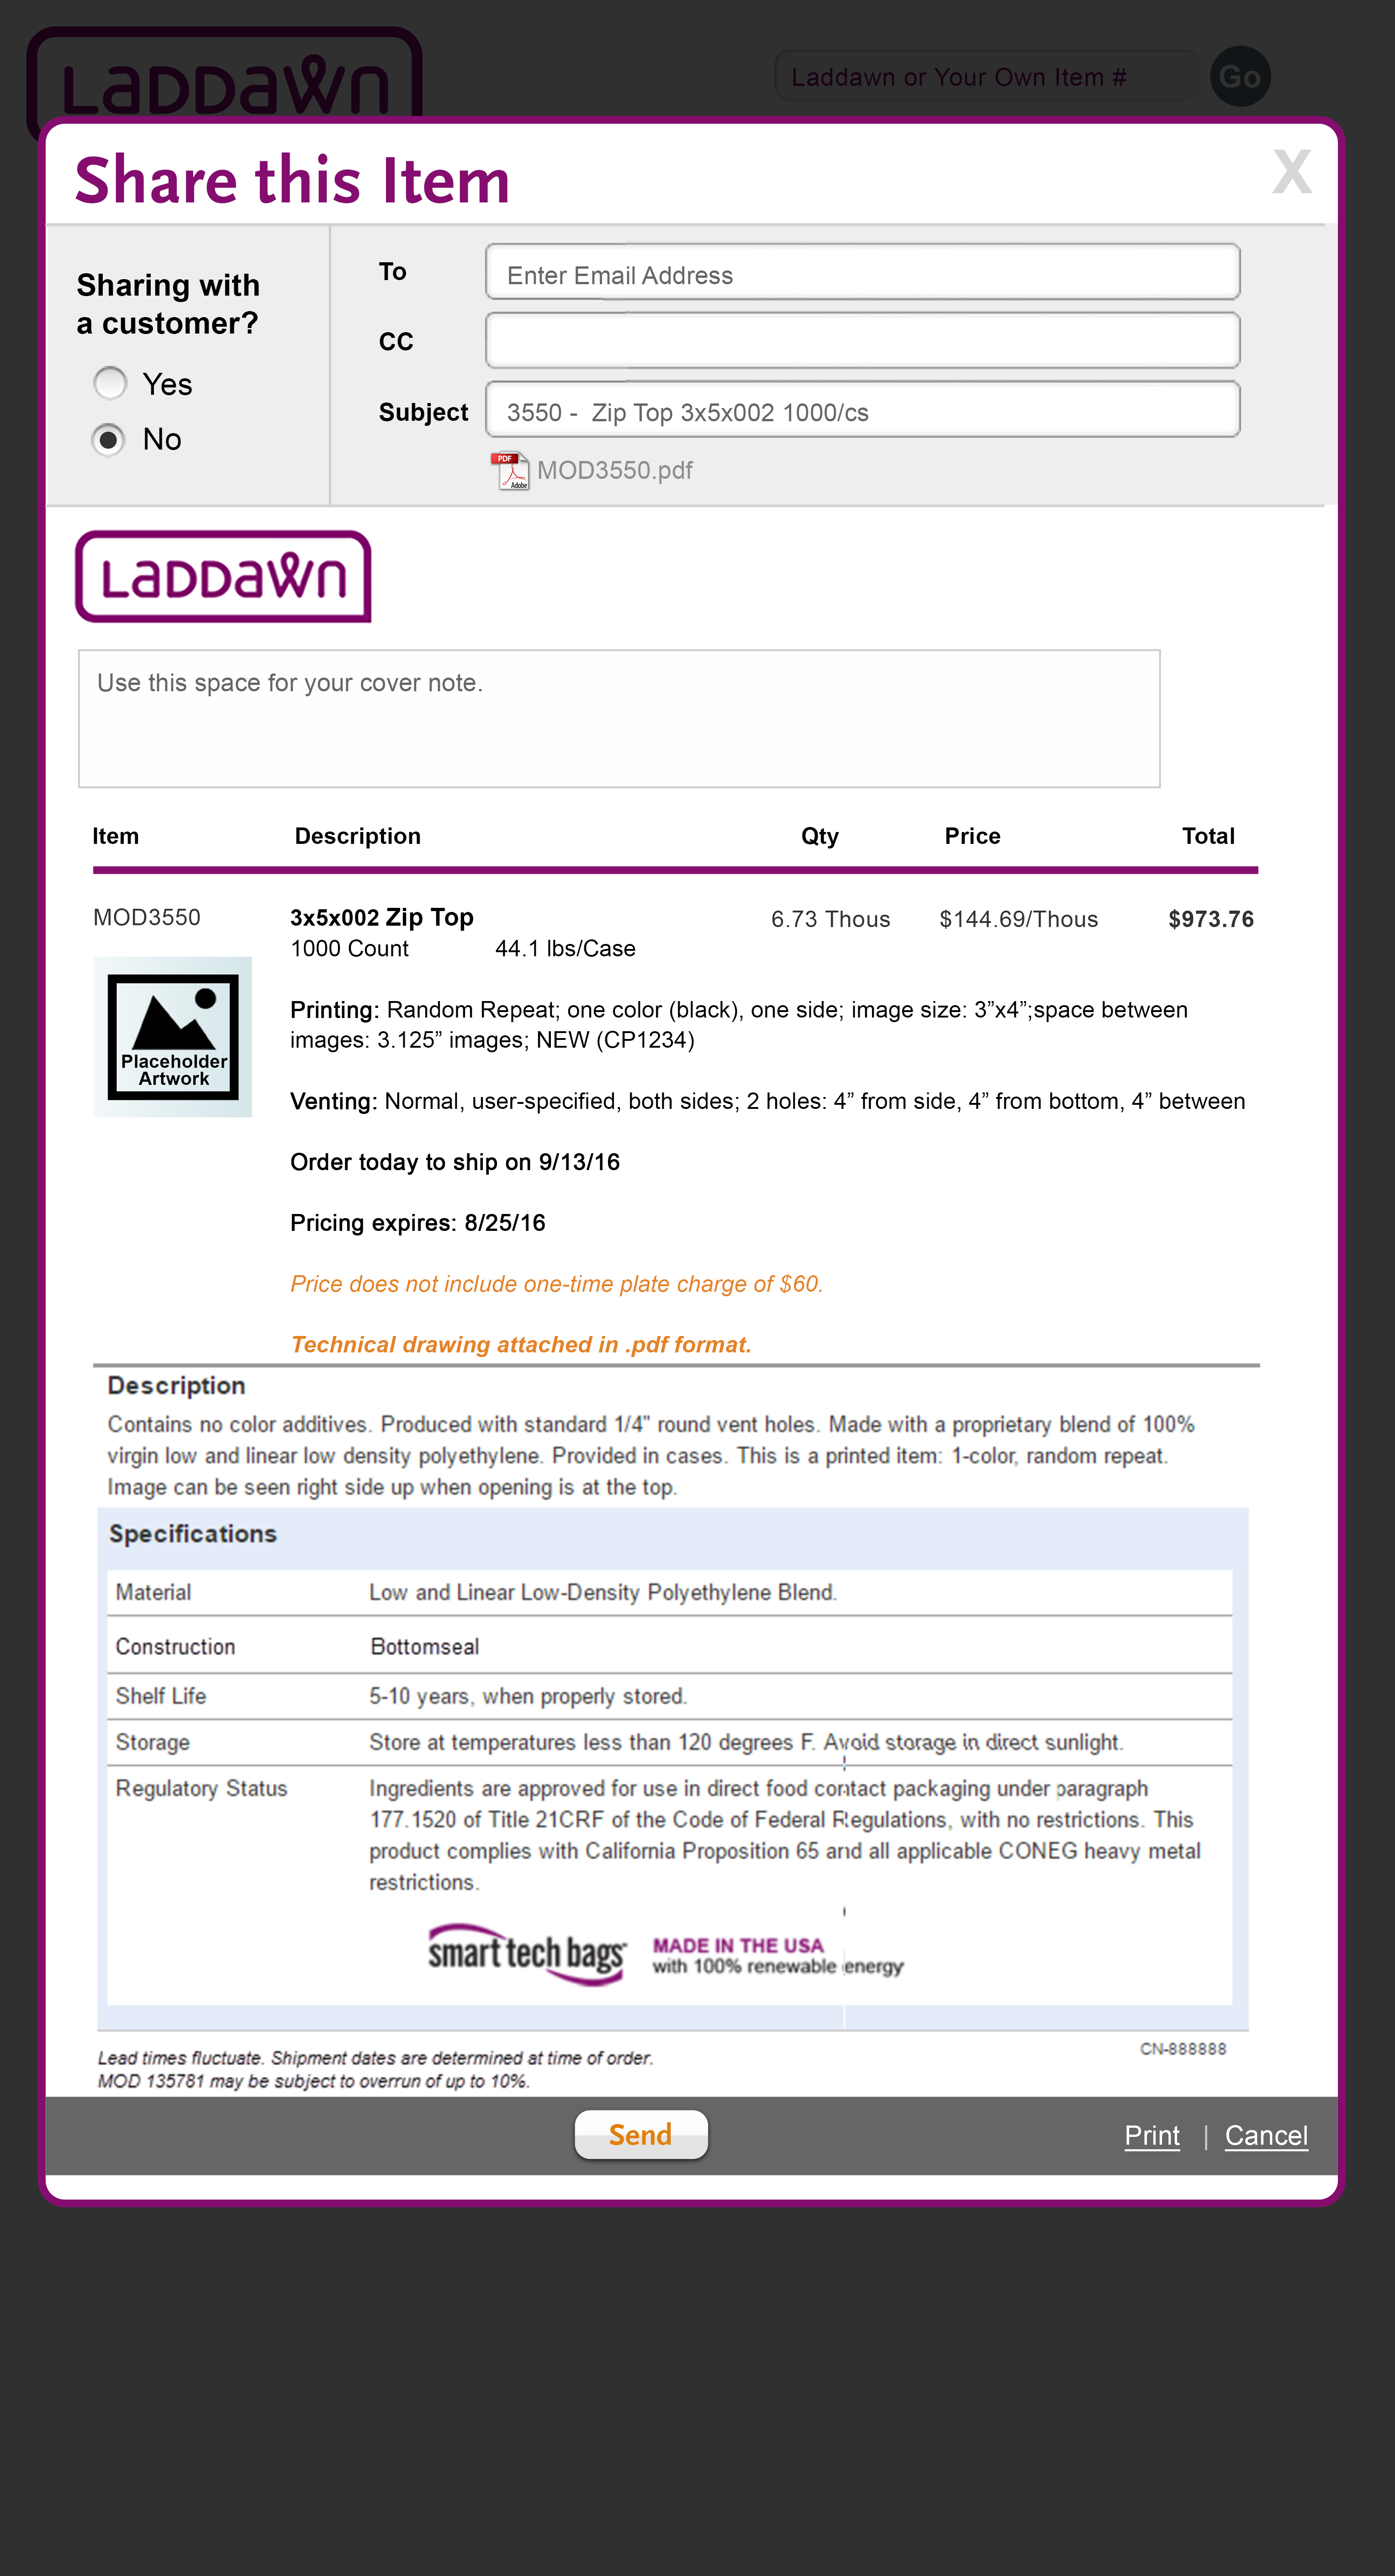
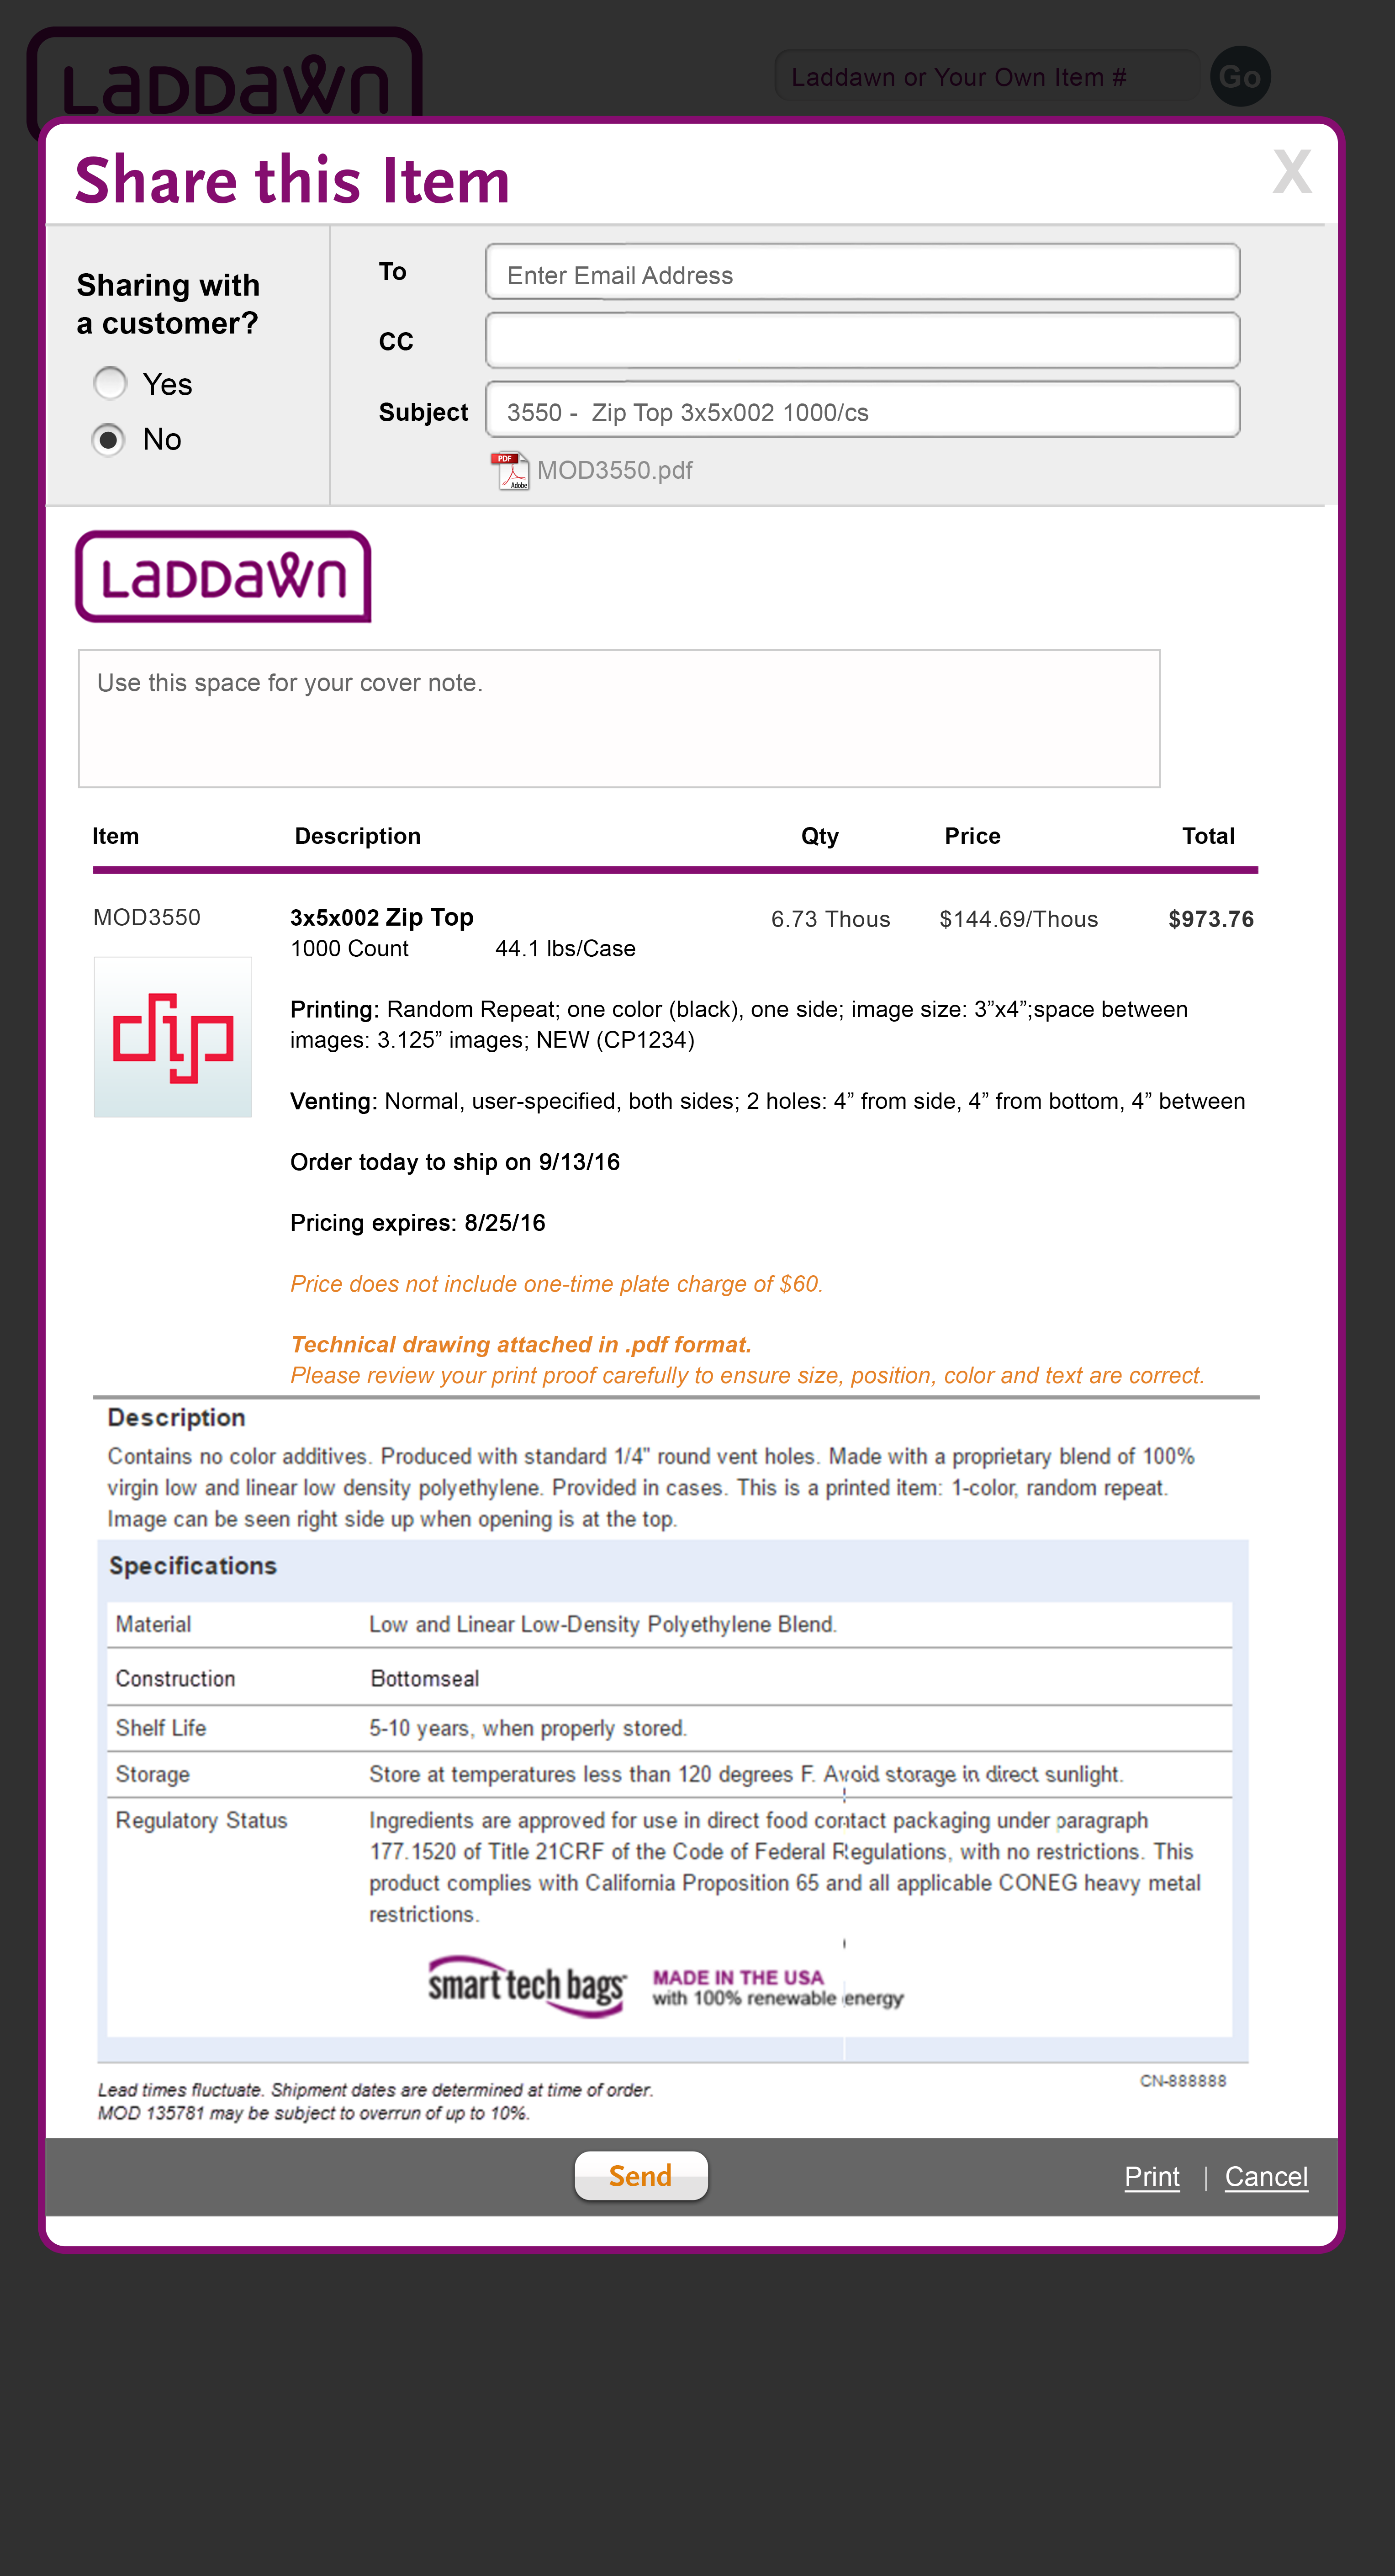
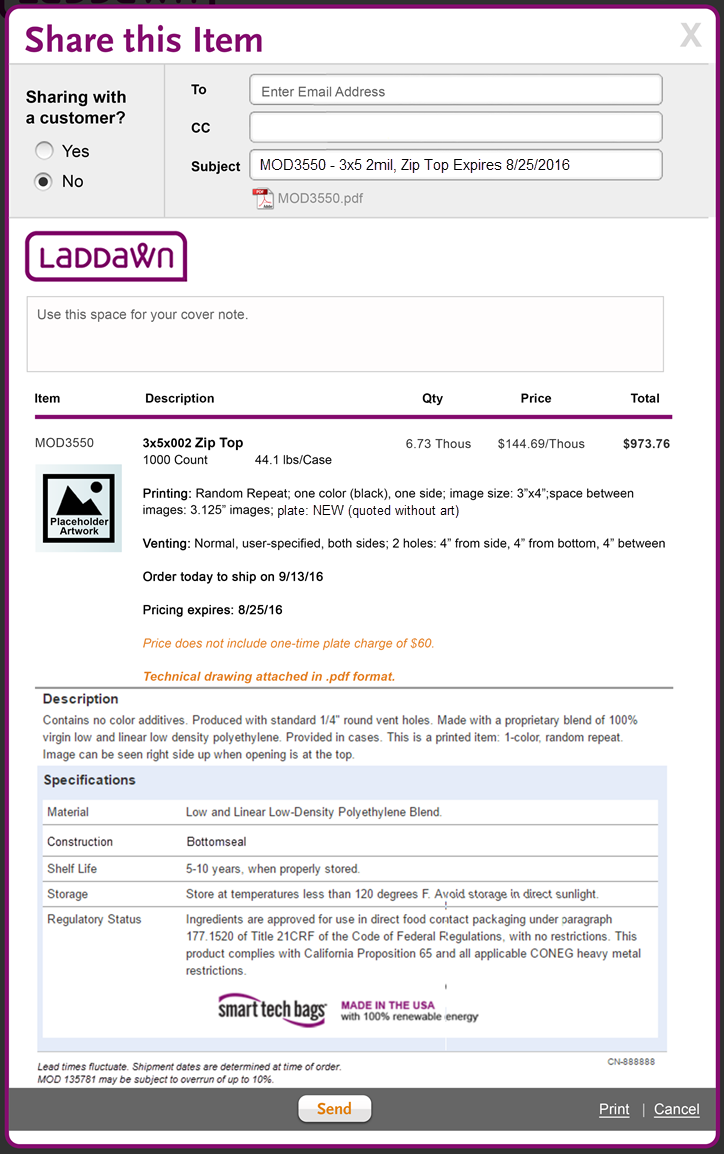
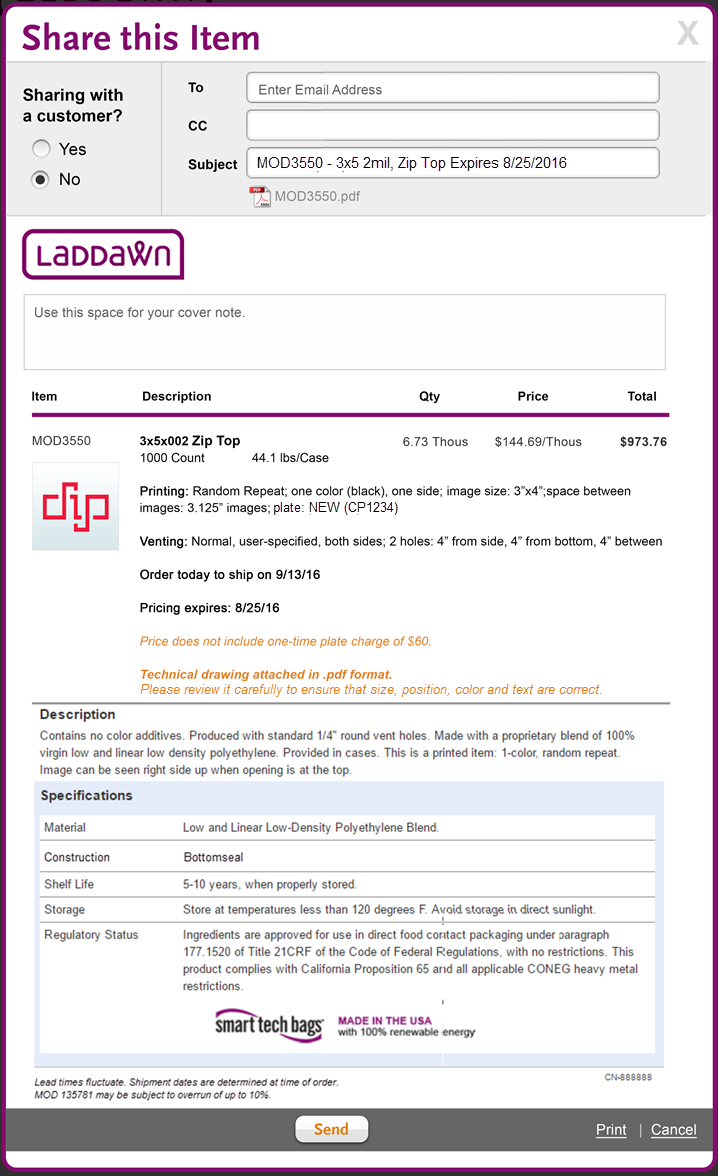
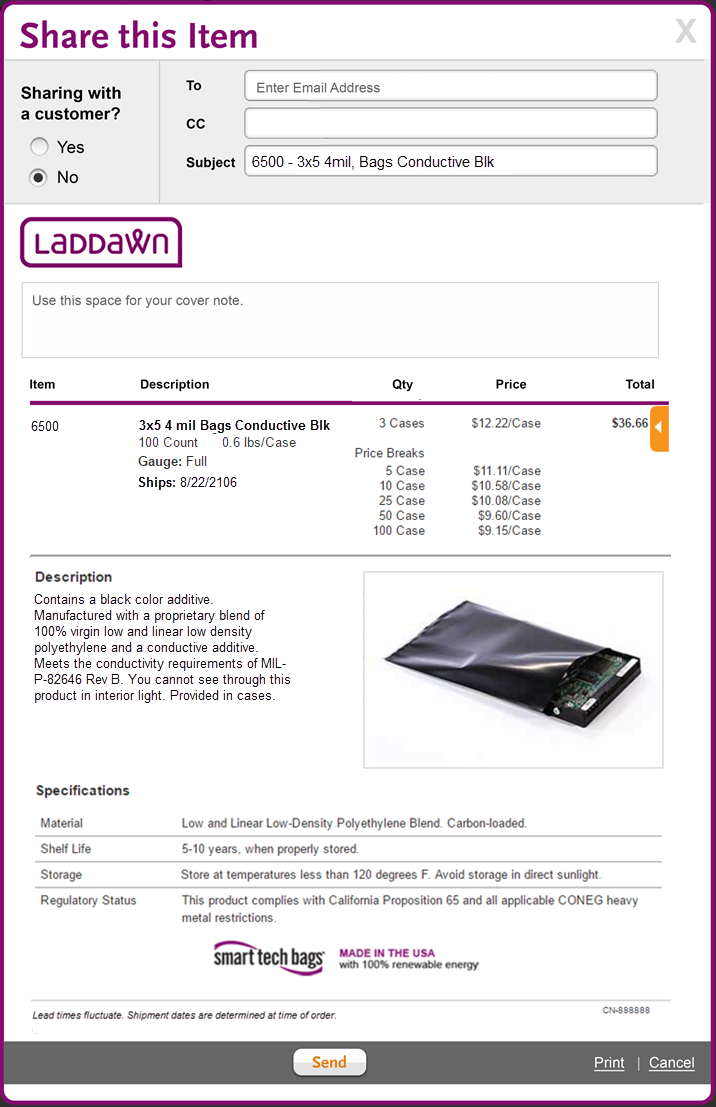
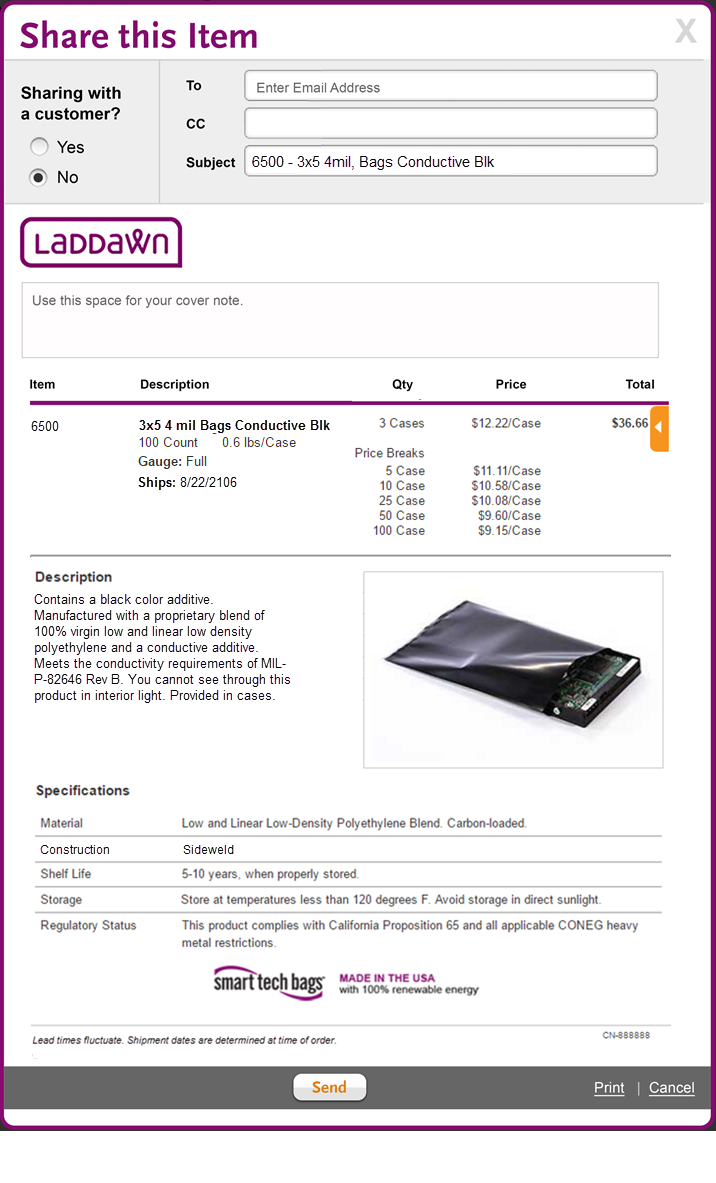
E. Share item
Sharing item, priced without artTechnical drawing attached. Static indicator below subject line. File name = MOD number. "Order today to ship on..." | Sharing item, priced with artSame as sharing without art, except for additional line of text - "Please review..." | Sharing an item without any printingWritten description only wraps halfway; image add to right of written description. Question: Why is there blue shading around specifications for MOD and not stock? We'd like it to be consistent; if possible remove all blue shading. |
|
|
|


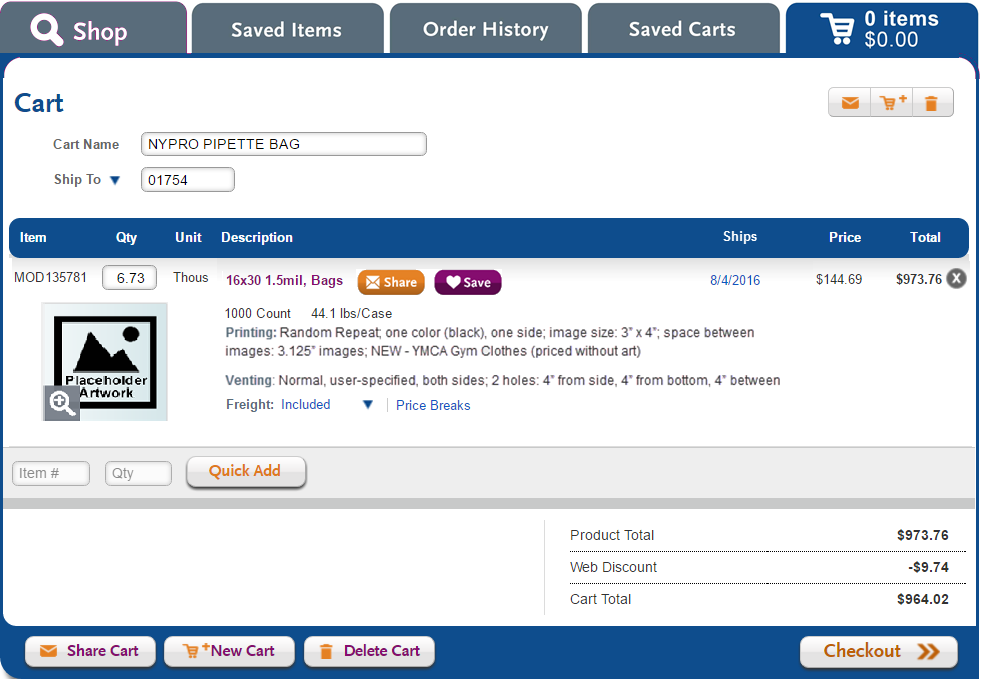
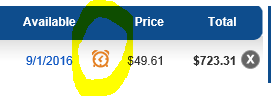
F. The Cart with printed items
|
|
|
|
|
|


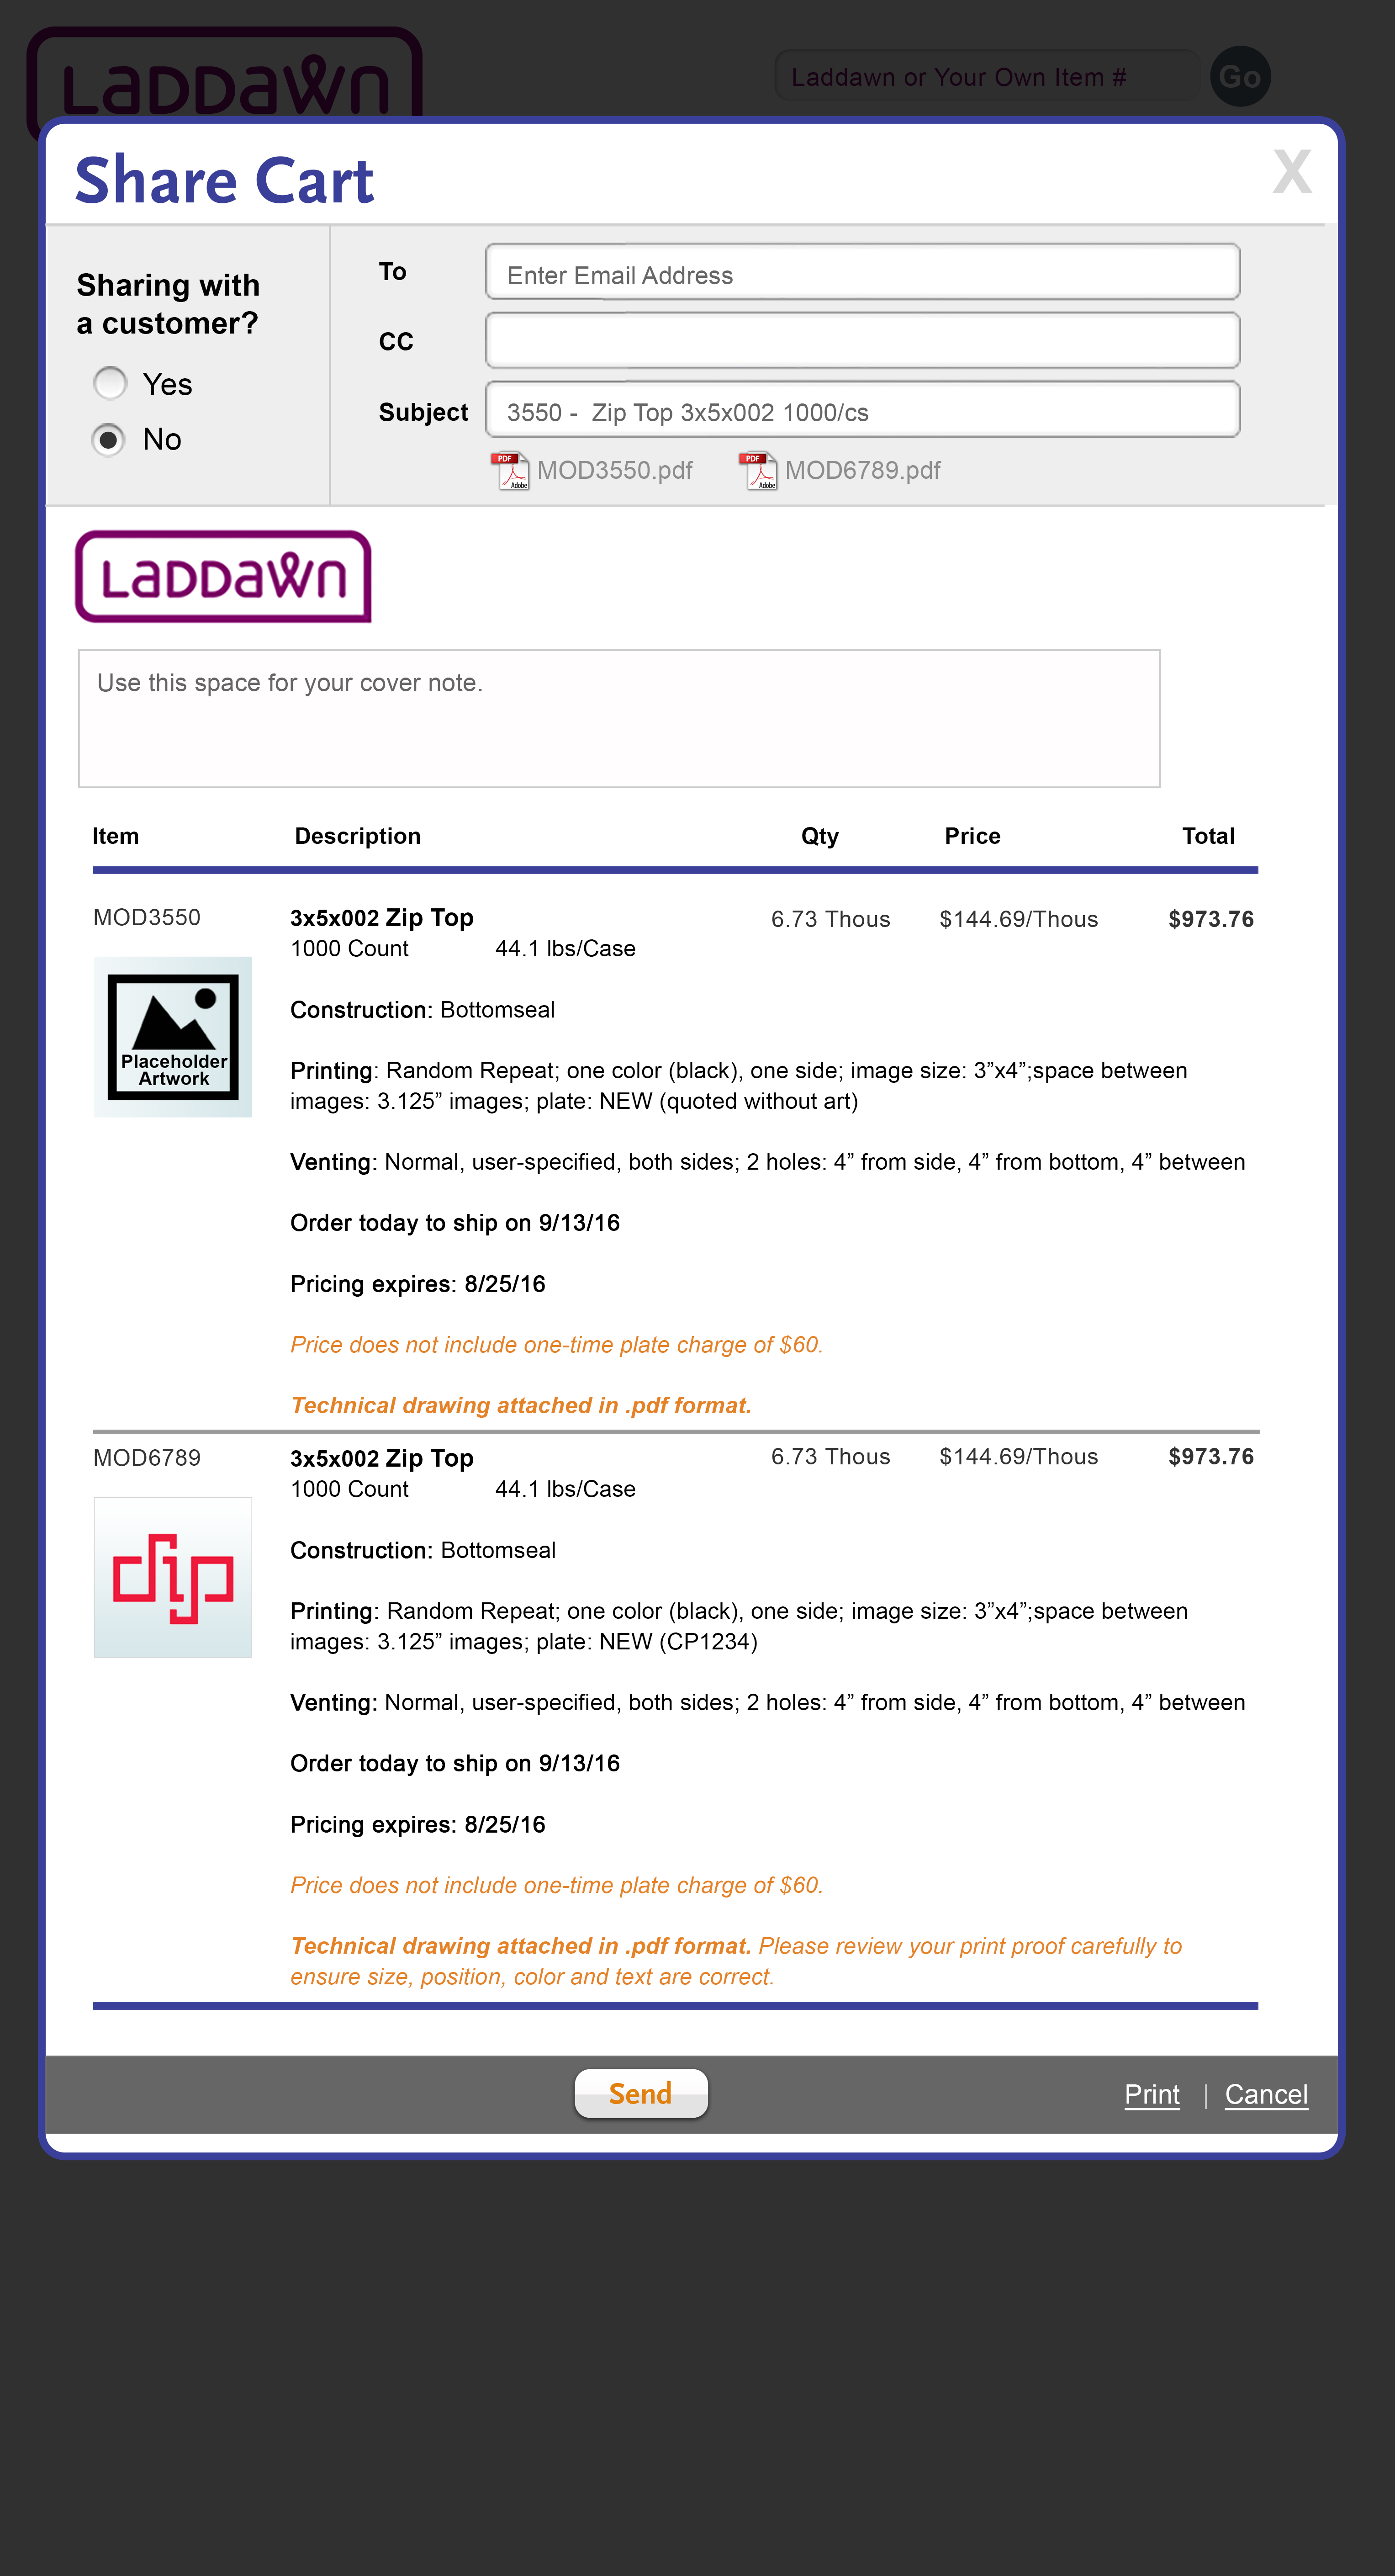
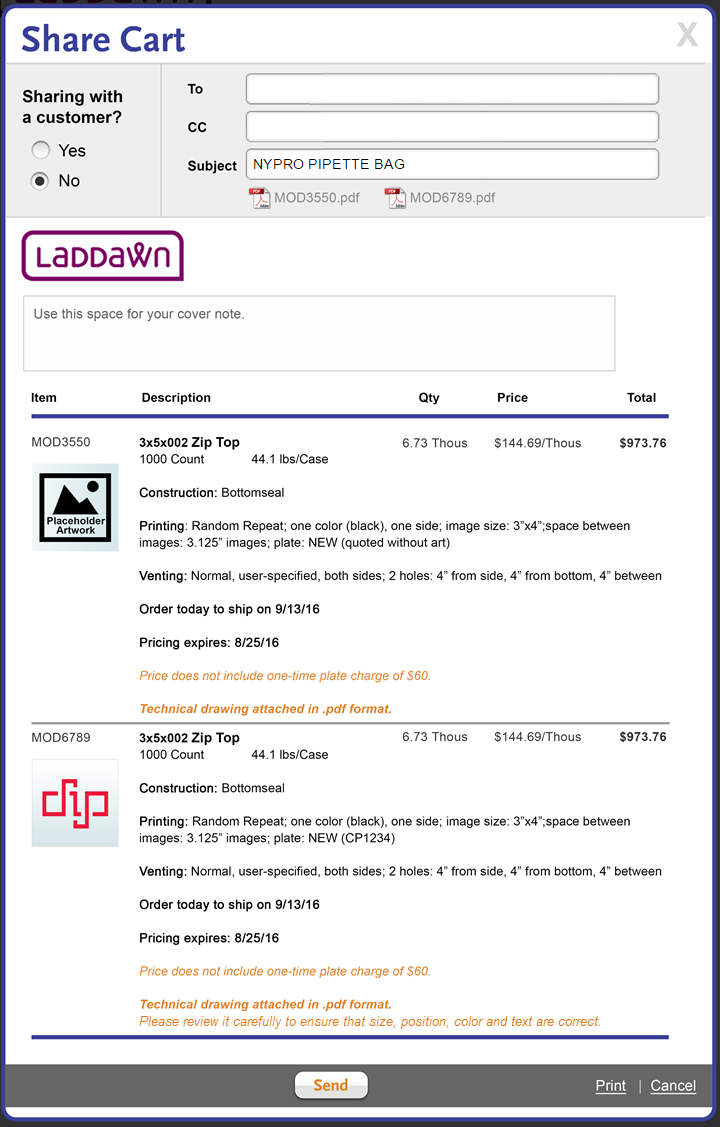
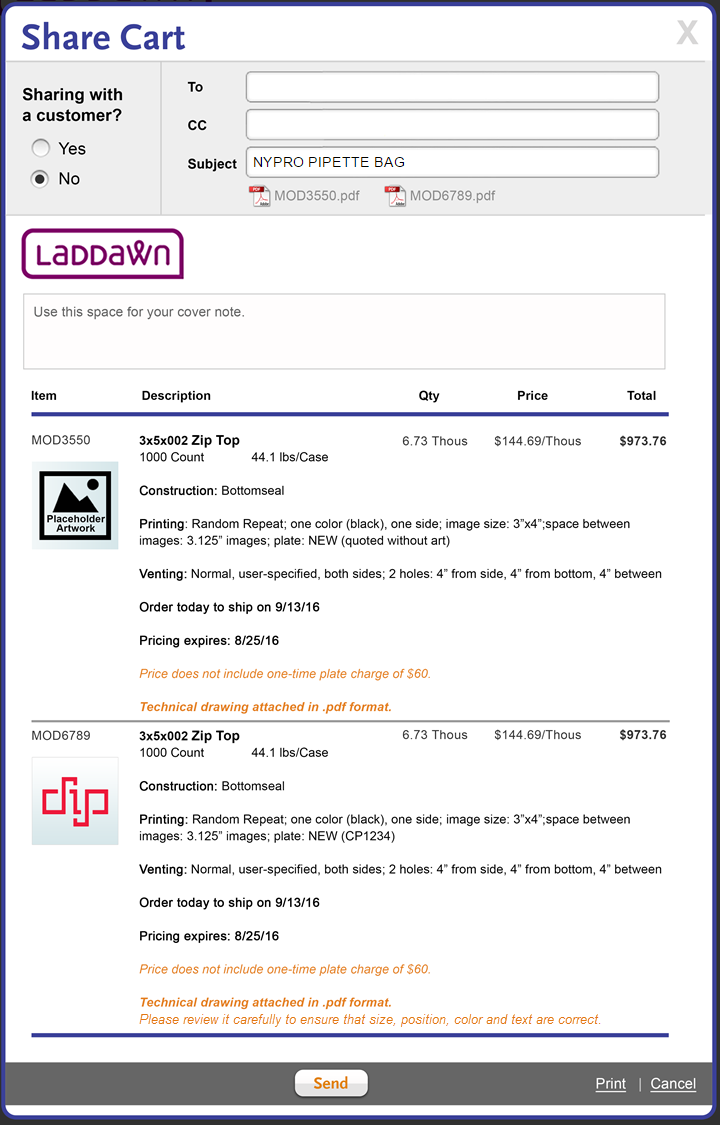
G. Share cart
(Not shown - vertical scroll bar and product total summary at bottom.)
Technical drawing will be attached to email that is sent. In pop-up, static indicator of attachment below subject line. File name = MOD number.
Item with art is same as item with placeholder, except for additional line of text - "Please review..."
"Order today to ship on..."

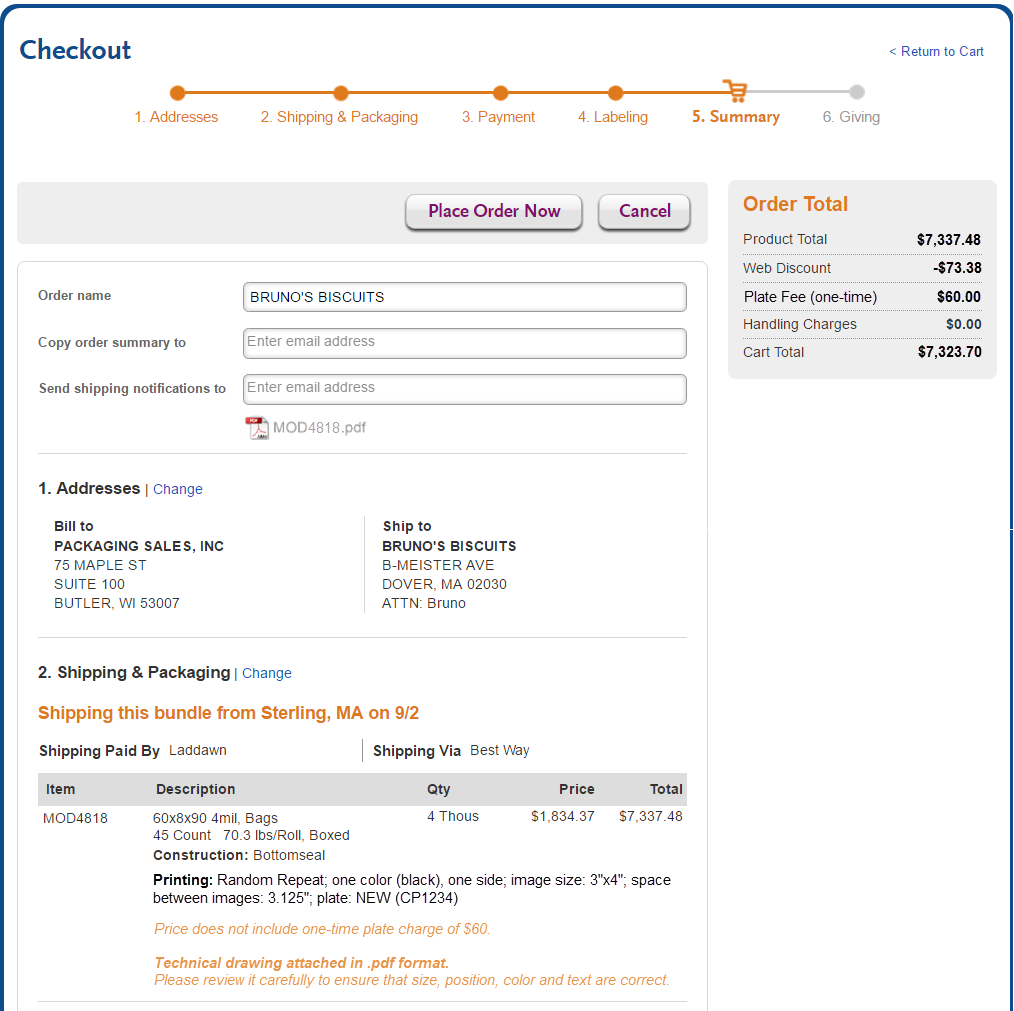
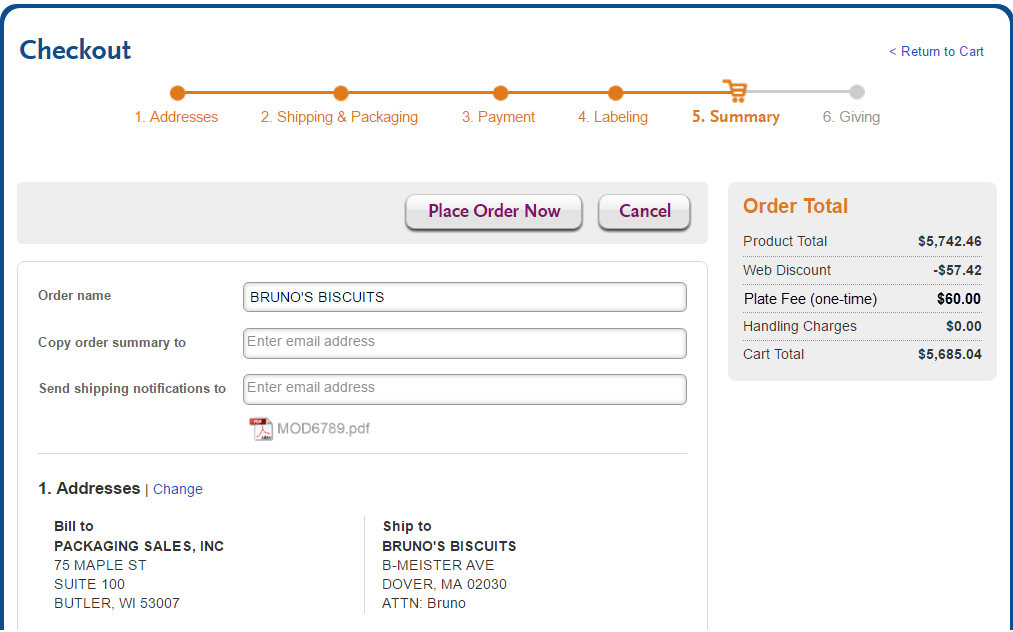
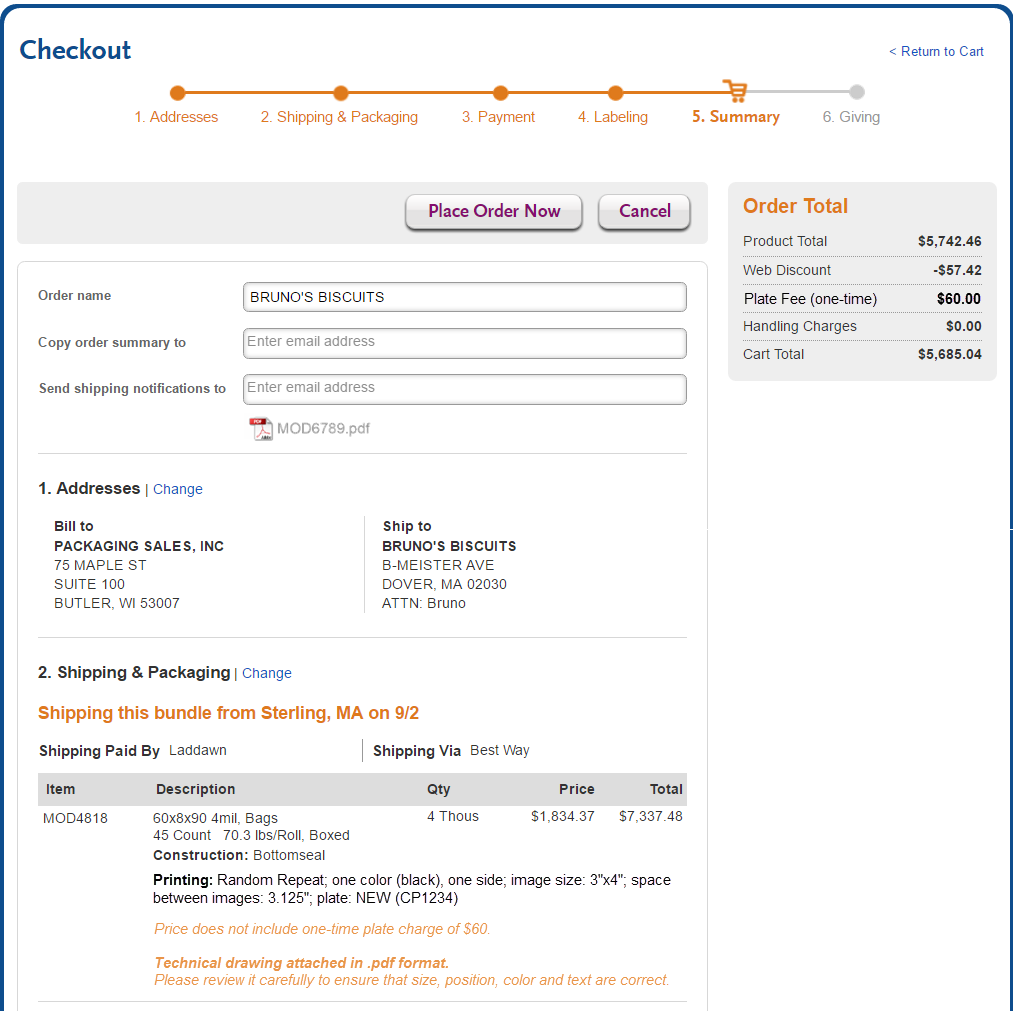
H. Checkout screens
We are not incorporating any thumbnails into either the bundling screen or the order summary screen. No changes to checkout screens other than:
|
|
|
|
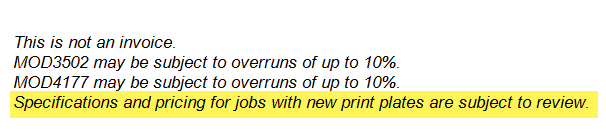
I. Order acknowledgment
No changes other than:
- The way printing details for registered and RRP show in results, cart and checkout, should carry through to order acknowledgment, including the orange text referencing the technical drawing and plate fee.
- No need for the static indicator of technical drawings; the attachment indicator will come from the user's email client. (The technical drawing PDFs will be in addition to the PDF version of the order acknowledgment.)
- Removal of disclaimer in footer about pricing with new plates:
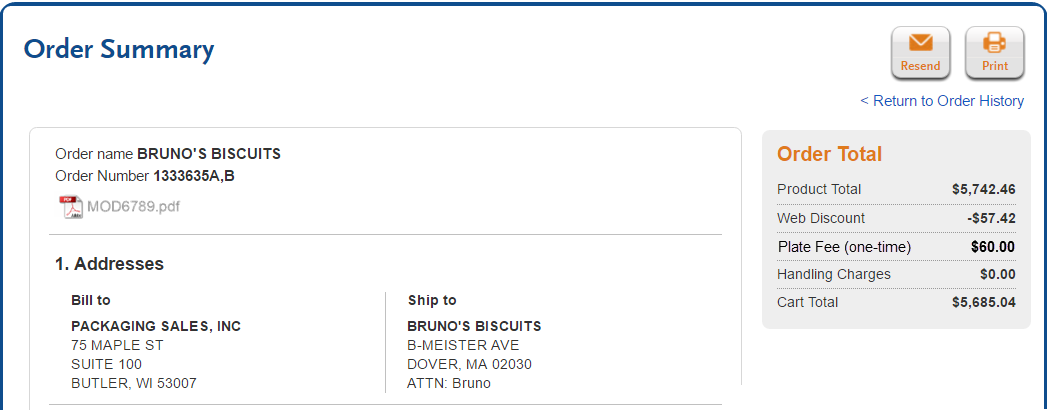
J. Order history
No changes to any of the order history screens (reprice, tracking, filter by item, filter by order, etc.) for release 1, except for order summary screen (below). Note - at a future date, we may want to tweak some of the item details shown in screens like reprice/reorder popup - for example, it would help to say whether an item has printing or venting (but it is not necessary to include all the printing venting details).
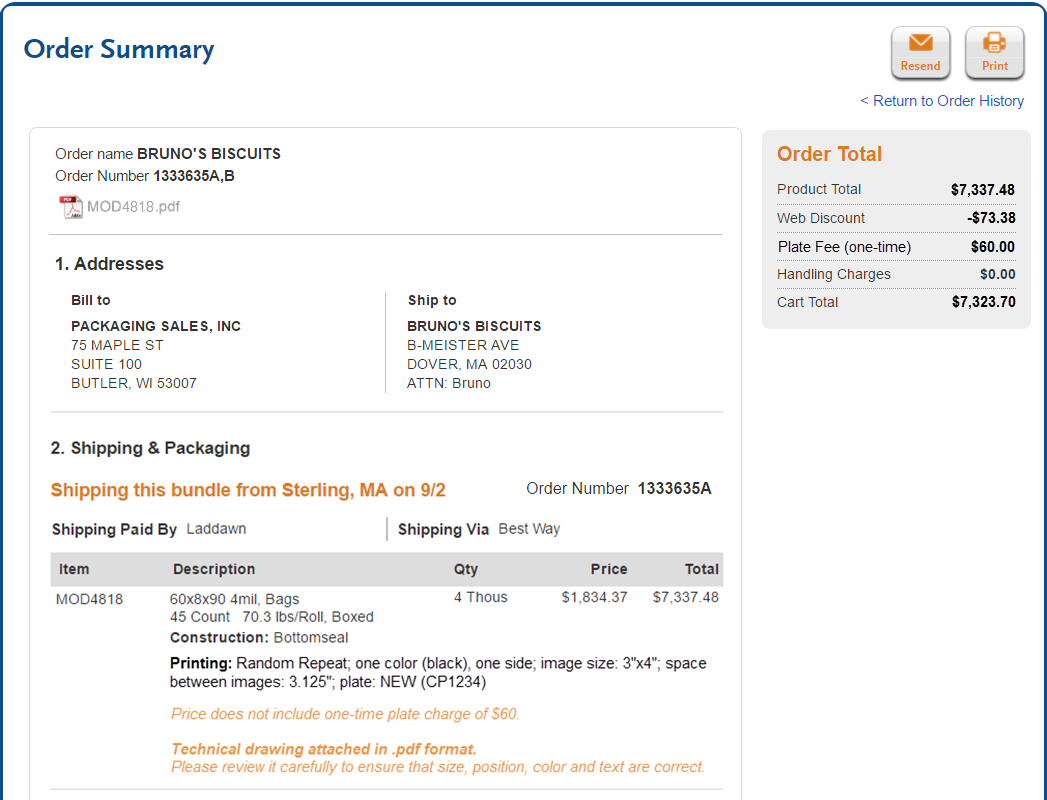
Order summary screen | |
As with checkout, we are not incorporating any thumbnails into the order summary screen. However, we would like to:
Clicking "Resend" will resend the order acknowledgment and any attachments. Clicking "Print" will open the browser's print menu with the order acknowledgment queued up to print as it does today. It is not possible to automatically include the attachment in that queue. If the user wants to print the attachment, they will have to resend to themselves. |
|
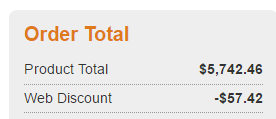
| Question: Why are the lines in order summary/order history, order total box (on live) different from those in Checkout? (Solid gray, not dotted line.) They should match checkout. Can we fix that? | |
Order summary (order history)
| Order total (all checkout screens)
|


K. Shipping notification
No thumbnails here either. Printing details should carry through, but no need for the orange text (referencing technical drawing and one-time plate fee). No technical drawings attached; no indicators or references to them needed.
L. Going from cart to widget and back to cart
Please refer to this page: Going from the cart to the widget and back to cart
M. Process flow
The various manual and automated handoffs for registered and random repeat from quoting through delivery.
N. Not Doing
- We are not producing PDF schematics with layers and PMS colors???
7 Testing
Quoting new printing and sharing printed items from results
Registered
Scenarios
Without art - Quick Price
With new artwork upload
With text
With stock art
With my existing art
With combinations (text, new art, stock art)
Procedure:
- Vary product types (eligible for printing) and film color.
- While configuring, check all elements of print designer toolbar, format popup, art sizer. With quick price, be sure to test all ways of sizing including "use most requested size."
- Also test making some choices, navigating back to Reg v. RRP screen, navigating completely away from print menu, and coming back to your design.
- After clicking Find, check all elements of results including save and add to cart.
- Before moving on to each successive item, test sharing. Test internal share and share with customer. Check all elements of share pop-up, share email, and technical drawing PDF attachment.
Also do a search for one stock and one non-printed MOD and check results for conformity to new design. Do a broad search - a search that returns many matches - as well.
Random Repeat
Repeat scenarios and procedure above.
Cart
Create a cart containing the following 8 items:
An item priced without art - Quick Price; one random, one registered.
An item priced with customer art (new or from "my artwork) or text; one random, one registered.
An item priced with stock art; one random, one registered.
A stock item
A non-printed MOD item
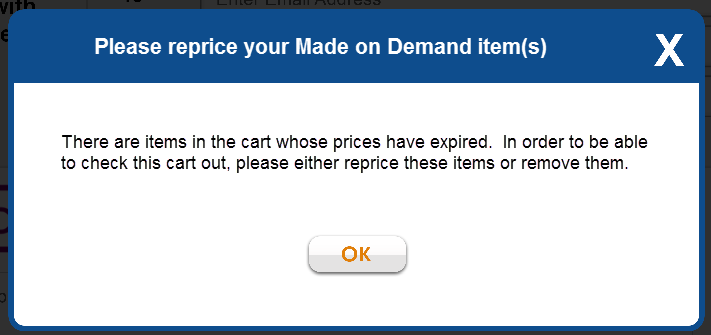
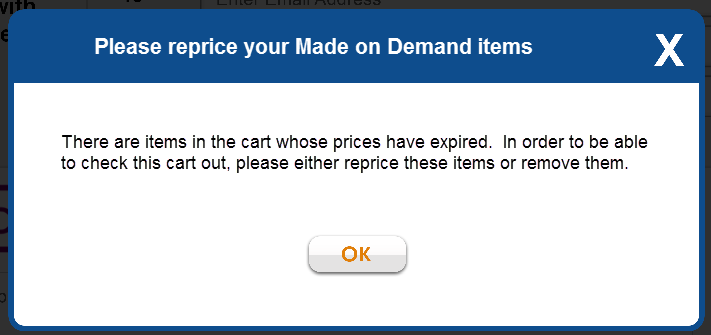
Check all elements within the cart including non-printed items, and order summary. Check for behavior of checkout button while there is at least one "unfinished" quick price item in the cart. Check all technical drawing thumbnails. Check 'revise artwork' on at least one printed item, and check add artwork on both quick price items. Share at least one printed item from the cart and check against share item specifications.
Share cart
Share a cart containing a quick price item, an item with artwork (can be stock, text, my artwork, new artwork or combo), and at least one stock item and one non-printed MOD item. Be sure there is at least one registered item and one random repeat item.
Test internal share and share with customer. Check all elements of share pop-up, share email, and technical drawing PDF attachments.
Checkout
Check out the cart used for testing sharing or one containing the same components. (In order to be able to check out, you will have to either delete the quick price item or convert it into an item that has artwork.)
Check for plate fee appearing within gray order total summary box on all screens. Check order summary screen for all elements including technical drawing attachment indicator. Check order acknowlegment for all elements and technical drawing attachment. Check order history, order summary screen for all elements, including resend.
Process flow
The various manual and automated handoffs for registered and random repeat from quoting through delivery.
Quoting and ordering ashads
<Describe expected behavior>
8 Change management and rollout planning
What will be different for production/shipping?
What will be different for CE/CR?