1 Introduction
We launched the Print Designer in November 2016 and since then we have added numerous marketplace categories eligible to be printed (registered), but until now, we've only supported printing on one side at a time. (Several months ago, we added the ability to print on front or back for pre-opened bags.) This limits the usefulness of print designer to distributors who have customers that print on more than one side.
(Details here about quotes/sales to date for print designer and for NS jobs involving multiple sides?)
Goals
Increase quoting and sales of print jobs, and increase ROI for Print Designer, by allowing users to place art on any side or surface they choose, including front, back, bottom gusset and lip. To improve our odds of a timely release we are excluding bags with bottom seal construction.
We would also like to include the following enhancements with this new capability:
- Better representation of reclosables and bags with a lip within the print designer.
- Better organization of buttons and tools.
- Refresh some aspects of look and feel in keeping with our future "re-skinning."
- Address backlog of print designer tickets?
Background and strategic fit
Expanded use of Print Designer is a linchpin in Laddawn's strategy to increase sales and profit. Adding to its capabilities (and addressing its weaknesses) is key to its expanded use.
Solution and scope
Modify Print Designer, schematics and technical drawings to support registered printing on more than one side. Enable users to preview their multi-sided designs as a whole - front, back and bottom if applicable - with normal reading orientation, before committing to a Find.

Not doing
- Address issues with "white backing."
- Addition of a cropping tool. [ Need to research desired behavior. ]
2 Definitions
Safety Line - Defines the design area on the canvas; delineates the boundary within which artwork must fit.
Full Bleed - The entire bag is printable all the way to the edges. Needs no safety line.
Long side - the side of a lip & tape bag or poly mailer that includes the lip in its open/unfolded state. Could be the front or the back of the bag.
Short side - the side of a lip & tape bag or poly mailer without the lip. Could be the front or the back of the bag.
3 Assumptions
Our plate numbers for registered print aren't used or referenced by our suppliers (according to Caitlin and Chris).
4 User Interaction and Design
Understanding the bag and its sides
We initially experimented with a canvas that depicted all sides of the bag at once, which is the way it runs off the press for sideweld bags and is depicted in technical drawings (aka a "deconstructed bag"). However, due to early usability findings, we decided to present one side at a time in the designer. When presented with a deconstructed bag canvas (especially for lip & tape), users didn't quite understand how to correlate the parts of the bag to the canvas. Stakeholders expressed a great deal of skepticism that visual aids and other tools would help users get past their confusion. Moreover, the majority of artwork for our 2+sided NS printing orders is coming in from customers as a single composition per side, with normal reading orientation; a very slim minority came in with a single composition to cover the entire deconstructed surface. At a later time, should we see some demand, we may entertain adding an option for users to design the with the entire deconstructed surface.
We also found that users are not familiar with the terms our vendors use to refer to the sides of lip & tape bags - "long side" and "short side." (Most test subjects thought that long and short were in reference to the bag's edges.) We considered pairing the long/short labels with the labels "front" and "back" but the truth is, for lip and tape bags, front and back are mental constructs. Some customers will place art that you would consider "front" art, on the long side, whereas others place it on the short side - both are correct. To help users understand long side/short side, we are experimenting with animated .gifs that would appear <where/when TBD; upon opening of the print designer canvas?>; it could gracefully fade away into a button somewhere, so users can access it again should they need a refresher. We're posting Suzi's work on a separate page (it's hard to concentrate on the words here with lots of moving images...![]() ).
).
In addition, users wanted to see tape depicted in the canvas, when in reality, tape is part of the interior of the bag and therefore never part of the printed surface of the bag (a deconstructed bag canvas which would depict only the exterior, printed surface). Switching to showing one side at a time in the canvas made showing the tape more feasible.
For this release and for the foreseeable future, the bags we will print on require 4 sets of buttons in the toolbar for selecting a side:
- Wicketed bottom gusset bags: Long side, short side, bottom gusset
- Lip & tape bags, poly mailers, wicketed layflat: Long side, short side
(Both sides will include the lip; the long side will include the outer, printable side of the lip; the short side will show the interior side of the lip with its tape and perforations if applicable.) - Pre-opened bags (aka auto bags): Open side, back side
- Layflat, gusseted, zip top, slider, tamper-evident: Front, back
Bag canvases, toolbar, rulers and art
Functionality in the designer
Initial zoom state
We no longer want to default the zoom to show the entire canvas, but we have added a toolbar button that enables the user to zoom out in one click to see the entire canvas. Instead, canvas default zoom should be... .. <Jointly determine once we have a working prototype in place. > Could it be something like always show the product at its actual size up to the point it doesn't fit within space having comfortable margin (.5"?); after that always show zoomed out to include the top and sides w/.5" margin?
Zoom in, zoom out
+/- button. What increments? (What are they currently?)
Rulers and zooming
<Jointly decide how tick marks and numbering will work in various zoom states once we have a working prototype in place..>
Working with art
Quick Price
Users will be able to place one Quick Price placeholder per side. Art will continue to default to a rectangle or square that is 50% of the total area of the bag. Users will be able to resize it on each side, as they can today with one-sided printing. Note: At some point prior to launch, we expect the Marketplace team to take art size out of the formula for pricing printing (it is currently not a factor in setting plate fees). <For changes to floating toolbar, see floating toolbar section below.>
Add Art
Today art that is placed on a canvas in both RRP and registered interfaces doesn't get added to "My Artwork" until after a Find. At that point, if more than one piece of art was placed on the canvas, the art in My Artwork is stored as a fixed composition, not its original component parts. This art can be repositioned or reduced or increased in size on the current item or if selected for reuse on another item, but the original component parts cannot be changed.
Unlike Random Repeat printing, there's little benefit to being able to call Registered plate compositions back up (except for as hads - which can be called up via item search). This is because these compositions are a) less likely to be reused on different bags (especially those with multi-sided printing) and b) will always incur a new plate fee if used on a different bag (a fact that is generally not well understood). Therefore we've decided it no longer makes sense to enable the user to recall and reuse Registered plate art in the designer. Instead we will reconceive My Artwork by populating it with images as they are uploaded, in their raw form - in other words, we will not keep track of post-placement size, position, etc. of these images or design compositions. Captions will consist of file name, date and image dimensions (either their original dimensions or what they are if we automatically shrink to fit the canvas). We will, however, keep track of color count and color values. We hope to add the ability to search by filename as well as sort by name and date.
In the event customers question having to recreate Registered art compositions and/or being charged for new plates, we can assist with recreation of art or provide plate fee concessions on a case-by-case basis. For example, if they're reusing a plate on a bag that is a different type of bag (e.g. wicketed and poly mailer), we may choose not to offer a concession because these items are run on different lines with different types of plates. Or if they're reusing an artwork composition on a bag that is identical in every respect except perhaps film color or gauge, we might grant a concession. We will always grant a concession (without having to be asked by the customer), if the vendor is able to reuse an existing plate. If the fee is not the issue, but the customer is frustrated about having to recreate a composition made up of multiple images, we can assist them in creating a reusable composition to upload to their "My Artwork" library.
We'd like to provide the raw art feature for the RRP Add Art popup as well, but since RRP plates can be reused on different items, we'd also like to preserve the tab containing the plate art compositions, but rename it "My Designs" to make it distinct from My Artwork.
Accordingly, we'd like to redesign the Add Art popup tabs as follows:
Invision mockups - showing the revised tabs and added strip for future search/sort functionality; does not include the new prompts for the upload step (provided separately below).
Registered
Tabs will consist of:
- Laddawn Artwork - Laddawn stock plates; captions are descriptive text plus art size.
- My Artwork - this will contain original artwork, as it is uploaded. Captions will consist of file name, date and image dimensions. Art can be deleted. Added 10/8/18: Files uploaded with same name should have counter appended: so picture.ping; picture.png(2); picture.png(3); etc. File names should not wrap to more than one line. Please truncate large file names so that the beginning and the full file extension show, with the middle characters truncated out as necessary. So looooooooongfilename.png(3) would truncate as someting like "looo....png(3).
- In a later release we would like to add search/sort functionality.
- Upload Art - see below
Upload art screen
During the art upload process for registered print, we will prompt the user to tell us whether their art consists of process/CMYK, spot colors or both. This will help our color counting algorithm, as well as prime the user for color counting and color specification downstream in the flow (floating toolbar during design, and color count modal at Find step).
Note: For analytics purposes, we would like to capture and preserve the user's process/spot/process & spot answer at upload (including whether process came from the gradient example or the photography example) to be able to compare it to changes made after placement, via the floating toolbars (described in more detail below).
- So for example, if the user indicates the art is process only (via photo) at the upload step, but indicates the art contains both process and spot colors via the floating toolbar, we want to preserve the original upload answer (process via photo) and the last revision via floating toolbar (process and spot), along with any PMS values if entered. (At this stage, for changes made via toolbar, all we know or care about is that it is process - we cannot track whether it's a photo or gradients.)
- Let's say the user uploads logo1.png and tells us it is process only via photo. Then in logo1.png's floating toolbar in the designer, they delete the process swatch and enter 3 PMS colors and create a numbered MOD (mod123). We store that the upload answer was process-via-photo, and the last color revision is 3 spot colors (and their PMS values).
- If the user starts a new bag, and retrieves logo1.png from "My Artwork" and places it on the canvas, the floating toolbar remembers that logo1.png was 3 spot colors along with PMS values.
- If the user makes any change to logo1.png via floating toolbar - adds process back in, deletes or adds a spot color or changes PMS values - and creates a numbered MOD (mod456), those revisions will overwrite the last color revision for logo1.png, but not the color count/values for mod123.
- If the user recalls mod123, opens print designer, clicks on logo1.png, the toolbar will remember the original 3 spot colors.
- We will still know that when they first uploaded logo1.png it was “process-only, via photo.”
Random repeat
Tabs will consist of:
- Laddawn Artwork - Laddawn stock plates; captions are descriptive text plus art size.
My Artwork - this will contain original artwork, as it is uploaded. Captions will consist of file name, date and image dimensions.<To be postponed for now.>- My Designs - this will contain artwork compositions; captions will consist of CP numbers and dimensions - i.e., the content currently contained in the My Artwork tab.
- Upload Art - no change
Where art lands when it is placed
When art is placed, it always lands centered within the side that it is on, excluding the lip if there is one.
Floating toolbars
Screens for floating toolbar for text, shape, stock art and quick price, for both registered and random repeat. Invision | Zeplin (Screens for toolbars for uploaded images covered in more depth in dedicated sub-section below.)
General
We are moving the following tools out of the global toolbar, into the floating toolbar (as appropriate to each type of art object - stock or customer art; text; shape; quick price):
- Send to front/back
- Rotate (being moved out of the artwork frame/sizing tool - it will rotate art 45 degrees at a time (v. current free form dragging which snapped to 15 degrees at a time).
- Duplicate
- Center
- Trash
Centering art
Centering the art centers it within the side it is on (excluding the lip if on the long side).
Dragging art into lip area
If it's a lip & tape or a poly mailer, the art can be dragged upwards to lay over a portion of the lip within the safety line. If it's a Zip Top, the 1/8" that is not printable is subtracted in equal proportions from the upper and lower portions of the art. Let's say the art is a 2 inch square, and I drag it so that half of it is on the 1" lip and half is below the lip. This means 1/16th" is subtracted from the bottom of the top half of the square, and from the top of the bottom of the square overlaying the lip, zipper and front/back side of bag.
Some additional notes
For registered print, we default text and stock art to black, and shape to white. We want the color swatch and PMS fields to both be filled in. Replace all instances of "Standard Colors" with "Basic Color Palette". Now that we have CMYK detection, we do not need the “or more colors” – the last color option should simply be “8 Colors”. RRP, text - on Live we are prompting for PMS colors. This is a bug.
Floating toolbar - image upload
Full toolbar, artwork size and color specification. In the color section the verbiage will reflect which of the three scenarios were specified at the upload step - just process, process and spot colors, just spot colors. The user will be able to add/remove process printing and spot colors, but each piece of art must have at least one color.
As the user adds or removes colors or CMYK, verbiage will change as indicated in the table below. Once the user makes any change, text changes from "We've detected..." to "You've said..." (regardless of change).
Conditional verbiage
Mousing over underlined text invokes tooltips which can be found in both Invision and Zeplin (links above).
| Upload scenario 1 - User has clicked apple 2 or 3 or 2 and 3 | Upload scenario 2 - user has clicked apple 1 ....and apple 2 or 3, or 2 and 3. | Upload scenario 3 - User only clicked apple 1. |
|
|
|
After adding spot color | After deleting CMYK | After adding CMYK |
|
|
|
After deleting CMYK (without having added any spot colors) | After adding or removing spot colors (leaving at least one detected spot color intact) | After adding or deleting spot colors (no addition of CMYK) |
<CMYK swatch is replaced with null color swatch that cannot be deleted until another spot color is added or CMYK is added back.> |
|
<If only one spot color with a detected hex value remains, it can be deleted, but upon deletion, it will be replaced with a null color swatch that cannot be deleted until another spot color is added or CMYK is added.> |
After removing all spot colors, leaving just CMYK intact | ||
You’ve said this includes 4-color process print. |
Previewing design
We decided a Preview feature would not be necessary, since the designer itself already serves this purpose. (Had we gone with a canvas based on a deconstructed bag, Preview would be essential.)
Color management before Find step
Before a Find can be executed (or before leaving the print designer), the user must be prompted to confirm the total color count for the project as a whole - all of the individual pieces of art placed for all sides of the item.
Color definitions
- Fully specified color: A color that has a hex value and a PMS value.
- Partially specified color: A color that we detected upon upload, but has not been given a PMS value.
- Unspecified color: The user has added a color for counting purposes, but there is no hex value because we didn't detect the color, and they did not enter a PMS value.
"Whole project" color count
When the user attempts to move to another part of the widget, or initiates a Find after having added any art, including uploaded art, or makes a change to existing art that could affect color count...
- We will present them with a modal screen [ Invision | Zeplin ] that displays thumbnails for each side of their bag, and states the total number of unique colors - fully and partially specified as well as unspecified - for all sides.
- Up until a max value of 8 unspecified colors is reached, we will count unspecified colors as unique colors. TRUE?
- In this screen, we will also provide a tool that allows them to decrease or increase the color count. They will only be able to decrease the count by the number of unspecified colors; they cannot reduce the count below the number of fully or partially specified colors (to do that, they need to return to the art in the designer and delete fully or partially specified colors).
- If they increase the count at this step, the added colors are considered unspecified. (However, we make no "behind-the-scenes" change to any of the formatting toolbars for individual pieces of art.)
- If they decrease the count at this step what do we do with unspecified colors in the formatting toolbars for individual pieces of art? Nothing.
- Suppose the user enters the color modal with two pieces of art: one has PMS red and PMS blue and 2 unspecified colors; the other has PMS red and PMS yellow, and 2 unspecified colors. They enter the modal with a count of three unique specified colors (PMS red, blue and yellow) plus 4 unspecified colors (2+2) - for a total of 7 colors. The user, knowing that one or more of the 4 unspecified colors is present on both pieces of art, can decrease the slider by up to 4 colors. If they decrease the count from 7 down to 6, 5 or 4 colors - e will not arbitrarily eliminate any unspecified colors from the formatting toolbars for individual pieces of art, but if they do nothing else and re-enter the color count modal at a later time, we will preserve their last color modal count (4, 5 or 6 colors).
Conditional verbiage for color count scenarios
- When the project contains only spot colors:
To ensure the accuracy of your quote, we need to confirm the number of colors in your print job. We have detected <N> color<s>. If this is incorrect, please modify the number of colors below: - When the project contains just process print:
To ensure the accuracy of your quote, we need to confirm the number of colors in your print job. We have detected 4-color process print for a total of 4 colors. If this is incorrect, please modify the number of colors below: - When the project contains process print and spot colors:
To ensure the accuracy of your quote, we need to confirm the number of colors in your print job. We have detected 4-color process print and <N> other color<s>, for a total of <N+4> color<s>. If this is incorrect, please modify the number of colors below:
Description in results
Thumbnail
Please show the art that appears on the first side that has printing. For example, for a Wicketed bottom gusset bag, if there is art on each side, show the art that is on the short side. If there is no art on the short side, show the art on the long side.
Item details
Current (registered)
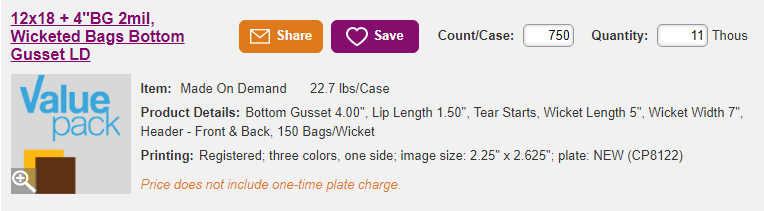
Proposed
Let's remove image size (has no bearing on plate or printing costs). Let's also exclude number of sides. TBD: Whether to include reference to new/existing plate and plate number for registered print (keep reference to plate number for RRP).
Registered
Printing: Registered; three colors
Random repeat
Printing: Random Repeat; one color (black); space between images: 9.5000; plate: NEW (CP8714)
Technical drawing, online preview and PDFs
Here is the latest technical drawing that I've been collaborating with Bill on. (SP, 7/19/18)
Random repeat printing
Effect of re-skinning on RRP screens.
Mockups in Invision
https://projects.invisionapp.com/d/main#/projects/prototypes/14771190
Boilerplate
Be sure to address the following as applicable:
- Worst case scenario for configuration details on MOD items - material & additives, color, printing, venting, packaging, construction
- CPU customers/orders
- NorthEast Poly Bag customers
- Fax-only customers/Optio forms
- Analytics
- Customer experience procedures
- Other????
Not Doing
- Printing on more than one side for bottom sealed bags: side gusseted bags and pre-opened bags (aka auto bags).
5 Testing
<< Optionally include a test plan here. >>
6 Change management and rollout planning
<< Which departments are affected by these changes? What are the possible negative perceptions of these changes, and how do we manage them? Articulate "what's in it for me?" for all internal and external stakeholders. Are call scripts necessary? Is advance customer outreach/communication necessary? What lead time is needed for training and other advance preparations? >>
Share new technical drawings with all production managers and....